What is QuickBooks Error 1712?
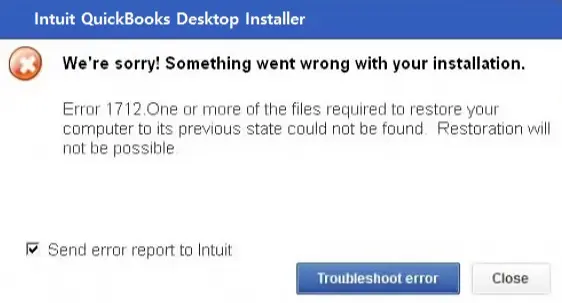
When trying to install QuickBooks Desktop for Windows, sometimes, you might run into QuickBooks error 1712. You are likely to observe the following error message on the screen:
| “We’re sorry! Something went wrong with your installation. Error 1712. One or more of the files required to restore your computer to its previous state could not be found. Restoration will not be possible.” |
Whenever this error message appears, the QB Desktop installation process suddenly stops. Moreover, you can notice certain additional indications due to this error as described below:
- Frozen QuickBooks Desktop screen.
- Unresponsive third-party apps installed on the system.
- Unexpected shutdown of your computer.
The important thing is that you can resolve this problem very easily using simple methods. Let’s go through the entire article to learn why we experience this installation error and what tactics we can implement to resolve it effortlessly.
Why Do You Encounter QB Desktop Installer Error 1712?
You can encounter QuickBooks error 1712 due to the following major factors:
- Lack of fresh Windows operating system updates on the system.
- Running Windows operating system without admin privileges.
- Defects in the Windows Registry settings.
- Faulty Windows components, such as Microsoft .NET Framework and MSXML.
- Malware attacks on system files and folders.
Now, you can jump to the following section to learn the simplest hacks to fix this problem.
Quick Fixes For QuickBooks Installation Error Code 1712
Here’s the table that shows different solutions that you can try for QuickBooks error 1712. Explore the table and use these fixes to ensure the seamless QB installation on your system.
| Common Reasons | Appropriate Resolutions |
| Damaged registry keys | Use the Program Install and Uninstall Troubleshooter |
| Damaged Windows user account | Utilize a Windows admin user account |
| Faulty .NET Framework component | Repair the .NET Framework component |
| Damaged Microsoft Windows MSXML component | Repair the MSXML component |
| Interference by third-party apps running in the background | Stop all the third-party apps functioning in the background |
Let’s proceed to the next section to discover various methods to address this installation error code.
9 Powerful Methods to Eliminate QuickBooks Error 1712
Here are all the resolutions that you should implement for QuickBooks error 1712. Make sure to use them in the order indicated below.
1. Run the Quick Fix My Program Tool
The Quick Fix my Program tool can help you fix relevant internal issues that can prevent the QB Desktop installation on your computer. Here’s how you can run this tool:
- Firstly, download and install QuickBooks Tool Hub on your system.
- Open the QB Tool Hub window by double-clicking the QuickBooks Tool Hub icon on Windows Desktop.
- At this point, choose the Program Problems menu and tap the Quick Fix my Program icon.
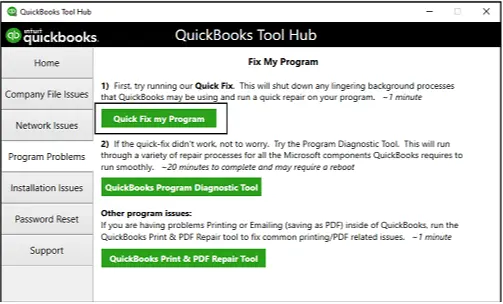
- After the full execution of the Quick Fix my Program tool, you can install QB Desktop effortlessly.
If you are still getting QB error 1712, use the solution described below.
2. Install the Newest Windows Updates to Fix QuickBooks Error 1712
If you are using an obsolete Windows version on your computer, you are likely to encounter QuickBooks error 1712. You need to install the latest Windows updates to make sure that you can install QB Desktop seamlessly.
Do you continue to face QuickBooks installation error 1712? If that’s the case, consider utilizing a fresh Windows admin user account as described below.
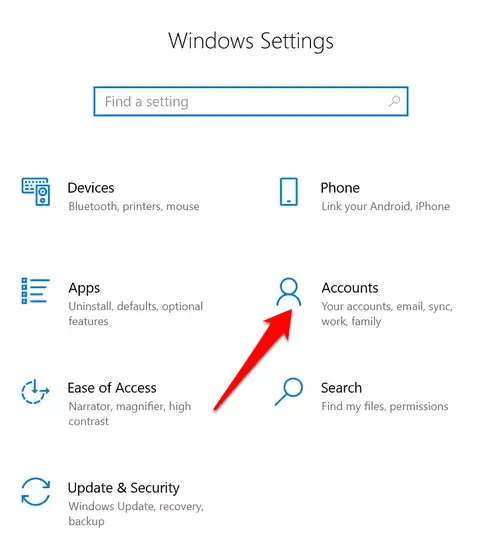
3. Use a New Windows Admin User Account
You need to ensure that you are operating the Windows operating system with full admin privileges on your computer. This will make sure that you experience no hindrances when installing QB Desktop. The following steps explain how to create and use a fresh Windows admin user account:
- Open the Settings app on your computer and choose the Accounts menu.
- Next, tap Other User and immediately click the Add Other User option.
- Now, choose the Add Account option and instantly click the I don’t have this person’s sign-in information option.
- At this step, utilize a fresh email address to set up a new Microsoft account.
- After that, follow all the on-screen instructions and successfully add the relevant username and password for the new account.
- Once you have created a new Microsoft Windows account, you must navigate back to the Settings app.
- After that, choose Other Users and select the Windows account that you have recently created.
- Now, utilize the Account Options menu to choose the Change Account Type icon.
- After that, select the Administrator option and tap the OK button.
- Finally, you must operate the new Windows admin user account and finish the QB Desktop installation successfully.
If you still encounter the QB installation error code 1712, try using the Program Install and Uninstall Troubleshooter as outlined below.
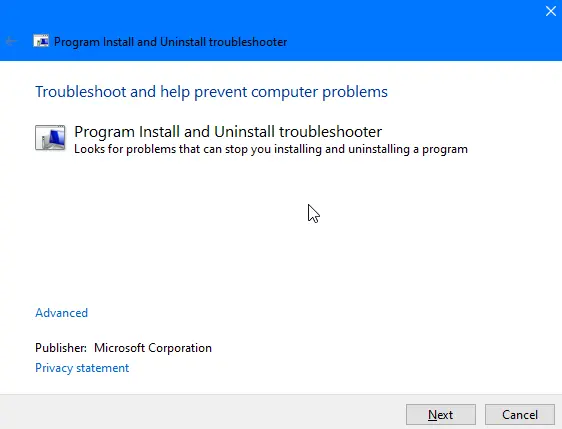
4. Run the Program Install and Uninstall Troubleshooter
The Program Install and Uninstall Troubleshooter assists you in automatically fixing issues when you are blocked from installing specific programs on your computer. Moreover, it helps you repair damaged registry keys. The following steps explain how you can run this tool:
- Firstly, you must download the Program Install and Uninstall Troubleshooter, after which you need to access the downloads folder.
- Now, identify the MicrosoftProgram_Install_and_Uninstall.meta file and double-click its icon.
- Immediately tap the Advanced link on the window and mark the Apply repairs automatically checkbox.
- Click Next and tap the Installing option on the window.
- After that, choose QuickBooks from the list of programs shown on the screen.
- Now, you can tap Next and start the repair process.
- Once the repair process is completed, you can install QB Desktop effectively.
At this point, if you are still experiencing QuickBooks error 1712, you can follow the next solution.
5. Operate the QuickBooks Install Diagnostic Tool
The QB Install Diagnostic Tool is widely used to resolve various errors, such as error code 1310, that arise when installing QB Desktop on the computer. This tool fixes your QB installation files and repairs Windows registry keys. Here’s how to use this tool:
- Install QuickBooks Tool Hub on your system and double-click its icon.
- Move to the Installation Issues tab, and after that, you should click the QuickBooks Install Diagnostic Tool icon.
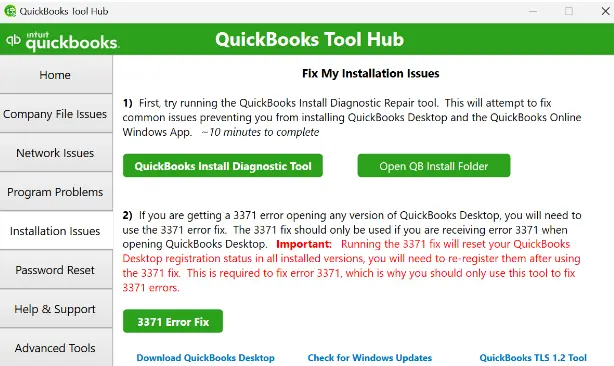
- Allow the tool to run on your computer. Once done, you can exit QuickBooks Tool Hub immediately.
- Finally, you need to restart your computer and install QB Desktop successfully.
Are you still facing QuickBooks error 1712? If so, try stopping the execution of third-party apps as detailed below.
6. Stop the Third-Party Programs Running in Background
One of the main factors that give way to the QB application installation error 1712 is the constant background execution of different third-party apps. To fix this issue, you need to stop the execution of all such apps on your system. It will also help you resolve company file errors, such as QB error 12 0. Here’s how you can do so:
- First and foremost, you should press Ctrl + Alt + Delete on your keyboard.
- Now, go to the Task Manager window and access the Processes tab.
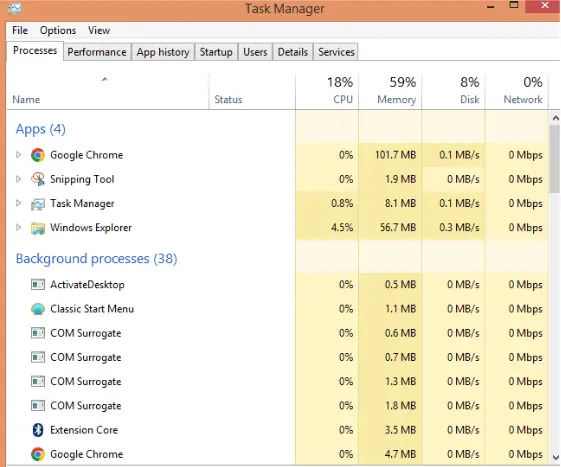
- At this point, select all the third-party apps shown in the Processes tab and tap the End Task button.
- Once you have terminated the execution of third-party apps, reopen your computer and install QB Desktop.
If you still notice QuickBooks error 1712, try disabling Windows Firewall as explained below.
7. Disable Windows Firewall On Your System
Windows Firewall can perceive the QB Desktop installation process as a threat to the system’s security. It can block the QB installation process, triggering QB error 1712. You need to temporarily disable Windows Firewall on your computer. Once you do so, you can install QB Desktop effortlessly.
If, however, you keep getting QuickBooks error 1712 even after disabling Windows Firewall, try fixing Windows components as discussed below.
Read More: Create QuickBooks Antivirus Exclusions
8. Manually Repair the Windows Components
Several Microsoft Windows components are necessary for the prompt QB Desktop installation on your computer. You cannot install QB Desktop if all the crucial Windows components are damaged. The relevant points mentioned below will help you repair the specific Windows components:
(a) Fix Microsoft .NET Framework Component
The Microsoft .NET Framework component provides tools and libraries that serve as a foundation for the QB Desktop installation. You need to use the following steps to repair this component:
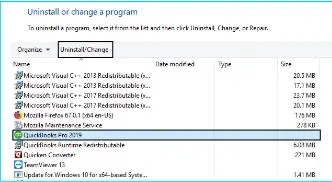
- Go to the Start tab and carefully type Control Panel in the search field.
- After that, tap the Control Panel icon and move forward to access the Control Panel window.
- Now, open the Programs and Features tab and click the Uninstall a Program option.
- Tap the Turn Windows features on or off icon and locate the Microsoft .NET Framework on the list.
- At this step, locate the .NET Framework 4.5 and mark its checkbox if it is unmarked. However, if the checkbox is already marked, you need to clear it immediately.
- Save your settings by tapping the OK button and instantly reopen your computer.
- Navigate back to the Control Panel and make sure that the .NET Framework 4.5 checkbox is marked.
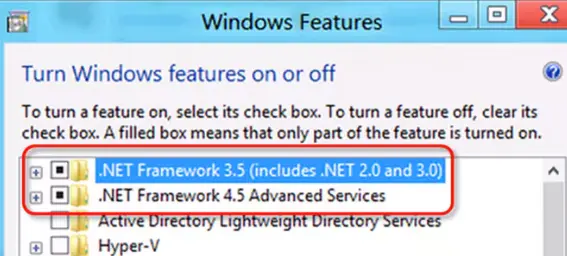
- Now, you have successfully repaired .NET Framework 4.5 on your system. In a similar way, you can fix .NET Framework 3.5 SP1, .NET Framework 4.6, 4.7, and 4.8 on the computer.
(b) Fix Microsoft MSXML Component
The Microsoft XML Core Services (MSXML) component acts like a translator, enabling QB Desktop to interpret data written in Extensible Markup Language (XML). You can use the following steps to repair this component on a 64-bit operating system:
- Access the Start menu and type cmd in the search field.
- After that, find the cmd icon and right-click it to choose the Run as Administrator option.
- Now, you need to type the following command in the Command Prompt window: cd\windows\syswow64
- In addition, you need to type the following command: regsvr32 MSXML6.dll and hit the Enter key.
- After that, you can promptly finish the QB Desktop installation on your computer.
Note: If you have a 32-bit operating system, you should only run the regsvr32 MSXML6.dll command when repairing Microsoft MSXML. It is because the cd\windows\syswow64 command corresponds to the 64-bit operating system.
If you are still getting error 1712 when installing QB Desktop, try using the Windows Malicious Software Removal Tool, as detailed below.
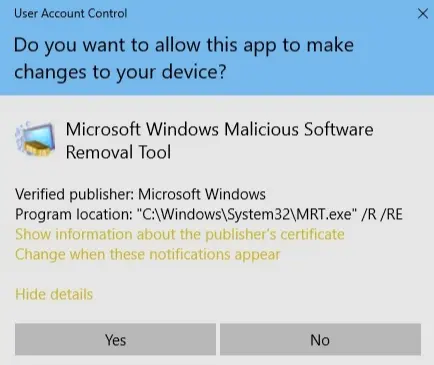
9. Run the Windows Malicious Software Removal Tool
The Windows Malicious Software Removal Tool helps tackle all the malware that can prevent the QB Desktop installation on your computer. You can use the steps detailed below to download and run this tool:
- Firstly, you must download the Windows Malicious Software Removal Tool on your computer.
- After that, run the download file and accept the Microsoft license terms and conditions so that you can install this tool.
- Next, open the newly installed Windows Malicious Software Removal Tool and you will be prompted to choose the type of scan.
- After that, you should select the Full Scan option so that a complete system scan takes place.
- Allow the tool to finish the scan process. Once the entire scan process is completed, you will get the dialog box with results.
- Any malware detected on the system will be displayed in the results section. If the Windows Malicious Software Tool is unable to tackle any malware, you can use an antivirus program to fix it.
Once you have removed the malware program, you can download and install QB Desktop successfully.
Final Words
In this in-depth article, we showed you how you can troubleshoot QuickBooks error 1712 using effective methods. Hopefully, you can now download and install QB Desktop seamlessly. If, however, you are still encountering various challenges or have a query, you can contact a QB professional for real-time guidance.
Frequently Asked Questions (FAQs)
A. You can encounter QuickBooks error 1712 if you are trying to install QB Desktop without using the Windows admin user account. Furthermore, you can run into this error if the Windows registry is damaged and if you do not satisfy the system requirements for QuickBooks.
A. Here are different methods to fix QB Desktop installation errors, such as error code 1603:
a. Run the QB Install Diagnostic Tool.
b. Install Windows updates.
c. Remove malware and viruses from the computer.
d. Terminate the execution of third-party applications running in the background.
A. Sometimes. Missing or outdated Windows updates can prevent QuickBooks from installing correctly. Running Windows Update ensures system compatibility and reduces installation errors.
A.. It is critical in the sense that it prevents QuickBooks from installing or updating. However, it does not affect existing company files or data. The issue is purely related to installation and setup processes.
A. Common examples of common errors codes are 404 (page not found), 500 (server error), 403 (access denied), 401 (authentication failed), and 503 (service unavailable). All of these codes indicate that there are issues with the web page or server, or preventing access to the web page. Developers as well as users can quickly identify and troubleshoot issues by reading these error messages.
A. You may use the QuickBooks Built-In File Doctor Tool to automatically detect and repair damage to your QuickBooks file. Alternatively, you can restore a recent backup of your data, use the Rebuild Data utility found in the Utilities menu, or use the Verify Data utility to identify any errors. If these solutions are not sufficient to resolve the problems, you may wish to contact QuickBooks support for assistance with advanced recovery techniques.

Gabby Taylor, combines financial expertise with literary prowess. With over a decade in finance, she crafts insightful narratives on navigating fiscal complexities
