When you download QuickBooks Migration Tool and run it, you can transfer all your QB data to the new system in no time. The data remains safe from any loss during the migration process, and you can immediately start running various operations on the transferred data. In this blog, you will discover all the proven steps to download and run this tool.
One of the main reasons behind the immense popularity of the QB Migration Tool is that it is highly reliable and simple to operate. Moreover, it is capable of automatically downloading the latest QB Desktop version on the new computer and setting it up with all the required files.
Let’s immediately explore the full article to learn how you can download and run this tool to migrate your data to the new computer.
Download QuickBooks Migration Tool (Official Method)
To download the QuickBooks Migration Tool:
1. Open QuickBooks Online
2. Go to Export Overview
3. Click “Download Tool”
4. Install and run the tool
What Is QuickBooks Desktop Migration Tool? Quick Overview, Features & Uses
The QuickBooks Desktop Migration Tool is a highly advanced utility that you can utilize when converting between QuickBooks products. It is easily accessible, saves your valuable time, and there is no risk of data loss when running it.
Here are the points that highlight all the main aspects of this tool:
- You can use this tool if you are using the 2018 (or subsequent) QuickBooks edition.
- The tool is capable of automatically downloading and installing the relevant QB Desktop version on your new computer. Furthermore, it will promptly transfer your QB data files and integrate them with the newly installed QB Desktop version.
- The migration tool won’t reformat your system drive, and no other files will be affected during the data transfer process.
Now that you have a good understanding of the migration tool, let’s move to the next section to learn all the essential technical conditions that need to be fulfilled before running it.
Read More: Convert Sage 50 software to QuickBooks Desktop
What to Do Before Running the QuickBooks Desktop Migration Tool (Step-by-Step Guide)
You must satisfy the following requirements before running the QB Migration Tool:
- Your new computer should have a robust and uninterrupted connection to the Internet. An excellent Internet service connection will ensure the smooth execution of the data transfer process.
- The migration tool can transfer 64-bit QB Desktop files (2022 and 2023 editions) only to a 64-bit computer. Therefore, you must ensure that the new system has a 64-bit processor.
- You must have a modern USB (Universal Serial Bus) flash drive with a free space up to 250 MB. This much free space is needed in the USB flash drive to ensure effective and reliable storage of all your QB Desktop files.
Once you have fulfilled the requirements stated above, you can go to the next section to learn how to download and execute the QB migration tool.
How to Download QuickBooks Migration Tool & Run It
Here are the steps that you can use to download and run the Intuit QuickBooks Migration Tool:
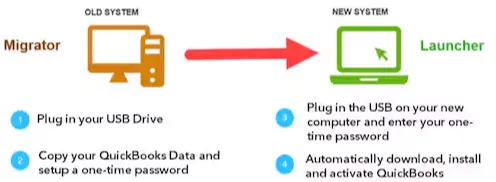
1. Copy QB Data From the Old Computer to the USB Drive
Firstly, you need to transfer the QuickBooks data from the old system to the USB flash drive. Here’s how you can do so:
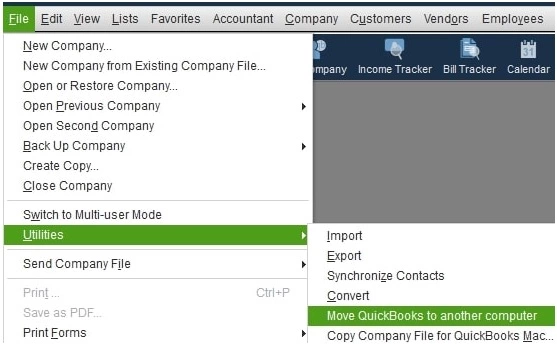
- Open the QB Desktop window on the old computer and go to the File menu.
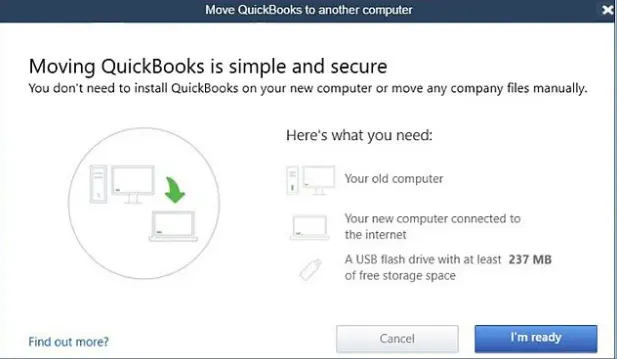
- Carefully choose the Utilities tab and immediately click the Move QuickBooks to another computer option.
- At this point, click the I’m Ready button and create a strong one-time password. You should write down this password because you will need to use it in the next step.
- After that, follow the instructions shown on the screen to choose the attached USB flash drive.
- Finally, all the QB Desktop data will be copied to the attached USB flash drive.
Now, you should disconnect the USB flash drive from the old computer and move to the following step.
2. Transfer QB Data to the New Computer After You Download QuickBooks Migration Tool
In this step, you will run the migration tool to transfer QB data from the USB flash drive to the new system. Here are the points that you must follow:
- You should fix the USB flash drive to the new computer. The QB Migration Tool won’t automatically launch due to Windows security program restrictions.
- You should access the USB flash drive folder to view all the saved files. After that, identify and double-click the icon of the Move_QuickBooks.bat file.
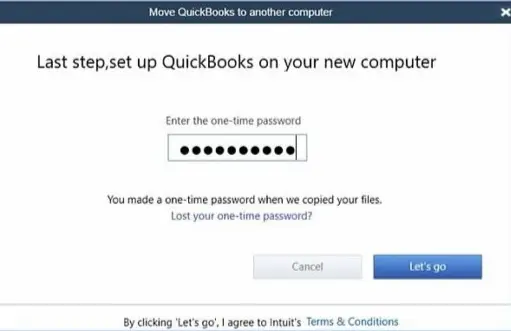
- At this point, the QB Migration Tool will launch, and you must type the one-time password that you created in the previous step.
- Now, click the Let’s Go button to start the execution process of the QB Migration Tool.
- After you have finished the execution process, all your QB data will be moved to the new computer. The speed of the execution process depends on the size of QB data files and the stability of the Internet connection. If the company file is too large, you might need to condense it.
Note: (a) If the QB Migration Tool doesn’t launch even after opening the Move_QuickBooks.bat file, you should download new Windows updates.
(b) The QB Migration Tool will erase all files from the USB flash drive after the data transfer process is completed. However, the files will remain on your old computer. You should rename all the data files present on the old computer to avoid any confusion.
Now, let’s go to the next section to review certain technical limitations related to the migration tool.
QuickBooks Migration Wizard Limitations Explained
The QuickBooks Migration Wizard does not transfer all your data to the new computer. Here’s the table that explains what gets moved to the new system and what doesn’t:
| The Tool Will Copy: | The Tool Won’t Copy: |
| QB Desktop Installation Details and Last Accessed 3 Company Files | Multi-User Setup Configuration |
| Letters, Templates, and Reports | QB Payroll and Payment Services |
| Printer Settings and Spell Checker | Intuit Data Protect (IDP) |
| Financial Statement Designer, Business Planner, and Cash Flow Projector | Older QB Company Files |
| Loan Manager, Advanced Reports, and Statement Writer | Backup Company Files |
Now, let’s explore the next section to know what additional steps you need to take after running the QB migration process.
Next Steps After Running the QuickBooks Migration Tool for a Smooth Data Transfer
As stated earlier, the QB Migration Tool doesn’t transfer all your data to the new computer. Therefore, you will need to execute certain additional steps to fully configure QB Desktop data and services. Here are the points that explain what you should do:
- You should transfer all the remaining QB company files to the new computer.
- It is recommended that you create a fresh backup company file on the new system.
- You will also need to set up additional services, such as QB payroll and Intuit Data Protect (IDP).
Finally, you can utilize all the transferred QB data on the new computer for different projects.
Winding Up
In this comprehensive blog, we showed you how to download QuickBooks Migration Tool and how to run it to transfer QB data to the new computer. Hopefully, you can now easily migrate your QB data to the new system & utilize it for various tasks. If, however, you experience any difficulties or have a query, You can connect with a QB professional for real-time assistance at +1 (800) 780 3064..
Frequently Asked Questions (FAQs)
Q. What is the QuickBooks desktop migration tool?
A. The QuickBooks Migration Tool is a built-in utility designed to help users transfer their QuickBooks Desktop company files, settings, and related data from one computer to another. It eliminates manual copying errors and ensures that important accounting information remains intact. Many businesses download it when upgrading systems, replacing old computers, or shifting to a faster workstation.
Q. Where can I download the QuickBooks Migration Tool?
A. You don’t need a third-party website. The tool is already integrated within QuickBooks Desktop (2020 and later versions). You can access it directly from the File menu under Utilities. Downloading from unofficial sources can risk malware or corrupted files, so always use the built-in option.
Q. Is the QuickBooks Migration Tool free to download?
A. Yes, it is completely free for licensed QuickBooks Desktop users. There are no hidden subscription charges for using the migration feature. It is included as part of your QuickBooks installation package.
Q. What does the QuickBooks Migration Tool transfer?
A. It transfers company files (.QBW), supporting files, templates, letters, logos, and certain preferences. However, it does not move payroll data that hasn’t been updated, multi-user network configurations, or older QuickBooks versions not installed on the new system.
Q. How do I download and install QuickBooks Tool Hub?
A. To download and install QuickBooks Tool Hub, follow these steps:
1. Go to the official Intuit website and download the latest version of QuickBooks Tool Hub.
2. Save the file (usually named QuickBooksToolHub.exe) to your computer.
3. Open the downloaded file.
4. Follow the on-screen instructions to install the tool.
5. Accept the license agreement and click Next.
6. Once installed, double-click the Tool Hub icon on your desktop to open it.
👉 Pro Tip: Close QuickBooks before installing the Tool Hub to avoid errors.
Q. How much does QuickBooks Tool Hub cost?
A. QuickBooks Tool Hub is completely free to download and use.
1. There are no subscription fees
2. No hidden charges
3. Available to all QuickBooks Desktop users
👉 It’s an official troubleshooting tool provided by Intuit to fix common QuickBooks errors.

Gabby Taylor, combines financial expertise with literary prowess. With over a decade in finance, she crafts insightful narratives on navigating fiscal complexities
