When attempting to download QB payroll updates, sometimes, you can encounter QuickBooks payroll error 30159. You are likely to see the following error messages on your system’s screen:
| “ERROR 30159 – Unable to load account for PSID null: Entitlement is Enabled, but Entitlement Unit is deactivated.” |
| “Can’t Verify Payroll Subscription Error 30159.” |
| “Error 30159: QuickBooks has encountered a problem and needs to close. We are sorry for the inconvenience.” |
Apart from the error message shown above, you can identify the following indications on your computer:
- The QB Desktop window will freeze, and it won’t respond to any commands.
- Your system will work slower than expected, and it may crash suddenly.
- Several third-party apps installed on your computer might become inaccessible.
This error shows that Intuit’s official server is unable to verify the status of the payroll subscription. Fortunately, there are many tried and tested methods that you can utilize to fix this error code easily. Let’s immediately dive into the article to explore common causes behind this issue and learn appropriate solutions.
What is QuickBooks Payroll Error 30159?
QuickBooks Payroll Error 30159 is a payroll error that arises when the system can not perform payroll services as result of QuickBooks being unable to authenticate payroll subscription or system settings.
When It Occurs:
This mistake is usually manifested when:
- You are a subscriber to payroll, but are not confirmed.
- The EIN (Employer Identification Number) information is incorrect or missing.
- System files on windows are lost or corrupt.
- QuickBooks Desktop is not effectively updated or installed.
Why Do You Get Error Code 30159 When Updating QB Payroll?
Here are the prominent factors that can trigger QuickBooks payroll error 30159:
- Expired QB payroll subscription.
- Defective paysub.ini files.
- Outdated QuickBooks Desktop version.
- Imprecise payroll service key.
- Malware attacks on different files and folders.
- Corruption in the QB company file.
Now that you know about all the reasons behind this payroll error code, let’s quickly go to the next section to find easy hacks for it.
How to Fix QuickBooks Error 30159 (Step-by-Step)
Here’s the table that depicts all the easiest tactics that you should follow to eliminate QuickBooks payroll error 30159. Explore the table and make sure that you can install the latest payroll updates successfully.
| Common Factors | Appropriate Resolutions |
| Obsolete QuickBooks version | Download and install new QB updates |
| Expired payroll subscription | Reactivate the QB payroll subscription |
| Faulty payroll service key | Verify and update payroll service key |
| Defective paysub.ini files | Rename the paysub.ini files |
| Incomplete QB Desktop installation | Reinstall QB Desktop application |
Let’s go to the following section to learn extensive troubleshooting approaches for this error.
11 Easy Ways to Troubleshoot QuickBooks Payroll Error 30159
Here are the troubleshooting solutions to get past QuickBooks payroll error 30159. Implement these solutions in the given order.
1. Verify Your QuickBooks Desktop Payroll Subscription
It’s essential to check whether your payroll service subscription is active or inactive. To verify the payroll subscription, follow the steps below.
- Begin by closing all the company files and restarting the system.
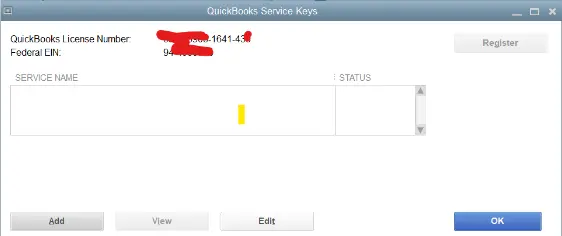
- Open QuickBooks, move to Employees, select My Payroll Service, then Manage Service Key.
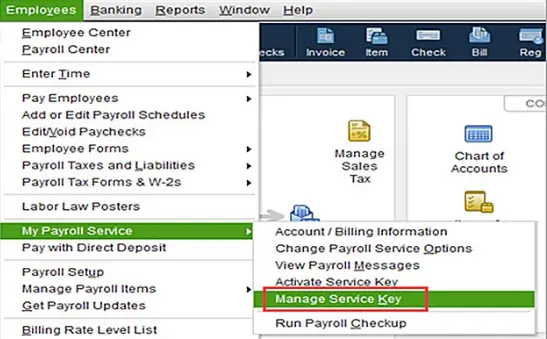
- Now, check whether the QuickBooks Desktop payroll subscription is Active.
- The next step is to select Edit and verify the service key. If it is incorrect, enter the correct service key carefully.
- Further, hit Next, uncheck the Open Payroll Setup box, and hit Finish. QuickBooks will now download the entire payroll update.
Let’s assume your payroll subscription is inactive. In that case, move to the next solution and reactivate the QuickBooks Desktop payroll subscription.
2. Reactivate the Payroll Subscription
An inactive payroll subscription is a leading cause of QuickBooks error 30159. Therefore, reactivation of the payroll account is essential. You can do so in two different ways, as described below.
Case A: Through the Company File
The best way to turn the payroll service back on is to use the QuickBooks Desktop company file. Here’s how to do so:
- First, open the company file, click Employees, and select My Payroll Service.
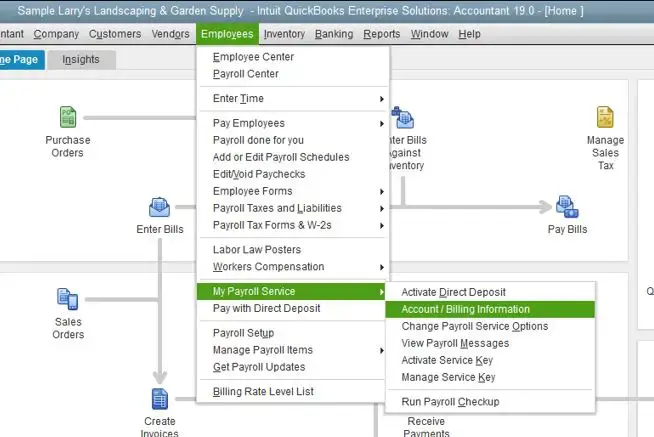
- Select Account/Billing Info and sign in using your Intuit Account login credentials. This opens the QuickBooks Account page.
- Under Status, choose Resubscribe, and finally, follow the on-screen steps to reactivate the payroll service
Case B: Through the Intuit Account
Another way to turn the payroll service back on is from the web. Here’s how you need to do so:
- Sign in to your account using your Intuit credentials and choose Resubscribe under Status.
- Finally, follow the on-screen steps and reactivate the payroll service.
If you get QuickBooks payroll error 30159 even after reactivating the payroll service subscription, consider renaming the paysub.ini files as described below.
3. Rename the Paysub.ini Files to Fix QuickBooks Payroll Error 30159
Since the system does not permit the same name twice, you need to rename all the paysub.ini files found. Here’s how you can do so:
- Firstly, right-click the paysub.ini file found and choose Rename.
- Further, consider adding ‘.OLD’ to make the file name unique.
- Rename the other paysub.ini files by adding other words to the file names.
If this also doesn’t resolve the QuickBooks error 30159, move to the solution below.
You May Also Like to Read: What to Do When QuickBooks Stop Adding New Supplier Automatically.
4. Update Billing Info for Your Payroll Subscription
Incorrect or outdated billing information can lead to failure when verifying the payroll service subscription. Moreover, you can experience delays in payroll processing. Authorized users can easily update the payroll billing info. Here’s how you need to do so:
- Sign in to QuickBooks, move to Employees, select My Payroll Service, and then select Account/Billing Information.

- Further, sign in using your Intuit Account login and verify your information. If you don’t see your name on the list, contact us.
- Next, opt for Billing Detail. Remember that the level of information may vary depending on your contact role. For instance, if you don’t see any information under the Billing Details box, this simply means that you’re not the current billing contact. In that case, you can change the holder or the billing contact. Contact us for the same.
- Select Edit billing info, enter your new billing information, and select I Agree to conclude.
If trying this solution doesn’t help fix the QuickBooks payroll service error 30159, move to the solution below.
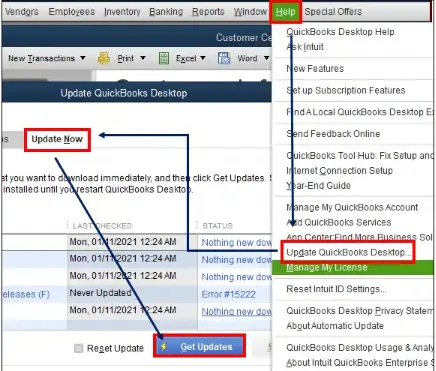
5. Download and Install the Latest QB Desktop Updates
Updating QuickBooks ensures that payroll will work without obstructions. Therefore, you should immediately download QuickBooks updates to ensure the seamless operation of payroll.
If, however, you continue to get QuickBooks payroll error 30159, try updating the payroll service key as discussed below.
6. Edit and Re-enter the Correct Payroll Service Key
An incorrect service key is a leading cause of QuickBooks error 30159. Here’s how to rectify the incorrect service key.
- Move to Employees and choose My Payroll Service.
- Further, click Manage Service Key and then find & select your payroll service key.
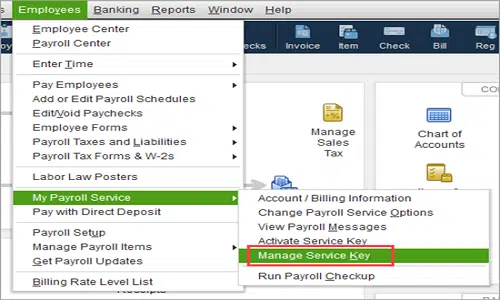
- Select Remove, then click Add.
- Further, enter your active payroll service key.
- Select Finish and hit OK.
If rectifying the incorrect service key also doesn’t help fix QuickBooks payroll error 30159, consider reinstalling QuickBooks as detailed below.
- Select Remove, then click Add.
- Further, enter your active payroll service key.
- Select Finish and hit OK.
If rectifying the incorrect service key also doesn’t help fix QuickBooks payroll error 30159, consider reinstalling QuickBooks as detailed below.
7. Reinstall QuickBooks in Selective Startup
If none of the solutions resolve the QuickBooks payroll tax error 30159, consider reinstalling QuickBooks in Selective Startup mode by following the detailed steps below.
Step I: Switch to Selective Startup
Switching the system to selective startup ensures that no other apps get in the way while you reinstall QuickBooks on the system. Here’s how you can do so:
- Firstly, press the Windows + R keys together and open the Run dialog box.
- Type in msconfig and hit OK to move further.
- A System Configuration window will open; move to the General tab, select Selective Startup, and Load System Services.
- Further, move to the Services tab, then select Hide all Microsoft Services, then Disable all.
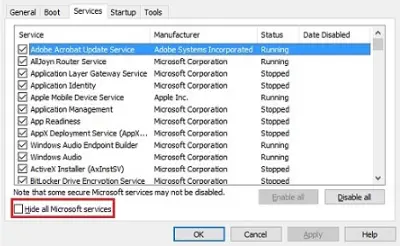
- Then, uncheck Hide all Microsoft services and select Windows Installer from the list of services.
- Lastly, hit OK and then Restart.
Step II: Uninstall QBDT
In this step, we’ll learn how to remove QBDT from the system. Here’s what you need to do:
- Firstly, press the Windows Start menu, type Control Panel in the search bar, and select it in the results.
- Further, select Programs and Features or Uninstall a Program, and from the list of programs on the screen, select the version of QBDT you want to remove from the system.
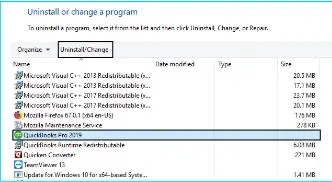
- Select Uninstall/Change, then select Remove, and finally hit Next. If you can’t see this option, sign out and then sign back into Windows as an admin.
Step III: Install QBDT on the System
When you install QBDT, it automatically installs new folders and renames the old ones. Here’s what you should do:
Some Prerequisites to Consider Before Installing QuickBooks
- First of all, download the installer for your version of QBDT.
- Ensure that your system appropriately meets the QuickBooks system requirements.
- Lastly, ensure you have the product and license numbers handy.
Now, let’s move forward and install QBDT again on the system. Here are the steps that you need to follow:
- Launch the file QuickBooks.exe file and follow the on-screen instructions.
- Further, accept the software license agreement and then hit Next.
- Enter the product and license numbers, and then hit Next again.
- Further, select Express and then hit Next once again.
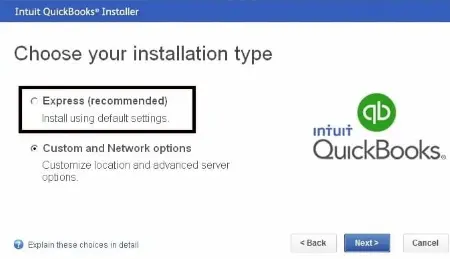
- Lastly, select Install; when it finishes, select Open QuickBooks.
Step IV: Switch to Normal Mode
The final step is to switch back to Normal mode after reinstallation. Follow the detailed steps below to effortlessly switch the system back to Normal mode.
- Firstly, press the Windows + R simultaneously to open the Run dialog box.
- Further, enter msconfig in the search bar and hit OK.
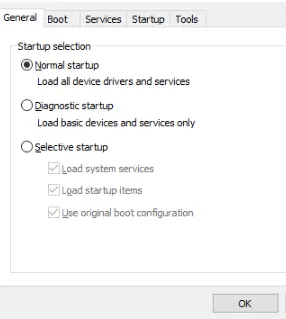
- Move to the General tab, select Normal Startup, and then hit OK.
- Lastly, on the System Configuration window, select Restart.
If reinstalling QuickBooks doesn’t help resolve QuickBooks error 30159, move to the next solution.
8. Restore the System and Run the Windows Malicious Software Removal Tool
In this solution, we’ll learn how to restore the system and run the Windows Malicious Software Removal tool by following the detailed steps below.
- Click the Windows Start tab, move to All Programs, and click the Restore option.
- Further, open a new window, click the Restore My Computer tab, and hit Next.
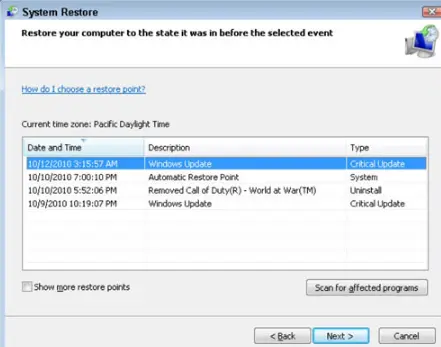
- Next, select the most recent system restore point and hit Next again.
- Click on the confirmation window and then reboot the system.
- Further, download and install the Windows Malicious Software Removal Tool to proceed.
- Move to the Scan tab and select the Fix error option.
- Lastly, reboot the system once again to conclude the process.
Move to the next solution if you continue to see QuickBooks error message 30159 on the screen.
9. Run the QuickBooks File Doctor Tool
QuickBooks File Doctor tool is designed to fix data damage or corruption. Fixing the damage in the company file will help you overcome QB payroll update error 30159. Here’s how you can use this tool:
- First & foremost, you have to install QuickBooks Tool Hub on your computer.
- Once you have installed QB Tool Hub, you should double-click its icon, which is shown on Windows Desktop.
- Move to the Company File Issues tab after accessing the QB Tool Hub window.
- Further, click the Run QuickBooks File Doctor button. The File Doctor tool may take up to a minute to open.
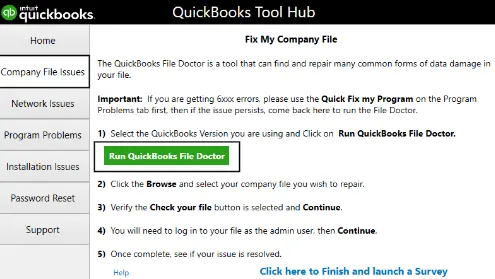
- Select the company file you want to scan from the drop-down menu in the QB File Doctor. If you can’t see the file, choose Browse and Search to find it.
- Hit Check your file, which is the middle option, and then click Continue.
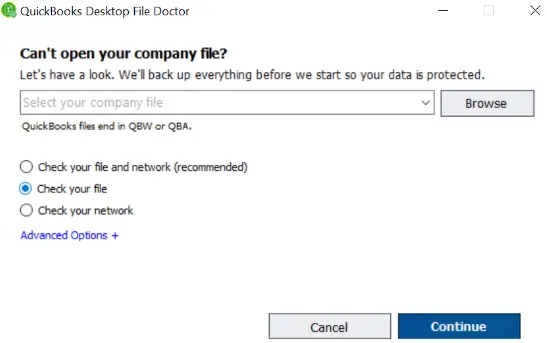
- Lastly, enter your QuickBooks admin password, and then hit Next.
- Allow QB File Doctor to repair your company file data fully. Once done, you can access all payroll service updates.
Do you still encounter QuickBooks Pro error 30159? If that’s the case, consider running the System File Checker as described below.
10. Utilize System File Checker to Repair Various System Files
The System File Checker utility can help you easily repair different system files. Once you have repaired system files, you can seamlessly get all the payroll service updates. Here’s how you need to do so:
- Firstly, you have to press Windows + R to launch the Run window.
- In the Run window, you need to type CMD, and after that, click OK.
- Go to the Command Prompt window and type sfc/scannnow.
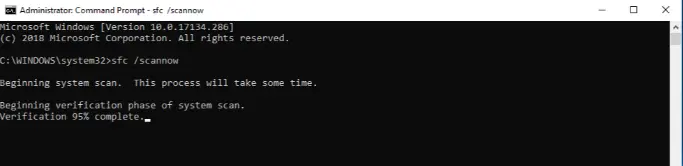
- At this point, hit Enter to execute the command through the Command Prompt window.
- Once the process is completed, you should reboot your system and immediately install QB payroll updates.
Are you still facing QuickBooks payroll error 30159? If so, consider updating the Employer Identification Number as illustrated below.
11. Update EIN (Employer Identification Number)
Incorrect or invalid EIN under the company settings may trigger QuickBooks payroll error 30159. Follow the detailed steps below to update the EIN.
- Move to Company, then choose My Company.
- Further, select Edit from Company Information.
- Next, choose Company Information from the menu on the left.
- Lastly, in the ‘Federal Employer Identification No.’ field, enter the new EIN, and then hit OK to conclude.
Once you have ensured the correct EIN in the company file, you will be able to download and install new payroll service updates effectively.
Summing Up
In this extensive guide, we showed you how to resolve QuickBooks payroll error 30159 using proven methods. Hopefully, you can now download and install all the new payroll service updates effortlessly. If, however, you continue to face this error code or have a query, you should contact a QB professional for real-time support.
Frequently Asked Questions (FAQs)
A. QuickBooks Payroll Error 30159 pops up when the payroll system fails to verify your EIN (Employer Identification Number) with Intuit’s payroll server. It usually strikes when your payroll subscription is inactive, incorrectly configured, or carrying outdated system files. Many users encounter it right when processing paychecks, making it feel like a sudden “payroll shutdown.”
A. This error often appears due to broken Windows registry entries, outdated payroll tax tables, corrupted program files, or a mismatch between your business EIN and the QuickBooks payroll database. Even a single damaged system file can interrupt payroll calculations and force QuickBooks to throw this error code.
A. The fastest beginner-friendly fix is updating your payroll tax table, revalidating your payroll subscription, and restarting QuickBooks. Many users also resolve it by refreshing the EIN under Payroll Settings → Company Info. If the error persists, using QuickBooks Tool Hub’s “Quick Fix My Program” often clears system conflicts instantly.

Gabby Taylor, combines financial expertise with literary prowess. With over a decade in finance, she crafts insightful narratives on navigating fiscal complexities
