Sometimes, when creating or printing bank transactions, you might find the QuickBooks reports not showing Memo or Description. Consequently, you can experience difficult problems when performing crucial tasks, such as tracking expenses, analyzing income, and reconciling bank accounts.
The common reasons behind this frustrating issue are heavy cache data in the browser, improper report selection, and the failure to add memo or description in different reports. Fortunately, experts have devised several amazingly effective tactics through which you can resolve this problem.
Let’s dive into the article to know why we face this issue and explore how we can troubleshoot it using various reliable methods.
Why Do QB Reports Fail to Show Memo or Description?
Here are the reasons why you might find QuickBooks reports not showing memo or description:
- Heavy cache data in the browser can disrupt the connection to QB Online (QBO), and thus, you might fail to properly run different reports.
- If you are using a web browser that is incompatible with the technical specifications of QBO, you can face multiple difficulties when creating & printing transactions.
- It might be possible that you haven’t added the memo or description in the report.
- You may have customized the report in such a way that memo or description fields are excluded.
- Not all reports include the memo or description fields. For example: Summary Report. If you have selected any such report, you won’t find memo or description fields.
- Filter settings on different reports might make the memo or description fields to become invisible in reports.
- If you don’t have the necessary permissions to access certain fields in the report, you might fail to add and view memos or descriptions.
- Selecting an improper date range when accessing reports can also cause the memo or description fields to disappear.
- The imprecise integration of third-party apps in QBO can be another factor that can trigger this problem.
Now that you know about the various causes behind this issue, let’s scroll down to the following section to discover detailed troubleshooting hacks for it.
8 Things to Do If QuickBooks Reports Not Showing Memo or Description
Here are the different resolutions that you can implement whenever you notice QuickBooks reports not showing memo or description. Ensure that you utilize these solutions in the correct order as described below. Note that if you face any error while running reports via QODBC, you should fix it first.
1. Run the Web Browser in Incognito Mode
The heavy cache data in the browser might create problems when you attempt to run reports in QB Online. When you run the browser in private mode, you automatically avoid saving various cache and cookie data. As a result, you can seamlessly access QBO and run different reports. Here’s the table that shows different shortcut keys for various browsers:
| Web Browser | Shortcut Keys |
| Google Chrome | Ctrl + Shift + N |
| Mozilla Firefox | Ctrl + Shift + P |
| Safari | Control + Option + P |
| Microsoft Edge | Ctrl + Shift + P |
If, however, you still find QuickBooks reports not showing memo or description, try the following troubleshooting method.
2. Clear the Cache and Cookie Data From the Web Browser
When you erase the cache and cookie data from your browser, you can ensure seamless access to QB Online. Furthermore, you will be able to run different reports to view the memo or description. This will allow you to finish various pending tasks related to income analysis and reconciliation.
Do you continue to find QuickBooks reports not showing memo or description? If that’s the case, consider using a different web browser, as described below.
3. Operate a Different Web Browser Application
Intuit has recommended various standard web browser apps that you can utilize to run QB Online. If you are facing severe challenges, such as the disappearance of memos or descriptions when running QBO reports, you can easily switch to a different web browser.
By utilizing a new web browser that is fully compatible with QBO technical requirements, you can ensure that your reports display each memo or description. Here’s the table that illustrates various web browsers that you can use:
| Web Browser Application | Recommended Edition |
| Microsoft Edge | 79 or Newer |
| Opera | 68 or Newer |
| Google Chrome | 78 or Newer |
| Samsung | 10 or Newer |
| Mozilla Firefox | 76 or Newer |
| Safari | 12 or Newer (Mac Only) |
Are you still finding QuickBooks reports not showing memo or description? If so, try checking whether you have added the memo or description in the report as detailed below.
4. Ensure That You Have Added Memo & Description For Various Transactions
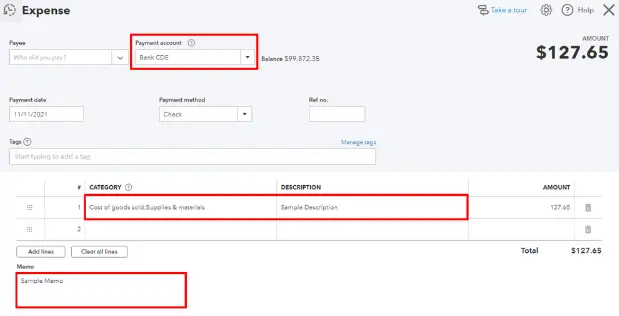
Memos and Descriptions in reports are two different things. You use Description for line items while the Memo adds notes to the whole transaction. You need to make sure that you have added both the memo and description, and after that, you can seamlessly run reports that will display all the added information. Here are the steps that you must follow:
Step I: Review the Added Banking Transactions
You should follow the points described below to check the transaction and verify if you have added the memo:
- Open QB Online and go to the Banking/Transactions menu.
- Choose your relevant bank account and move to the Categorized tab.
- Select any of the added banking transactions and check if the memo section has all the necessary details.
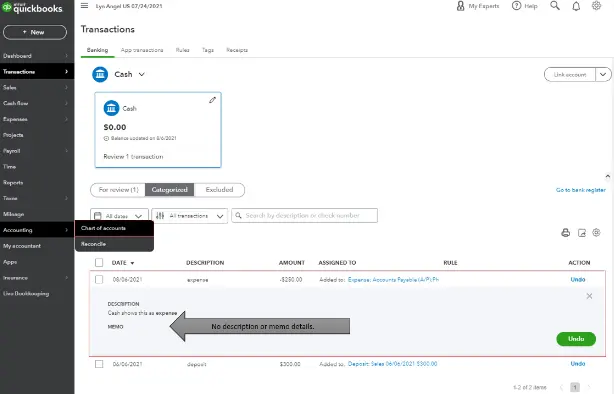
If you find that you haven’t added the memo to the transaction, know for certain that the memo details won’t show up in various reports. You can follow the next step to manually add the memo info.
Step II: Add the Memo & Description Through the Register
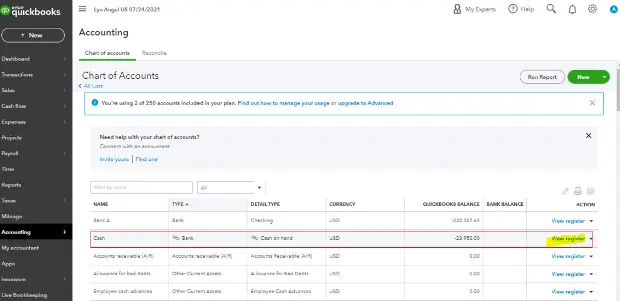
Here are the steps that will enable you to include the memo and description info in the transaction:
- Access QB Online and navigate to the Accounting menu in the left pane.
- Choose the Chart of Accounts and select your relevant account via the list.
- Go to the Action tab and choose View Register.
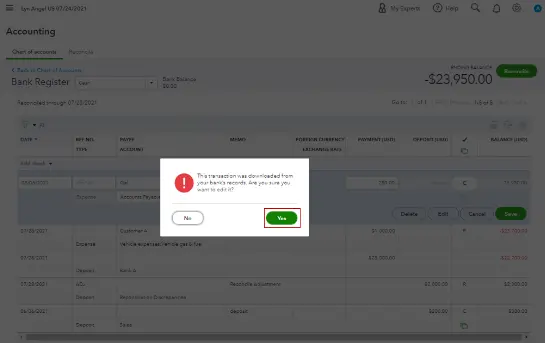
- At this point, select the relevant date and choose the transaction that has a blank memo section.
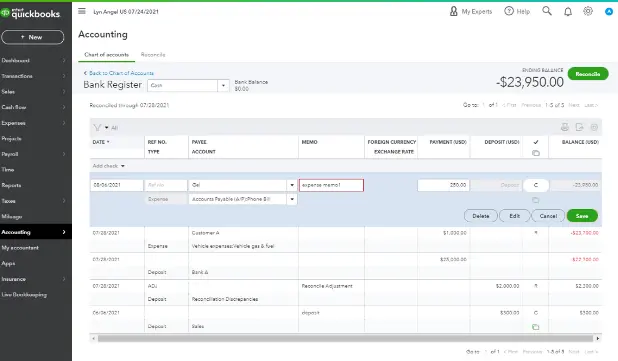
- In the selected transaction, you should type the memo information. Moreover, you can click Edit, and after that, fill out the Description section.
- Tap Save and Yes to save the modified transaction details.
- Finally, you can repeat the previous steps for all other entries in your account.
Now, you can run various reports that will show the memo and description. If, however, you still notice QuickBooks reports not showing memo or description, consider correctly customizing your reports as discussed below.
5. Properly Customize Your Reports to Display Memo
When you don’t customize your reports correctly, you cannot view the memo and description in various transactions. If you wish to view the memo and description, you should pull up the Transaction by Date, Transaction by Account, and the Sales by Customer Detail report. Here are the points that describe how you can access these reports:
A. Customize the Transaction by Date Report
By customizing the Transaction by Date report to display only the check transactions, you can ensure that the same report shows memos. Here’s how you can do so:
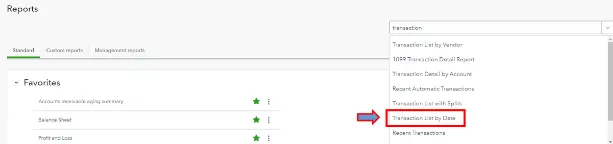
- Open QBO and proceed forward to choose the Reports menu.
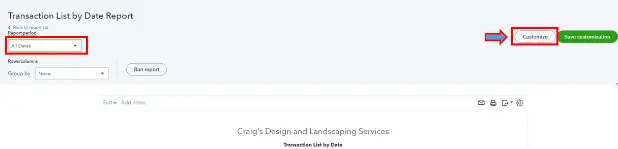
- Click the Transaction by Date option and select the proper reporting period.
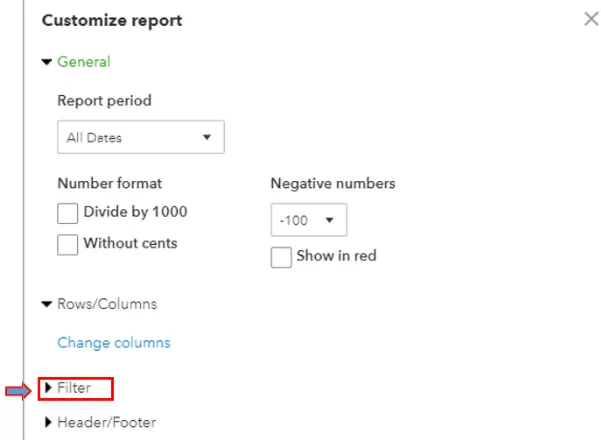
- Tap Customize and navigate to the Filter tab.
- At this point, mark the Check checkbox via the Transaction Type dropdown menu.

- Finally, tap Run Report to ensure that the report displays memos.
Now, let’s discover how to customize the Transaction Detail by Account report, as detailed below.
B. Modify the Transaction Detail by Account Report
Once you customize the Transaction Detail by Account report, you can seamlessly view the memo and description info. Here are the points that you must follow:
- Go to the Reports menu in the left panel of QB Online.
- Search for the Transaction Detail by Account report and select its option.
- Tap Switch to Classic View and choose the Gear icon in the report.
- Mark the Memo/Description checkbox and under the Change Columns.
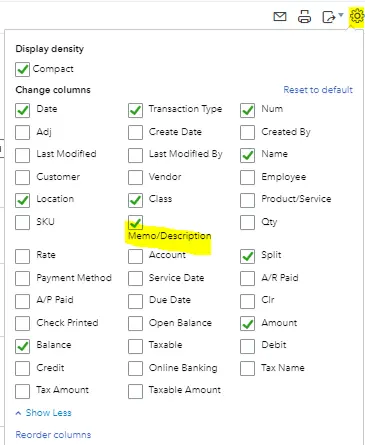
- Finally, you should run the report and seamlessly view the memo and description info.
Let’s discover how you can customize the Sales by Customer Detail report as outlined below.
c. Reorganize the Sales by Customer Detail Report
The following steps will enable you to customize the Sales by Customer Detail report:
- Open QBO and choose the Reports menu. After that, search and choose the Sales by Customer Detail report.
- Tap Customize and move to the Columns section.
- Mark the Memo/Description checkbox and tap the Save button.
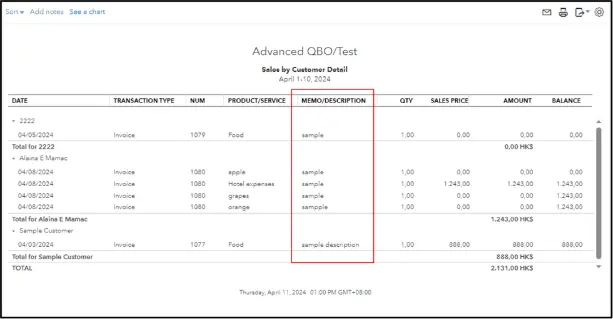
- Finally, you can run the Sales by Customer Detail report to show the memo and description info.
If you find QuickBooks reports not showing memo or description even now, try implementing the following resolution.
6. Reconfigure the General Ledger Report Settings If You Find QuickBooks Reports Not Showing Memo or Description
In the General Ledger report, the memo/description fields will remain visible for all bill transactions registered under the Accounts Payable (AP) side. If you haven’t enabled the Accounts Payable (AP) option, you won’t be able to view the memo/description fields. Here’s what you need to do:
- In the QB Online account, navigate to the Reports menu and choose the General Ledger report.
- Select the reporting period and the relevant accounting method.
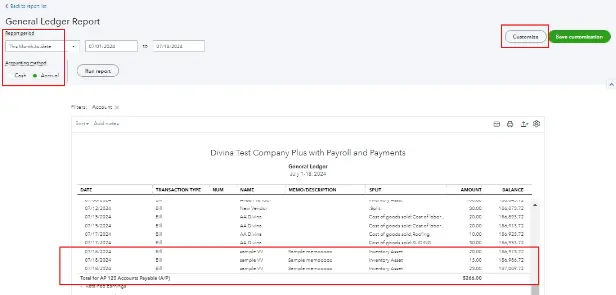
- Tap Customize and go to the Filter section to select Account.
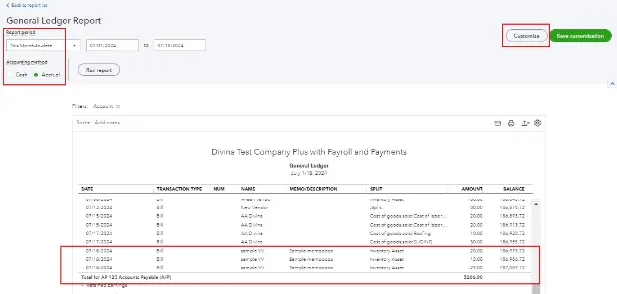
- Mark the All Accounts Payable (AP) account option and review all the details.
- Finally, you can tap Run Report and view the memo/description fields.
Do you notice that the memo or description issue in QBO reports persists even now? If that’s the case, consider refreshing your web browser as described below.
Read More: Unable to Import Bills For QuickBooks Desktop
7. Refresh Your Web Browser After Saving the Description Entry
Sometimes, the data utility on your web browser gets obsolete, resulting in different glitches when you attempt to access and utilize QB Online. You can face several issues due to an outdated data utility in your browser’s cloud storage, such as the failure to save the description entry. In such cases, you must refresh your web browser each time you save the description entry in your transactions.

Once you have refreshed the browser app, run the report to see if the description field shows up. If you continue to find QuickBooks reports not showing memo or description, try adding/editing the description in the CSV file as explained below.
8. Manually Add/Edit the Description in the CSV File
If you still find the QuickBooks reports not showing Memo or Description, you will need to manually edit the CSV file. Therefore, when you export the banking transactions into a CSV file, open it and edit the description before you upload it to QuickBooks Online. Let us see how you can edit the description in both cases – if your account is connected to online banking and if it is not.
Case I: If Your Account(s) is Connected to Online Banking
Here’s how you can add the description in the CSV file if your account is connected to online banking:
- Click on Bookkeeping Transactions and choose Bank Transactions.
- Now, tap on the blue tile for the account to which you wish to upload the transactions.
- Choose the Link account dropdown menu and select Upload from a file.
- Now, click on Drag and drop. Alternatively, you can choose the Select Files option and browse for the file you retrieved from your bank earlier.
- Now, tap on Continue.
- Now, go to the QuickBooks account dropdown menu. Choose the account to which you wish to upload the transactions.
- Click Continue.
- Carry out the steps as instructed, matching the columns on the file with the correct fields in QuickBooks. Then click Continue.
- Now, choose the transactions to import. Click on Continue, followed by Yes.
- After accepting the transactions, select Done.
If your account is not connected to online banking, you can follow the steps detailed below.
Case II: If Your Account(s) is Not Connected to Online Banking
Here’s what you can do if your account is not connected to online banking:
- Click on Bookkeeping. Select Transactions followed by Bank Transactions.
- Now, click on the Upload Transactions option.
- Now, click on Drag and drop. Alternatively, you can choose the Select Files option and browse for the file you retrieved from your bank earlier.
- Now, tap on Continue.
- Now, go to the QuickBooks account dropdown menu. Choose the account to which you wish to upload the transactions. Click Continue.
- Carry out the steps as instructed, matching the columns on the file with the correct fields in QuickBooks. Then click Continue.
- Choose all the transactions you want to import to QBO and choose Continue.
- Tap on Yes.
- After accepting the transactions, select Done.
Finally, you can effortlessly view the memo/description fields when running different reports in QB Online.
Winding Up
In this exhaustive article, we have discussed different resolutions that you can implement whenever you find QuickBooks reports not showing memo or description. Hopefully, you can now effortlessly view the memo and description fields when running various QB reports. If, however, you continue to face difficult challenges or have a query, you should connect with a QB professional for real-time guidance.
Frequently Asked Questions (FAQs)
Q. What is the difference between a memo and a description in QuickBooks?
A. QuickBooks A memo is a note on the entire transaction providing an overview with a description being a note on individual line items in a transaction. The intent is indicated by memos, and particulars are explained by descriptions and this ensures that the exactness of the reports reflects all the transactions.
Q. Why do I find QuickBooks reports not showing memos/descriptions?ports reflects all the transactions.
A. Multiple factors can be responsible for why a memo or description isn’t showing in QuickBooks Online, such as:
a. Using an outdated version of your browser.
b. Excessively stored browser’s caches and cookies.
c. Incorrectly added memo or description.
d. Your transactions might not be running by date.
Q. What should I do if I find that scheduled reports are not working in QuickBooks?
A. Here are the key things that you need to do when you find QuickBooks scheduled reports not working:
a. Disable the UAC (User Account Control) facility on your system.
b. Run QB in admin mode.
c. Run the verify and rebuild data tool to repair your company data.
d. Turn off different security apps installed on your computer, including Windows Firewall.
e. Run the antimalware scans on your computer.
f. Repair your system files using System File Checker.
g. Check the Internet connection settings on your computer.
h. Download and install QB Desktop updates.
Q. Does QuickBooks version matter?
A. Yes. Older versions may have limitations in displaying memo/description fields in reports, especially custom or specialized reports. Updating to the latest QuickBooks Desktop or Online version ensures all columns are supported and visible.

Gabby Taylor, combines financial expertise with literary prowess. With over a decade in finance, she crafts insightful narratives on navigating fiscal complexities
