QuickBooks Desktop software comes with the ability to run in a multi-user environment. In the multi-user mode, you will be able to host your company file in multiple systems in the network, and thus multiple users can work on the same company file simultaneously. However, the tricky part is that sometimes, you may find the QuickBooks multi user mode not working, if it is not configured properly or if something goes wrong. And the truth is, there is a lot that can go wrong.
To access the multi-user mode feature, you need to have a QuickBooks license on your workstations. It involves multiple components to use coherently. Due to the damage to these components, this issue can arise. In most cases, you will see this error when you try to access the company file on the server. But sometimes, the QuickBooks just continues running in single-user mode and doesn’t signal any error.
Thus, it is essential to resolve this issue in order to get back on track with your accounting operations. We have created this troubleshooting guide to help you fix it. Let’s explore several reasons why QuickBooks is not working in multi-user mode. After that, we will discuss the recommended fixes to address this issue.
What Is QuickBooks Multi User Mode? – An Overview
In the QuickBooks Desktop application, you will get the ability to access the same company file in multi-user mode. With the help of the QB Database Server Manager tool, many users can work on multiple workstations connected to the server system. However, sometimes users become unable to connect to the server, or can’t access the company file (.qbw) on multiple systems.
Misconfigured hosting settings, interruption from firewall security settings, and incorrect installation of QB on the server can cause this issue. However, it can be resolved by using the QuickBooks Tool Hub or by reconfiguring the Windows firewall settings. To know more, continue with this blog.
Note: When the problem continues, it can also cause the QuickBooks cannot open company file error, which denies users access to the company file in a multi-user setup.
Common Reasons Why the QuickBooks Multi-User Mode is Not Working ?
It is essential to understand the causes of the QuickBooks multi-user mode not working issue. It will help you to resolve this problem more effectively. Therefore, we have listed the common reasons below:
- The multi-use mode’s hosting settings might be incorrectly configured. This may block the user from connecting to the server of your workstations
- It may be possible that the QB Database Server Manager isn’t installed or operating on your server system
- When you don’t have complete Windows file permissions to the company file on the network, you may be unable to make any edits.
- If the QuickBooks Desktop isn’t installed on your server system, users will find nothing to access the company file.
- Misconfigured settings or damage to the .tlg and .nd files can block you from accessing the QB company file on the server.
- Restrictions imposed by the Windows firewall or antivirus software sometimes block you from accessing the company file. These security settings are essential, but sometimes make it difficult to run important operations due to security concerns.
- Sometimes malware on your device or virus attacks can raise security issues. In such a case, you may have an inability to access the company file in multi-user mode.
- Due to the corrupted or incorrect DNS settings, you may see your QuickBooks freeze when trying to access the files or switch on to the multi-user mode.
These are the reasons you must know before jumping into troubleshooting methods to resolve the QuickBooks multi-user mode not working issue.
Things to Ensure Before Troubleshooting the QuickBooks Desktop Multi-User Mode Not Working Error
You need to consider some important points below before trying to resolve the QuickBooks not working in multi user mode.
- Ensure that you have the updated QuickBooks application
- Maintain a stable internet connection while implementing any method
- You must have the QuickBooks Tool Hub installed on your workstations
- Use the QB company file as an admin user
After ensuring these pointers, you can implement the methods below and resolve the multi-user mode issue in QuickBooks more effectively.
Section A: 10 DIY Methods to Get Rid of QuickBooks Multi-User Mode Issues in Windows
After understanding all the common causes behind this issue, let’s learn how to resolve the QuickBooks multi user mode not working. Before implementing any method, you must download and install the QuickBooks Tool Hub software on your system. This will help you run several repair tools you need to fix this problem. Once done, you can follow the methods below:
Note: You must ensure that you are using the latest up-to-date version of QuickBooks Desktop. If your QB application isn’t up to date, update it to get enhanced features and a soft repair for glitches and errors.
Method 1: Run the QuickBooks File Doctor Tool
As we discussed, a damaged company file can cause the Multi-user mode QuickBooks not working issue. To fix this, you can run the QuickBooks File Doctor tool by carrying out the steps below:
- Start by accessing the QuickBooks Tool Hub
- Next, head to the Company File Issues tab
- Now, click on the Run QuickBooks File Doctor button
- After that, the QuickBooks File Doctor will start to run in a minute or two
Note: If it doesn’t, access the Start menu, type in QuickBooks File Doctor, and access the tool from there.
- Choose the right company file in the File Doctor window.
Note: If you are unable to locate the company file in the drop-down list, tap on browse and search to find the data file.
- Now, select Check your file and network and press Enter
- Lastly, type in the admin password and tap on Next
Now, wait for the QuickBooks File Doctor to scan the company file and repair it. After it is done, it may state that the scan failed, even though it resolved the multi-user mode problems you were facing. However, if you are still facing the same problem, try the next method.
Method 2: Check the Folder Permission on the Server System
Make sure that the folders hosting the company file have the correct permissions so that you can open it from other computers on the network server. Make sure that the folder permissions are set correctly or not, you must perform the steps below:
- Start by locating and opening the File Explorer, and head to the location of the folder that stores the company file
- Next, right-tap on the folder and choose the Properties option
- Now, head to the Advanced tab and choose QBDataServiceUserXX
- After that, tap on Edit, followed by Allow all the important settings option
- After correcting the settings, enable hosting on your server system as well
To do so, you can follow the instructions below:
- First, navigate to the File menu and click on the Utilities section
- Next, tap on the Host Multi-User Access option
- Finally, tap on Yes to save the changes
After implementing all the steps, you need to check whether the issue is resolved. However, if the same issue still persists, try the next method.
Method 3: Change the Name of the .TLG and .ND Files
As you are aware, the Network data (.ND) and transaction log files (.TLG) are the configuration files that are needed to connect QuickBooks and open the company file. Sometimes, damage to any of these files can block you from using the company file in QuickBooks. This factor can cause the QuickBooks multi user mode not working issue. To resolve it, you must try to rename these files and help us fix it if QuickBooks keeps accessing in single-use mode or doesn’t operate in a multi-user environment.
- Start by logging in to the QuickBooks Desktop company file
- Now, enter the F2 key on the Home page to access the Product Information window
- Here, you will be able to see the location of your company file under File Information. Also, you can locate the .TLG and .QBW.ND files are accessible in the same folder

- Next, right-tap the above-mentioned files to rename them
Now, restart the QuickBooks Desktop and check whether the multi-user mode works perfectly now. However, if you are still facing the same issue, follow the next method.
Method 4: Run QuickBooks Database Server Manager
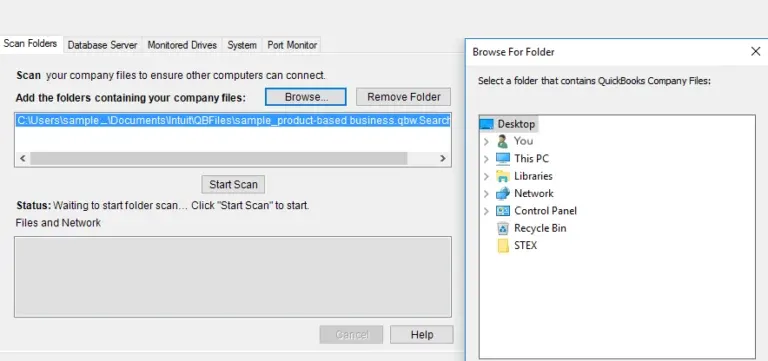
The QuickBooks Database Server Manager enables you to easily open the multi-user mode. This allows multiple users to operate on the same company file by sharing it with other systems over your network. When you install the QB Desktop on the server to host the company file, the QBD Server Manager is automatically installed on the system.
Use the QB Database Server Manager and scan for the company file on the server system. This will help you fix the QuickBooks multi user mode not working error.
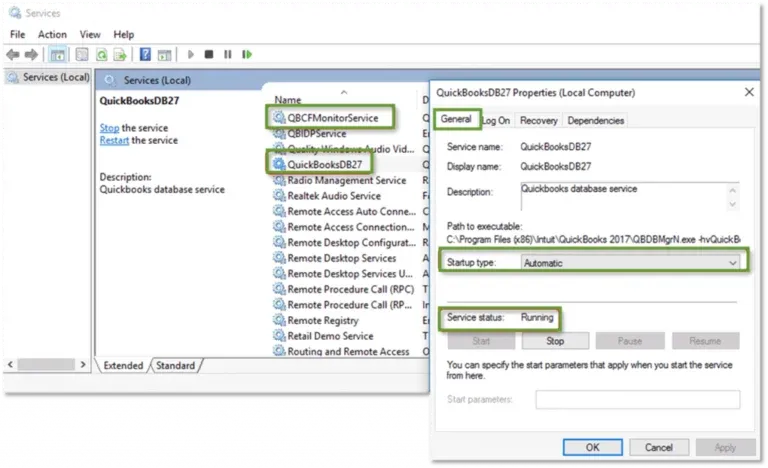
Method 5: Check the Services on Your Server
Various software programs are running in the background that help the QB run efficiently in multi-user mode. You may encounter using QuickBooks in multi-user mode. You may face troubles using QuickBooks if any services stop running or features automatically stop when Windows starts. This can cause the QuickBooks multi user mode not working issue. To resolve this, you can perform the steps below:
- Start by tapping on the Windows icon and typing Run in the browser tab next to the Start menu to open it.
- Next, enter services.msc in the Run window and hit the Enter key

- Tap twice on the QuickBooksDBXX
- Now, set the Startup type to Automatic. Ensure that the service status is set to either Running or Started.
- Navigate to the Recovery tab and tap on Restart the Service from the on-screen menu in case of First failure, Second failure, and Subsequent failures.
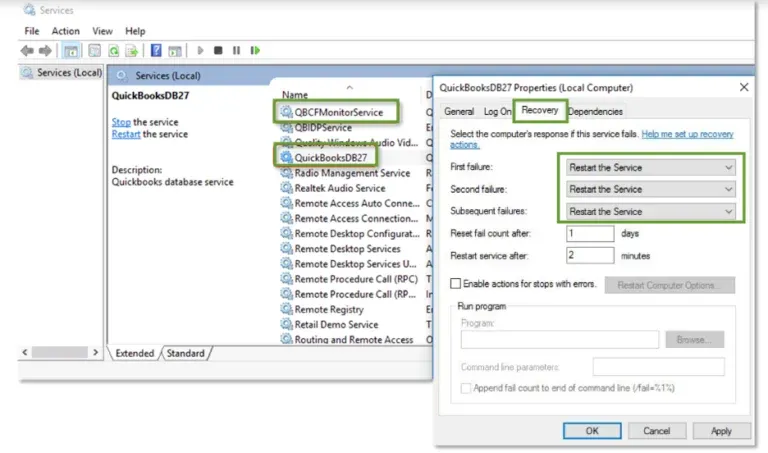
- Finally, tap on Apply, followed by OK to save the changes.
After that, check again whether the issue is resolved. Still facing the same error message? Try the next method.
Method 6: Configure the Windows Firewall Settings
The QB software can’t communicate with the server system or workstations if the Windows firewall or antivirus software restricts it. To fix this, you need to reconfigure Windows firewall settings to enable QuickBooks to run in multi user mode and resolve the QuickBooks multi user mode not working issue.
- Start by tapping on the Windows icon and head to the Control Panel
- Next, browse for the Windows firewall and hit the Enter key
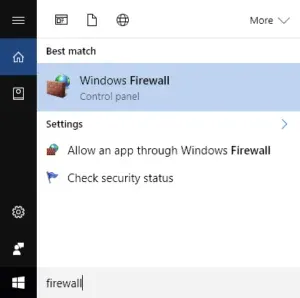
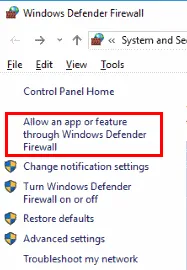
- Tap on Allow an app through the Windows Firewall option
- Now, tap on the change settings option and check the box under the Public list for the QuickBooks software, then tap on OK
- Finally, choose Public for the application
If the problem still persists, even after implementing the above steps, you need to create firewall exceptions for QuickBooks.
Method 7: Add Your Server to the Windows Host File
If the error still persists, you need to try to open the Windows hosts file by utilizing Notepad on the system that has encountered a multi-user mode problem.
- You will find the host file located at: C:\Windows\System32\Drivers\Etc
- You need to open Notepad as an Admin if needed
- Further, you will need to type the server’s IP address after the last IP address.
- Next, hit the Tab key and type in the server name
- Navigate to the File menu, and from there, tap on Save, followed by Exit
However, if the QuickBooks multi user mode not working issue still persists on your system, move to the next solution.
Method 8: Ping the Server from a Workstation
The next method to try is pinging your server from a workstation. To do so, perform the instructions below:
Note: You must ensure that you turn on the Network Discovery on the server and workstations.
- Start by opening the Windows Start menu on the server and workstation
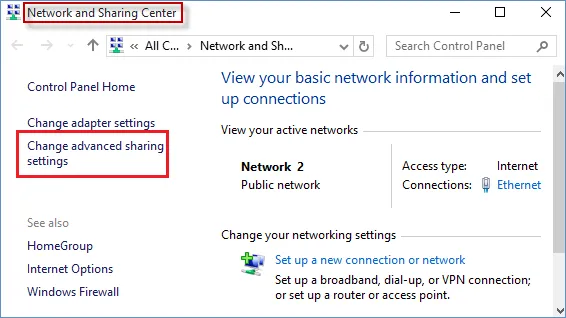
- Next, type in Network into the search and open the Network and Sharing Center
- Choose Change advanced sharing settings
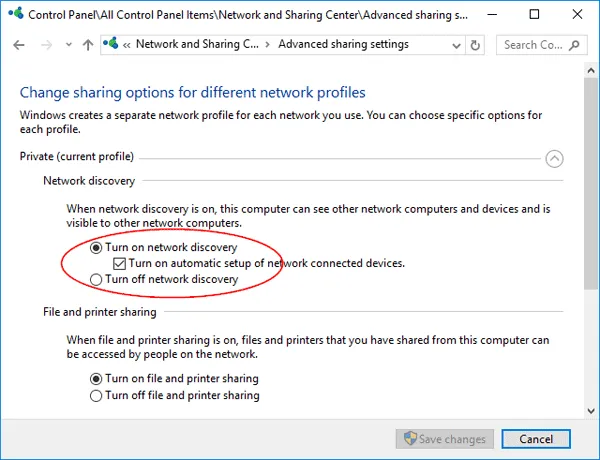
- Now, ensure that Turn on network discovery is chosen in the Network discovery, File and printer sharing sections.
Now, get your server name from your server:
- Begin by launching the Windows Start menu on the server system
- Type in Run into the search and open Run
- Now, type in cmd into the Run window, then hit Enter
- Next, type in ipconfig/all into the cmd window, then hit Enter option
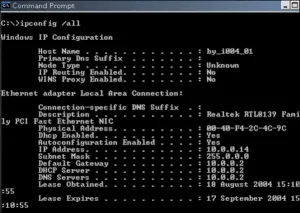
- In the Windows IP Configuration window, locate the Host Name. Your server name is on the right
- Finally, note down the hostname, or duplicate it to a Word document to access it quickly in the future
Head back to the workstation to test the server. These steps can get complex; therefore, you might want to reach out to an IT professional for help.
- Start by accessing the Windows Start menu from a workstation
- Next, type in Run into the search bar and open Run
- Type in cmd into the Run window, and then hit Enter
- Now, type in ping [your server name], and then hit Enter. Don’t add any brackets around your server name
- Lastly, perform these steps for each workstation that is facing the QuickBooks multi user mode not working issue
Now, check whether the issue is resolved. However, if the issue still persists, follow the next fixes.
Method 9: Access a Sample Company File in Multi-User Mode
Try to open the sample company file in multi-user mode to isolate the main cause of the issue with QuickBooks Desktop in multiple users in different locations:
- Start by opening the No Company Open
- Next, select Open a sample file
After that, try to find out if you can access this file and the size of the company file. If you can’t and the QuickBooks multi user mode still does not work, follow the next method.
Method 10: Clean Install the QuickBooks Desktop
Even after trying the above methods, if the QuickBooks multi user mode not working issue still persists, you must clean install your QuickBooks Desktop by performing the steps below:
- Start by uninstalling the QuickBooks Desktop
- Next, access the Windows Start menu. Browse for File Explorer, then open it.
- Now, locate and access the folder that holds your QuickBooks company files. This is commonly the QuickBooks folder. It’s common in one of these locations:
- C:\ProgramData\Intuit\QuickBooks (year)
- C:\Users\(current user)\AppData\Local\Intuit\QuickBooks (year)
- C:\Program Files\Intuit\QuickBooks (year)
- C:\Program Files (x86)\Intuit\QuickBooks (year) for 64-bit version
- Right-tap the folder and choose Rename.
- Add the word “old” at the end of the folder name to prevent QuickBooks from opening when you reinstall
- Finally, reinstall the QuickBooks application.
After reinstalling the QB software, you need to verify again whether the QuickBooks multi user mode not working. We hope that these methods will help you resolve such problems.
Section B: How to Resolve QuickBooks Multi User Mode Not Working Error in MacOS
For macOS users, we have outlined the proven fixes to the QuickBooks multi-user mode not working issue. However, before implementing the troubleshooting methods, consider the pointers mentioned below:
Did the system run QuickBooks Server in Sleep mode?
To keep the system from going into sleep mode, you can modify your preferences. For that, follow the instructions below:
- Choose System Settings, then Energy Saver
- Select the energy preferences, and then close the window.
Did the network settings on your system or the QB Server system change?
Ensure that the QuickBooks Server is sharing the computer file and avoid changing the network settings. To check them, carry out the steps below:
- Choose System Settings, then choose Network.
- If the settings are correct, close the window. If you need to make updates, make the essential changes, then choose Apply
Is the system using wifi?
Your connectivity to the QB Server may have been dropped due to a weak signal. Navigate to an area with a strong wifi signal or consider utilizing an Ethernet connection.
After considering the important pointers above, we advise you to follow the methods below to get rid of the QuickBooks multi user mode not working H202 error.
Method 1: Verify If the QuickBooks Server is Running and If Your Company File is Shared
It is essential to check whether the QuickBooks company file is running in multi-user mode. To do so, perform the instructions below:
- Start by pressing the Go button, and then tap on the Applications
- Next, tap twice on the QuickBooks 20XX Server.app icon
- Share the files listed below, if needed
- If the file is mentioned in the NOT SHARED list, then select that file and tap on the Start Sharing option to share it.
- If the file is not outlined in the list, then use the + sign to add a file to the list.
Remember that only a host system must have the QB Server program installed and active on it. Additionally, check if the QuickBooks Server program is installed on the same system where the company file is running.
Method 2: Verify the Firewall Settings of MacOS
To check the firewall settings in MacOS, you need to carry out the steps below:
- Start by heading to the Apple menu and choosing System Preferences from there
- Now, tap on the Firewall under the Security & Privacy tab
- Next, navigate and choose the Firewall Options. If the button is a grayed icon, then press the lock icon to choose it
- Verify if the QuickBooks Server app is set to Allow Incoming Connections
Method 3: Check the File Sharing Permissions
Instructions need to be followed to verify the permission:
- Initiate by selecting the Apple menu, then choose System Settings
- Next, select the Sharing icon from the Apple menu
- Now, mark the File Sharing checkbox to enable it
- After that, add the company file’s storage location folder to the list of Shared Folders
- You need to tap on the + sign in the Shared Folders to add the folder
- Browse for the company file by tapping on the browser button, and then look for the file from the desired location, and then press the Add button.
- Make sure that the permissions are set to Read and Write for Everyone or just for the single users who will be using QuickBooks under the Users column.
Method 4: Verify If the Bonjour Service is Working Properly
Below are the instructions that you need to follow to check the Bonjour service on the systems.
- Start by choosing the File and then the New Finder Window
- Make sure that all the QuickBooks-using systems are also visible in the Shared section
- Next, verify if ports, including 5297 TCP, 5298 TCP/UDP, 53535 UDP, and 56565 TCP, are open or not. If they are not enabled, you need to enable them.
Method 5: Verify the Configuration of the Network
Due to an issue in the system’s hardware, the interaction between the QB Desktop and Server may occasionally be impeded. To fix this, perform the instructions below:
- If you are utilizing the wireless internet, turn it off and unplug the Ethernet cord
- Next, restart the system by tapping on the Start button and choosing the Restart option from the Power menu
- Now, access QuickBooks with the help of the username and password
- After that, activate the multi user mode
Now, you need to ensure that all the computers are connected to the same network. If you are utilizing wireless internet, then all the computers need to be connected to the same wifi.
Method 6: Settings of Peer-to-Peer Direct Connection
You can link two systems utilizing an Ethernet cable through a peer-to-peer connection.
- Start by shutting down both systems and connecting them by plugging the Ethernet cable into the respective ports of each system.
- Next, reboot both systems. The Bonjour service must facilitate both PCs to view each other. Confirm this by choosing File, then New Finder Window, and making sure that the other systems using the QB are visible in the Shared section
- Now, make a system the host for QuickBooks Server. Access QuickBooks, then select the File, and Enable Multi-user mode.
- After that, go to the second system, open QuickBooks, and from Shared Files, access the company file.
Once you have implemented all the instructions, you need to link the two systems by using an Ethernet cable; the QuickBooks Mac multi-user issue must disappear. If it doesn’t work, move on to the next method and try it.
Method 7: Make Sure that No User is Logged In
Make sure that no other users are currently logged into QuickBooks and actively working. After ensuring that, follow the instructions below:
- On your QuickBooks Mac version, then head to the File
- Next, choose Enable Multi-user Admin mode
- Now, you need the ability to edit the preferences
- Verify the issue with QuickBooks not allowing multi-user now
After that, check whether the issue is resolved. We hope that the methods above will help you eliminate the QuickBooks multi user mode not working error on the Mac.
Prevention Tips to Avoid Multi User Mode Not Working Issue in QuickBooks
As we discussed, the QuickBooks multi user mode not working issue can interrupt your access to the company file on the server. To also avoid this problem in the future, we have mentioned some healthy practices below:
- You must use the up-to-date version of the QuickBooks application
- Make sure that your workstations are compatible with the QuickBooks version
- Ensure to create a firewall and third-party antivirus software exceptions for the QB software
- Always use QuickBooks under a stable internet connection
- Remember to grant complete access permission to the users
These healthy practices will help you avoid such errors. Other than that, if maintaining these tips doesn’t resolve your issue, follow the next method.
An Overview – QuickBooks Multi User Mode Not Working
You can go through the table below to see the condensed version of the information from this blog on the multi-user mode issue in QuickBooks Desktop.
| Description | The QuickBooks multi-user mode not working issue prevents users from accessing the company file on the server network. |
| Common reasons | Misconfigured hosting settings, interruptions due to firewall software, absence of QB on the server computer, damaged QB Database Server Manager, or insufficient permissions to work under the server network. |
| How to fix it on Windows | Utilize QuickBooks Tool Hub, verify the folder permissions, rename the .tlg and the .nd files, use QB Database Server Manager, check the server settings, configure Windows firewall settings, include your server in the Windows Host file, ping the server from a workstation, and clean install the QB Desktop. |
| How to fix it on macOS | Check if the QB Server is running and if the company file is shared, verify the macOS firewall settings, check file sharing permissions are set correctly on the Host system, check if the Bonjour service is working correctly on all systems, and set up a peer-to-peer direct connection. |
Conclusion
This was all about the QuickBooks multi user mode not working issue. In this article, we have discussed the common reasons behind this error that block users from accessing the company file on the server. Moreover, we have outlined the complete expert troubleshooting procedure to get rid of this problem. To ensure effective troubleshooting, we have discussed some important pointers you need to consider before implementing any instructions. However, if these methods don’t work in your favor, you can seek professional assistance.
Frequently Asked Questions (FAQ’s)
QuickBooks may not access in multi-user mode due to internet connection issues, incorrect hosting settings, or firewall restrictions. Other than that, make sure that the QuickBooks Database Server Manager is correctly configured to resolve this issue.
When QuickBooks is not opening in single-user mode, try restarting the system, and make sure that no QuickBooks operation is running in the background, and check the integrity of this company file.
To fix the QuickBooks multi user mode issues, first, you need to run the QuickBooks File Doctor tool. If this doesn’t fix this issue, verify the folder’s permissions on the server computer. Rename the .tlg and the .nd file, use QuickBooks Database Server Manager, verify the services on the server, and configure the Windows firewall settings. Some other key troubleshooting methods include adding the server to the Windows Host file and pinging the server to the Windows Host file. However, if this also doesn’t work, you must clean install your QuickBooks Desktop application.
To troubleshoot the multi-user mode issue, you can start by verifying if the QuickBooks Server is operating and if the company file is shared. If doing this doesn’t help you, configure the MacOS firewall settings. Check that file sharing permissions are set correctly on the host system. Sometimes, incorrect settings of the Bonjour service can also cause this error in your MacOS, which can be fixed by checking its settings.

Gabby Taylor, combines financial expertise with literary prowess. With over a decade in finance, she crafts insightful narratives on navigating fiscal complexities
