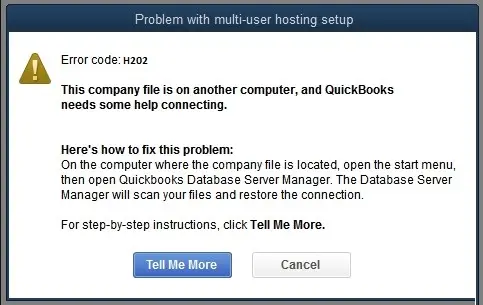
When attempting to run QuickBooks Desktop in multi-user mode, you can sometimes encounter QuickBooks error H202. Consequently, you won’t be able to utilize QB Desktop in multi-user mode and you won’t be able to finish crucial projects within a defined time frame. You are likely to observe the following error message on your system’s screen:
This error is actually a part of the H-error series that includes several multi-user mode errors, such as H101, H303, and H505. Some common indications of these errors are frequent freezing of QB Desktop, slow performance, and abrupt system shutdowns.
The reassuring fact is that it is easy to effectively troubleshoot this error using several techniques. Let’s continue to navigate the blog to learn why we face this issue and what strategies we can adopt to resolve it.
If you want effective and reliable assistance to troubleshoot QuickBooks error H202, dial 1(800) 780-3064 to immediately connect with an experienced QB professional.
Why Does H202 Multi-User Mode Error Occurs in QuickBooks?
The following reasons are behind the occurrence of QuickBooks error H202:
- Improper multi-user settings on different systems on the network.
- Damage in the company data on the server.
- Blocking of QuickBooks Desktop by Windows Firewall.
- Inaccurate folder permissions and Windows access settings.
- Damaged configuration files.
- Inactive QuickBooks services on the server computer.
Let’s explore the next section to learn the simplest hacks to fix this error on your system.
Instant Ways to Resolve Error Code H202 in QB Desktop
Here’s the table that includes some of the most effective solutions for QuickBooks error H202. Navigate through the table and implement the following resolutions to utilize QB in multi-user mode successfully.
| Relevant Factors | Quick Solutions |
| Imprecise multi-user hosting settings | Revise multi-user hosting setup on the server & workstations |
| Restrictive Windows Firewall settings | Add QuickBooks to the exception list in Windows Firewall |
| Inactive QB services on the server system | Reactivate all QB services on the server |
| Invalid antivirus software settings | Exempt QB in antivirus software |
| Damaged company file | Run verify and rebuild data tool |
| Improper network connection | Verify and update network connection |
Now, let’s learn extensive troubleshooting approaches for this error code in the following section.
Expert-Recommended Solutions to Fix QuickBooks Error H202
Before running any solution for QuickBooks error H202, you need to install the latest QuickBooks Desktop application updates. This will ensure that you have all the recently developed bug fixes and features when implementing various resolutions.
Let’s now implement the following resolutions according to the operating system installed on your system. There are three separate sections in which we have listed the solutions:
- Section A: For Windows Computers
- Section B: For Windows Server 2012 Essentials R2
- Section C: For Citrix Server or Fedora Linux
- Section D: For Mac Operating System
Therefore, scroll to the operating system you use and follow the solutions given there.
Section A: Troubleshooting QuickBooks Error H202 on Windows Computers
First & foremost, you need to download and install recent Windows updates. This will enable you to utilize the latest Windows operating system features and improvements when fixing error H202.
Now, you should use all the solutions mentioned below in the precise sequence.
1. Run QB Database Server Manager on the Server System
Running QB Database Server Manager is the first approach to fix error H202 in QuickBooks, as it automatically restores the connection to the company file hosted on the server. Here’s how you can do so:
- Firstly, you should quickly download and install the newest version of QuickBooks Tool Hub on your server system.
- Once installed, launch Tool Hub using the shortcut icon created on the desktop screen. If you can’t find the Tool Hub icon on the desktop, search for it in the Windows search and select it from the results.
- Go to the Network Issues tab in Tool Hub and select the QuickBooks Database Server Manager option.
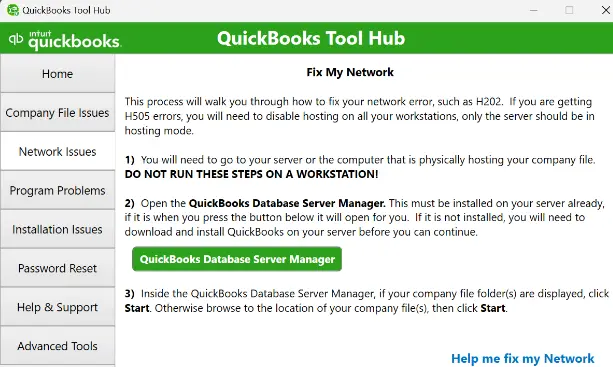
- You will get a prompt to install QuickBooks if it has not already been installed on the server.
- If you see your company file folder in QuickBooks Database Server Manager, select the Start Scan option or choose Browse if you don’t. Utilize the Browse option to reach the location of your company file folder.
- QuickBooks Database Server Manager will now automatically repair the connection to the server.
- When the scan is complete, you can seamlessly connect to the server from different workstations to open the company file.
If you still encounter QuickBooks error H202, try the next troubleshooting hack described below.
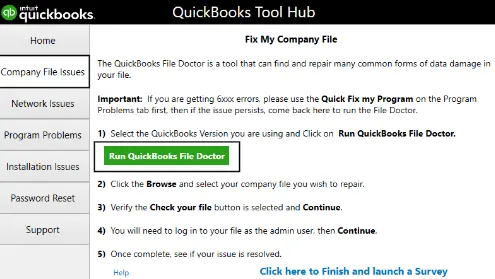
2. Repair Your Data File Using QuickBooks File Doctor
One of the main reasons behind the error message H202 in QuickBooks is corruption in the company file. You can effortlessly scan and repair your company file by operating QuickBooks File Doctor on your server.
Once the company file is completely repaired, you can seamlessly access it from various workstations using multi-user mode.
If, however, QuickBooks Desktop error H202 reappears while enabling the multi-user mode, consider enabling different QB services on the server as described below.
3. Reactivate QuickBooks Services on the Server System
You need to verify and restart QBCFMonitorService and QuickBooksDBXX services, which are necessary to allow multi-user access to QuickBooks. Here’s how to do so:
- Press Windows + R, enter services.msc in the text box, and press Enter.
- Scroll down the list of services to find the QuickBooksDBXX service and right-click it. The XX in the service indicates your version of QuickBooks. For example, QuickBooks Desktop 2023 has the database process running as QuickBooksDB33.
- Select Properties and then the Startup Type as Automatic.
- Choose Start as the Service Status on the window.
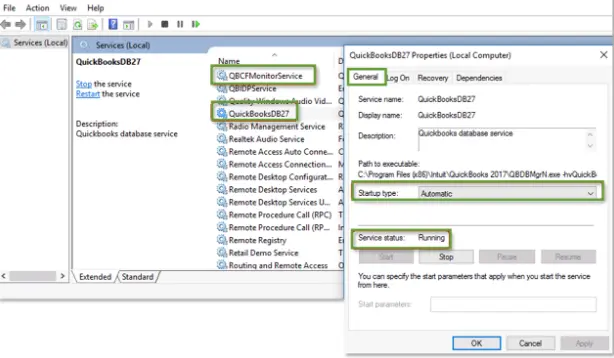
- Go to the Recovery tab and select the Restart the Service option for First, Second, and Subsequent Failures.
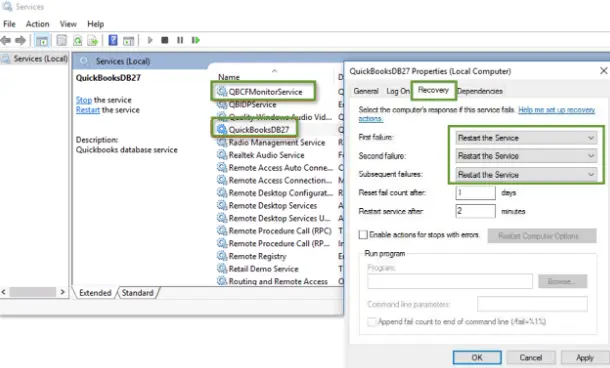
- To save the changes made to the service, select Apply and OK.
- Follow the same instructions for QBCFMonitorService and try to enable hosting to check if QuickBooks company file error H202 is resolved.
If, however, QuickBooks error H202 is still preventing you from hosting the company file, proceed to the next troubleshooting solution.
4. Ensure Proper Company File Folder Access Permissions
It is absolutely essential to grant full access permissions to the company file folder on your network. Once you do that, you can open data files saved on the server from any workstation. Here’s how you need to do so:
Step 1: Verify the Folder Permissions are Correctly Set Up
- Press Windows + E to open Windows File Explorer and go to the folder where your company file is saved.
- Right-click the company file folder, select Properties, and go to the Security tab.
- Select Advanced > QBDataServiceUserXX > Edit and verify whether the following settings are Allowed:

| Traverse Folder/Execute File | List Folder/Read Data | Read Attributes |
| Read Extended Attributes | Create Files/Write Data | Create Folders/Append Data |
| Write Attributes | Write Extended Attributes | Read Permissions |
- If you find that the permissions are not correctly set up, right-click the company file folder and choose Properties.
- Go to the Security, select Edit, and select QBDataServiceUserXX.
- Now, select Full Control, then Allow, click Apply, and OK.
Step 2: Set up Proper Folder Permissions
- Press Windows + E to open Windows File Manager and locate and right-click the folder below:
| C:\Program Data\Intuit\Entitlement Client\v8 | C:\Program Data\Intuit\Entitlement Client\v6.0 | C:\Program Data\Intuit\Entitlement Client\v5 |
| C:\Program Data\Intuit\Entitlement Client\v3 | C:\Program Data\Intuit\Entitlement Client | C:\Program Data\Intuit\QuickBooks Enterprise Solutions X.0 (X = version) or C:\Program Data\Intuit\QuickBooks 20XX (XX = year) |
| C:\Program Data\COMMON FILES\INTUIT | C:\Program Data\COMMON FILES\INTUIT\QuickBooks | C:\Users\Public\Public Documents\Intuit\QuickBooks\FAMXX (XX = year) |
| C:\Users\Public\Public Documents\Intuit\QuickBooks\Company Files | C:\Users\Public\Public Documents\Intuit\QuickBooks\Sample Company Files\QuickBooks Enterprise Solutions X.0 (X = version) or C:\Users\Public\Public Documents\Intuit\QuickBooks\Sample Company Files\QuickBooks 20XX (XX = year) |
- You might not have all the folders listed above, as some of them are specific to certain versions of QB Desktop.

- Select the Properties option after right-clicking the folder and go to the Security tab.
- Choose Everyone, and if you don’t find the Everyone option in the Group or User Name checkbox, choose Add and enter Everyone. Click OK, then Full Control, and hit Apply and OK.
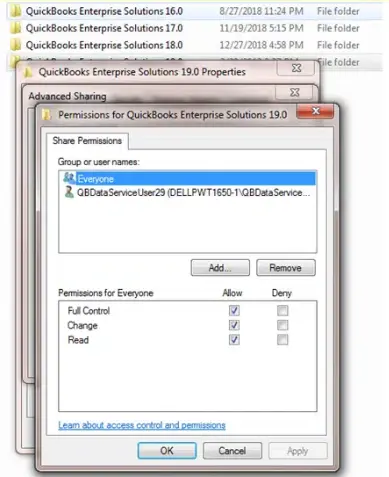
Step 3: Set Proper Windows Access Permissions
- Press Windows + R to open the Windows File Manager and find and right-click the company file folder.
- Choose the Properties option, select Sharing, and then the Share Add option.
- Select the QBDataServiceUserXX service for your version of QuickBooks Desktop and set Full Control as the permission level for both users.

- Finally, click Share and check if you can now access the company file from workstations.
If QuickBooks error H202 still does not let you open your company file, consider providing full exemption to QB in Windows Firewall as detailed below.
5. Add QuickBooks to the Windows Firewall Exception List
Configuring the Windows firewall is important to ensure QuickBooks can go through it without any restrictions. You need to provide full exemption to QuickBooks Desktop in Windows Firewall to ensure seamless multi-user access to the server. Once you do that, it will be very easy to open company files saved on the server from various workstations.
Do you continue to encounter QuickBooks error H202? If so, try providing full exemption to QB Desktop in your antivirus software as outlined below.
6. Exempt QuickBooks in Your Antivirus Software to Fix QuickBooks Error H202
It is crucial to configure your antivirus software so that it does not restrict QuickBooks’ general operations. You need to add QuickBooks Desktop to the exception list of your antivirus software.
Once done, you should restart the system and retry to enable multi-user mode to check if error H202 has been resolved. If not, follow the next solution and check the connection between the server and the workstations connected to it.
7. Verify the Network Connection Between the Server & Workstations
Using the Ping command, you will check the connection between the server and the workstations. Here’s what you should do:
- Go to the Start menu on the server and any workstation that is getting QuickBooks Desktop error H202.
- Enter Network in the search bar and select Network and Sharing Center in the results.
- Choose the Change advanced sharing settings option and ensure the Turn on network discovery option under the Network Discovery and File and Printer sharing is selected.
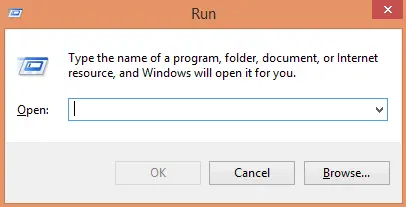
- Press Windows + R to get the Run command window and enter CMD in the search bar.
- Press Enter and enter ipconfig/all command in the command prompt window.
- Hit the Enter key and check out the Host Name under the Windows IP Configuration section.

- Take note of the server name or copy it to a notepad for quick access.
- Press Windows + R to get the Run command window and enter CMD in the search bar.
- Now, enter the command ping [your server name] in the command prompt window and press Enter. Do not include the brackets in the command.

- Follow the same set of instructions on each workstation getting QuickBooks company file error H202.
- No loss of data packets indicates that there are no issues in the connection to the server, and you must proceed to the next solution. However, if you notice packet loss or slow reply, you need to contact an IT professional.
Are you still noticing QuickBooks error H202? If that’s the case, consider relaunching the QBCFMonitorService as discussed below.
8. Restart the QBCFMonitorService on Your Server
QBCFMonitorService plays a crucial role in a multi-user environment, restarting which can help resolve QuickBooks multi-user mode error H202. Here’s what you should do:
- Press Control + Shift + Esc to open the Processes tab in Task Manager.
- Find and right-click the QBCFMonitorService and select the End Task option.
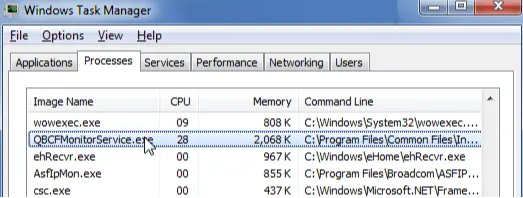
- Click Yes for confirmation and run a thorough scan of your system using an antivirus program to detect and remove any potential infections.
- Once you’ve done this, run QuickBooks and try switching it to multi-user mode to see if the error is resolved.
If you get QuickBooks Desktop error code H202 even after restarting QBCFMonitorService, consider installing the recent Windows Firewall updates as described below.
9. Install the Most Recent Updates of Windows Firewall
Updating the Windows firewall will ensure it does not accidentally restrict QuickBooks from hosting the company file. Here’s how you can do so:
Case I: For Windows 10
- Press the Windows Start button and select Settings to proceed further.
- Go to the Updates and Security section and click Windows Update.
Case II: For Windows 11
- Go to the Start menu, select the Settings option, and choose Windows Update.
Once the updates are installed, restart Windows to apply the updates, and check if you can now switch QuickBooks to multi-user mode. If you still see QuickBooks error H202, try allocating fresh names to configuration files, as discussed below.
10. Rename the Configuration Files in QB Installation Folder
Renaming the configuration files will prompt QuickBooks to create a new copy of them. Thus, if the error code H202 is caused by corruption in these files, renaming will help fix it. Here’s what you should do:
- Press Windows + E to open the Windows File Manager and move to the company file folder.
- Now look for the files with the same name as your company file but with .ND and .TLG extensions.
- Once located, right-click each of these files and select the Rename option.
- While renaming, add .OLD at the end of the file names and save the changes.
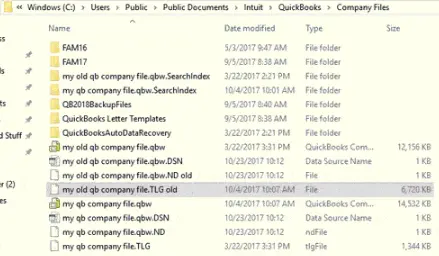
- Now, go to any workstation and immediately use the multi-user mode to open the company file.
If you aren’t successful in fixing QuickBooks error H202 even now, try adding the server’s IP address to the host file as outlined below.
11. Edit the Host File and Add the Server to it
Adding the server’s IP address to the Windows host file will help your system easily locate the server in the network and is one of the many potential solutions to resolve error H202. Here’s what you can do:
Navigate to either of the following paths and double-click on the Host file.
- Launch the Run dialog box by hitting the Windows and R keys on the keyboard.
- Enter CMD in the search box and hit Enter to open the Command Prompt window.
- Enter the command ipconfig/all in the command prompt window, ensuring there is a space after ipconfig in the command.
- Press Enter, take note of the IP address (or IPv4) and hostname, and exit QuickBooks Desktop.
- Now, go to the server system and press Windows + E to open the File Explorer.
- Navigate to either of the following paths and double-click on the Host file.
- C:\Windows\Syswow64\Drivers\Etc
- C:\Windows\System32\Drivers\Etc
- Select Notepad and first enter the IP address and then the computer name. After that, you can save the recent changes in the host file.
- Finally, you will be able to promptly access all company files present on the server from various workstations.
Section B: Resolve Error H202 on Windows Server 2012 Essentials R2
You can implement the following steps to resolve error H202 in QB Desktop on Windows Server 2012 Essentials R2:
1. Install QB Database Server Manager on Your Computer
Installing QB Database Server Manager (QBDBSM) on the server system will ensure stability on your multi-user network. Here’s how to do so:
- Firstly, you need to download the relevant QuickBooks Desktop file from the official website using your browser.
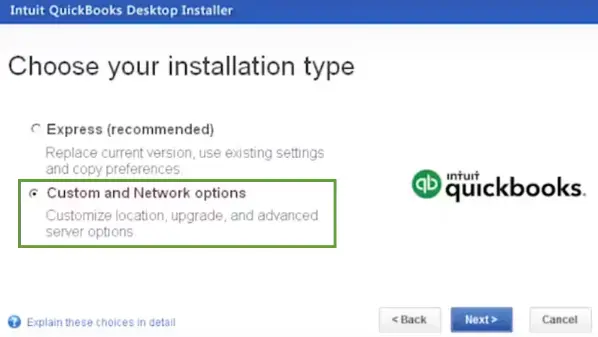
- Access the recently downloaded file (Setup_QuickBooks.exe) on your server. After that, follow all the steps that appear on the screen.
- At this point, select Custom or Network Options as Install Type and click Next.
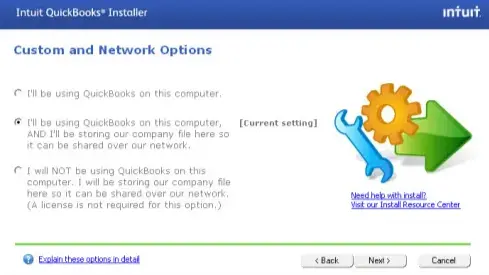
- If you wish to install QB Desktop and QBDBSM on the server, you can choose the ‘I’ll be using QuickBooks Desktop on this computer, AND I’ll be storing our company file here so it can be shared over the network’ option. On the other hand, if you want to only install QBDBSM on the server, you have to select the ‘I will NOT be using QuickBooks Desktop on this computer’ option.
- Follow all the remaining steps that show up on the screen. Tap Install and finish the installation procedure.
2. Relaunch Your Base Filtering Engine Service
You will restart the Base Filtering Engine Service to refresh the connection between the server and workstations. Here’s how you need to do so:
- Firstly, press Windows + R to obtain the Run window on your server.
- Type services.msc and click OK. After that, locate the Base Filtering Engine Service on the list available in the Services window.
- At this point, right-click the Base Filtering Engine icon, and after that, choose Stop. If you get any error message, you should dismiss it and select Stop again.
- Now, you should open QBDBSM and choose your company file folder using Browse.
- Tap Start Scan to scan the company file folder successfully. Once done, click Close and reopen the Services window.
- Locate the Base Filtering Engine icon and right-click it.
- Choose Start to relaunch the Base Filtering Engine Service on the server. You can dismiss any error message that may appear on the screen.
- Find the Windows Firewall icon on the Services window and right-click it.
- Select Properties, and after that, tap Start. The Windows Firewall will start operating on the server.
Finally, you can move to different workstations to open data files saved on the server. If you still get error H202 in QuickBooks, you should implement all the solutions described for the Windows operating system in the previous section.
Section C: Fix H202 on Citrix Server or Fedora Linux Servers
The following techniques will help you resolve QB Desktop error H202 on the Citrix server and Fedora Linux:
Case A: For Citrix Server
You might see error H202 if the Citrix server uses the client-side virtualization process to publish QB Desktop. To resolve this, you should run QB Desktop using the server-side virtualization process. There cannot be any general solutions for this problem due to the high complexity of the Citrix server. You can contact your network administrator or a trained IT professional for further assistance with Citrix server setup.
Case B: For Fedora Linux
Here are the strategies to fix error code H202 in QuickBooks for Fedora Linux:
1. Add Server’s Domain Name to Each QB Workstation Host File
- Open any workstation and click Start, and after that, choose All Programs.
- Select Accessories and tap Run. After that, type %SYSTEMROOT%\system32\drivers\etc.
- Tap OK to open the etc. folder. After that, you should double-click the icon of the Hosts file.
- Go to Programs and choose Notepad. Once you do that, tap OK to access Notepad.
- Type the IP number of the Linux server in the next line. Tap the Tab key and type the fully qualified domain name of the Linux server.
- Go to File and tap Save. After that, close the Notepad window and exit the Hosts file.
Do you still encounter QB error H202? If so, try the following troubleshooting method.
2. Modify the QBGlobalAppConfig.ini File
- Access the Linux window and open up the QBGlobalAppConfig.ini file.
- Locate the default range for different ports and make sure that there are no spaces before or after the equal (=) sign. For example: QuickBooks Desktop Enterprise 20.0 55388=5 5388=5
- You need to save the QBGlobalAppConfig.ini file, and after that, relaunch the QBDBFILEMON & QBDBMGRN services.
If you continue to face QuickBooks error H202, you should use all the resolutions discussed for the Windows operating system in the preceding section.
Section D: Troubleshoot QuickBooks Error Code H202 on Mac OS
You should use the methods discussed below to fix error code H202 if you operate QuickBooks Desktop on Mac:
1. Allow QuickBooks Via MacOS Firewall
- Access the Apple menu to choose System Settings.
- Move to Security & Privacy and select Firewall.
- Choose Firewall Options, and after that, make sure to use the lock icon to activate the firewall.
- Finally, choose Allow Incoming Connections for the QuickBooks server app.
If you still get error H202, consider verifying the Bonjour service as detailed below.
2. Check the Bonjour service on all systems
- Access the File menu and choose New Finder Window.
- Ensure that all the systems using QB are shown in the Shared section.
- At this point, ensure that 56565 TCP, 5297 TCP, 5298 TCP/UDP, and 5353 UDP are active.
Are you still noticing the error H202 in QB? If so, consider checking file permissions on the server as described below.
3. Check the File Sharing Permissions on the Server
- Access the Apple menu, and you need to choose System Settings.
- Go to Sharing and mark the File Sharing checkbox.
- Add the company file folder to Shared Folders. After that, tap ‘+’ in the Shared Folder tab.
- Select the company file folder and click Add.
- Go to the Users column and mark the Read and Write for Everyone checkbox.
Finally, you will be able to seamlessly access each QB company file present on the host computer using the multi-user mode feature.
Summing Up
In this comprehensive guide, we showed you reliable ways to resolve QuickBooks error H202. Hopefully, you can now work on QuickBooks in multi-user mode on all the workstations.
If, however, you continue to face this error or have a query, you can contact a QB professional for effective and real-time guidance.
Frequently Asked Questions (FAQs)
QuickBooks error H202 prevents you from utilizing the multi-user mode to access the company file saved on the server. Some common indications of this error code are constant system shutdowns, occurrence of unrecoverable error codes, abrupt network failure, and slow execution of QuickBooks.
Users have reported getting QB error code H202 on Server 2016 with QB Premier 2017 R5, QB Pro 2022, QB 2022 Pro Plus, Win 10 Pro server, Windows Server 2012 Essentials R2, QB Desktop Premier 2021, QB 2022 (Premiere/Accountant), QB Enterprise Contractor 22. If the specific conditions for hosting the company file are not met, QuickBooks cannot communicate with the company file.
If the server system’s Database Server Manager isn’t running, the company file path is broken, or the server’s hosting is off, workstations cannot connect. Testing by opening the file directly on the server helps confirm whether the server is responsible.

Gabby Taylor, combines financial expertise with literary prowess. With over a decade in finance, she crafts insightful narratives on navigating fiscal complexities
