Numerous problems arise in QuickBooks due to faulty company data. In such cases, you need to verify and rebuild data in QuickBooks Desktop. The verify tool detects the most common damages in the company file, and the rebuild tool resolves them quickly. In this blog, you will learn the steps to run these tools.
You can also use the verify and rebuild data utility in QuickBooks Desktop for Mac, in addition to Windows. Moreover, you can manually fix errors that QB for Mac finds in your company file. You will discover how to do so in this article.
Let’s explore the blog to learn how to use the verify and rebuild data feature in QuickBooks.
Quick Steps to Verify & Rebuild Data in QuickBooks Desktop
- A QuickBooks company file Desktop.
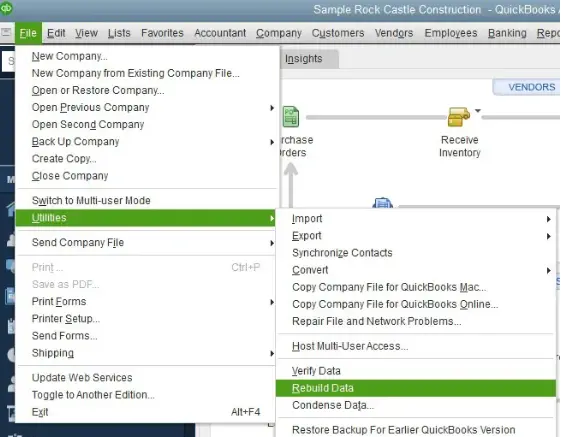
- Click on File– Utilities– Verify Data.
- In case of errors, select File– Utilities– Rebuild Data.
- Repair your data according to what is shown on the screen.
- Before shutting down the program save a backup.
Tip: Always close other programs before running rebuild to avoid errors.
When to Verify and Rebuild Your QuickBooks Company File [Step-by-Step Guide]
Here are all the common scenarios in which you need to run the verify and rebuild data utility in QuickBooks:
- Failure to access the company data.
- Occurrence of various company file error codes like QuickBooks error 12 0.
- Missing transaction data.
- Fatal errors in QuickBooks.
- Unexpected crashes of the QB application.
- Negative balance in various invoices and bill reports.
- When you find the QuickBooks payroll won’t update.
Now, jump to the following section to learn all the steps to run the verify and rebuild data tool in QuickBooks.
Section A: QuickBooks Desktop: How to Verify and Rebuild Your Company Data Quickly
Here are the steps that will help you run the verify and rebuild data in QuickBooks Desktop.
Step I: Verify the Company Data
The following points show how you can run the verify tool to find company file issues:
- Open the Window menu in QuickBooks and choose Close All.
- Select File followed by Utilities.
- Tap on Verify Data.
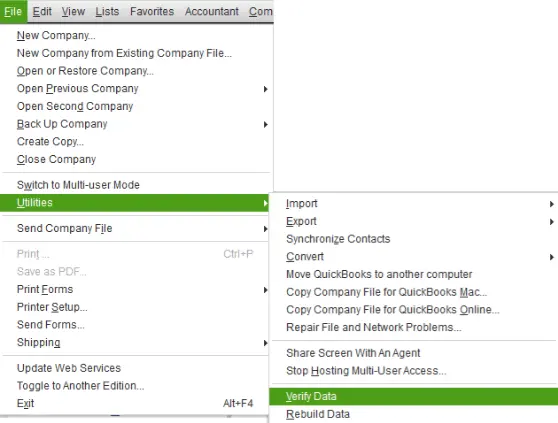
- Now, a message will appear on the screen. Explore the following points to learn what you should do according to the type of the message:
- If you see the message, “QuickBooks detected no problems with your data”, there is no issue with the company file and you don’t need to rebuild it.
- If you see an error message, search on the internet for how to fix it.
- If you see the message, “Your data has lost integrity”, you need to fix data damage in the file.
Now, proceed to the next step, which is to rebuild the company data.
Step II: Rebuild the Company File
Here are the points that illustrate how you can rebuild company files in QuickBooks:
- Open the File menu and go to Utilities.
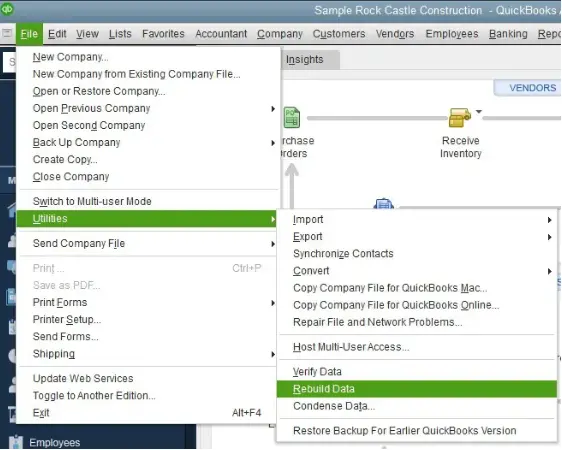
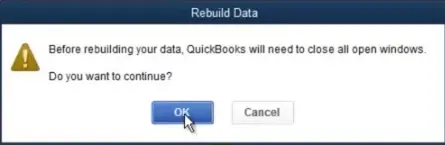
- When QuickBooks asks you to create a backup, follow the instructions to create a backup of the company file.
- Choose OK. You must create a backup before you can rebuild the company.
- Select the location and the file name with which you want to save the backup. Make sure not to rewrite an existing backup in that folder.
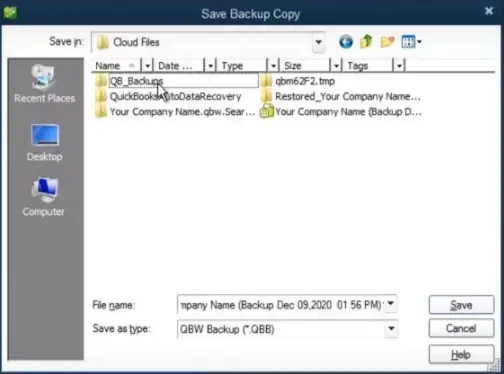
- After saving the company file backup, QuickBooks will rebuild the company file.
- You will get a message stating, “Rebuild has completed”. At that time, select OK.
Remember: QuickBooks ‘verify and rebuild company data’ can resolve corrupt data but cannot bring missing data. In that scenario, you may restore a backup or use the Auto Data Recovery tool.
Now, let’s move to the following step to search for additional faults in the company file.
Step III: Verify Company File for Additional Damage
Here’s how you can check your QB company file for additional damages:
- Select File and then go to Utilities.
- Tap on Verify Data.
- Now, follow the points stated below to discover what you need to do according to the message on your screen:
- If you see the message, “QuickBooks detected no problems with your data,” there is no issue with the company file, and you don’t need to rebuild it.
- If QuickBooks shows an error or finds damage, resolve it. You can check the qbwin.log file for more info on what went wrong and how to fix it.
Note: If you cannot find the error in the qbwin.log file, you can restore a recent backup data file. Here’s how to do so:
- Go to the File menu to choose the Open or Restore Company tab.
- Click the Restore a Backup Copy option, and after that, tap Next.
- Jump to the Local Backup option and tap Next.
- Use the Browse menu to choose your company file and select a folder.
- Tap Open and click Save to put the restored data file in the folder. If QuickBooks data restore fails, you can resolve it immediately.
Now, let’s explore the next section to learn how to verify and rebuild data in QuickBooks for Mac.
Section B: Verify and Rebuild QuickBooks Data on Mac: Easy Guide for Mac Users
Here are the steps that you should use to verify and rebuild data in QuickBooks Desktop for Mac OS:
Step I: Verify Your Company Data in QB For Mac
You need to use the verify tool to discover data damage in the company file. Here’s how to do so:
- Firstly, go to the File menu and immediately click Utilities.
- Now, choose Verify Data and tap OK. After that, allow the verify data tool to run on the system.
- At this point, you should follow these points and take the necessary action:
- If the verify tool reports no data damage, you need not repair your company data.
- If the verify tool shows the ‘Your data has failed the integrity check’ message, you need to repair your company data.
Let’s move to the following step to learn how to rebuild the company data.
Step II: Rebuild Your Company Data in QB Desktop For Mac
Here are the points that show you can rebuild your data file to resolve any errors:
- First and foremost, jump to the File menu and select Utilities.
- Click Rebuild Data, and after that, tap the OK button.
- At this point, QB Desktop will ask you to create and save a backup file. You need to tap OK and follow the points described below:
- If you have not selected any backup preferences, QB will ask you to do so. You can go to Backup Preferences and choose appropriate options.
- Once the backup file has been saved, you can move to ‘Show in Finder’ to discover the backup data file.
- The rebuilding of the company data will start after you have saved the backup file. Once the rebuild data process is finished, click OK.
- To ensure that your company file is free from damages, you can run the verify tool once again. If this tool still detects data damage, you should rebuild your company data again.
Now, let’s go to the following section to learn how you can manually resolve company file errors in QuickBooks for Mac.
Section C: How to Manually Fix Company File Errors in QB For Mac
When the verify tool finds errors in your company file, it also displays the record numbers that you can use to discover the appropriate troubleshooting steps. These record numbers are referenced in the QuickBooks.log file. Here’s how you can use the record numbers to manually fix company file issues:
- Open QB Desktop for Mac and move to the File menu.
- Choose the Backup tab and select a folder to save the backup company file.
- Tap Start Backup and wait until the backup file is saved in the selected folder.
- At this point, press the Command key and jump to the Go tab.
- Select Library, and after that, you should double-click the Logs Folder icon.
- Identify the icon of the QuickBooks.log file and double-click it.
- Locate the record numbers shown as RecNum and RefNum. If you notice an error that says “Verify Employee YTD Bal: ytd out of balance. Name = John Cohen. Ref = 52”. The record number is 52 in this case.
- Move to Edit and choose the Find tab. After that, search for @recnum and type the record number. For example: @recnum52
- QuickBooks will now show all records pertaining to that record number.
Finally, you can examine the results and modify or re-enter your company data to resolve the error.
Summing Up
In this extensive article, we have discussed all the steps to verify and rebuild data in QuickBooks Desktop. Hopefully, you can now resolve all the company file issues effortlessly. If, however, you are still encountering severe challenges or have a query, you can contact a QB professional for real-time assistance.
Frequently Asked Questions (FAQs)
A. The Verify and Rebuild utilities are built-in diagnostic tools inside QuickBooks Desktop. The Verify Data tool scans your company file for structural damage, data integrity issues, or transaction-level inconsistencies. If errors are found, the Rebuild Data tool attempts to automatically fix them.
Think of Verify as the “scanner” and Rebuild as the “repair technician.” Together, they help maintain the health of your QuickBooks company file without requiring advanced technical skills.
A. Yes, when performed correctly. QuickBooks always asks you to create a backup before rebuilding. This ensures that if something unexpected occurs, you can restore your file. The tool is designed by Intuit specifically to repair minor company file corruption safely.
A. Rebuilding modifies the internal structure of your company file. A backup ensures you can revert if necessary. Skipping backup is not recommended because rebuilding permanently adjusts data relationships.
A. No. You must switch to Single-user Mode before running these utilities. This prevents interference from other users accessing the file during repair.
A. Intuit is slowly dropping the use of QuickBooks desktop in favor of its cloud solutions such as QuickBooks Online. Cloud solutions will provide real-time updates, allow them to access remotely, auto-backups, and better security which the Desktop versions cannot afford to offer fully. To continue with the transitioning process, businesses that migrate their data to the QuickBooks Online should switch it out of QuickBooks Desktop to preserve continuity or employ conversion tools to convert data.
A. QuickBooks Rebuild Data is an inbuilt utility of QuickBooks Desktop available in both Mac and windows that scans and repairs damaged or corrupt company files. The errors that can be remedied by rebuilding your data include:
1. Transactions not matching
2. Missing balances
3. Crash recovery corruption of files.
It also keeps your financial records under control and without any errors, so that there is no problem with payroll, reporting, or banking work.
A. In order to reconstruct a QuickBooks Desktop (QBD) file, you must do the following:
1. Open QuickBooks Desktop.
2. Click on File – Utilities – Rebuild Data.
3. Click OK to create a backup.
4. Allow QuickBooks to scan and repair the company file.
5. After that, look over the Rebuild Summary Report to ensure that no more mistakes have been made.
Tips: We would be happy to help you with your computer issues. Our services are free and fast.
A. In QuickBooks desktop, the Product Information Window is accessed by pressing F2. This window displays:
1. QuickBooks release and version.
2. License details
3. File location
4. Current company file info
It is a fast method of verifying file details and troubleshooting errors, particularly when the user is reporting to the QuickBooks support.

Gabby Taylor, combines financial expertise with literary prowess. With over a decade in finance, she crafts insightful narratives on navigating fiscal complexities
