In this fast-paced world of business and accounting, time is the most important thing; those who value it and use it carefully usually succeed. Most business owners get stuck and fall behind, like creating invoices, saving them as PDFs, opening a separate Gmail tab, selecting the file, and finally sending. This can be such a hectic & time-consuming process. You put most of your energy into these small tasks, which eventually lowers your productivity for the day.
If you are also a QB user, then the only solution you need is to learn how to set up email in QuickBooks. This is the only guide you need to learn this step by step.
How to Set Up Email in QuickBooks Desktop in Simple Steps?
Alright, let’s start with this first. If you are using the software on your desktop, then you already have the better tools. But it still requires a bit of manual effort to get started. Before we dive into any steps, yo u should have a basic understanding of some terms. See in QB, you can set up your email in two ways. And understanding both ways will help you in avoiding any confusion later. There are mainly two terms: Outlook Mail and Webmail.
Basically, the main difference between both term is simple. Outlook is a desktop application installed on your system that stores emails on your local hard drive. And Webmail is an online service that you open in your browser. And before you start, just ensure you have Outlook 2010 or any latest version. Also, you have an Outlook email profile. Now, let’s see how you can set up mail easily by both methods.
Method 1: How to set up Outlook email in QuickBooks Desktop?
This method is a smooth, easy way to go. If you already have a Microsoft application on your computer or laptop, it’ll be quick for you.
Step 1: Contact your internet or email provider to get this information:
- First, Username
- Second, Password
- Incoming email server address
- Incoming email server type
- Outgoing email server address
Step 2: Setting up Outlook:
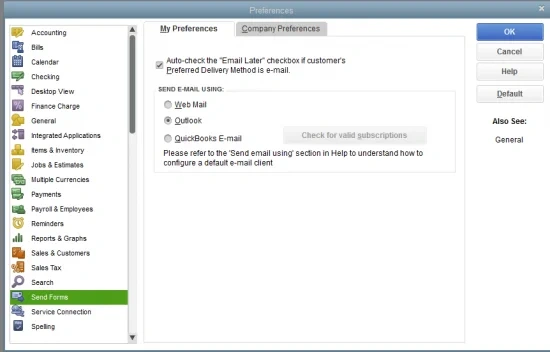
- First, go to the QuickBooks Edit menu.
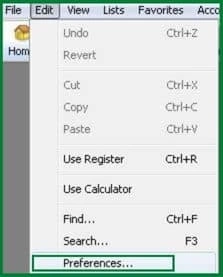
- Then choose Preferences and Send Forms.
- Lastly, select Outlook and OK.
This is how you can set up email in your QB software using Outlook.
Note: QuickBooks Outlook is not responding because QuickBooks settings in Outlook are damaged, problems with Outlook settings or QuickBooks application files are outdated.
Method 2: How to set up Webmail in QuickBooks in Simple Steps
Before we know the exact steps to follow, there are some points that you should know:
- First, verify your webmail server and port settings with your ISP.
- Second, webmail providers require users to enable two-step verification in their account settings.
- And last, QuickBooks can auto-fill info for some of the most common providers.
Just keep these things in your mind before you start setting up email using this method.
Setting up webmail step-by-step:
Now, let’s see how you can set up webmail easily.
- Firstly, go to the QuickBooks Edit menu and select Preferences.
- Then, select Send Forms.
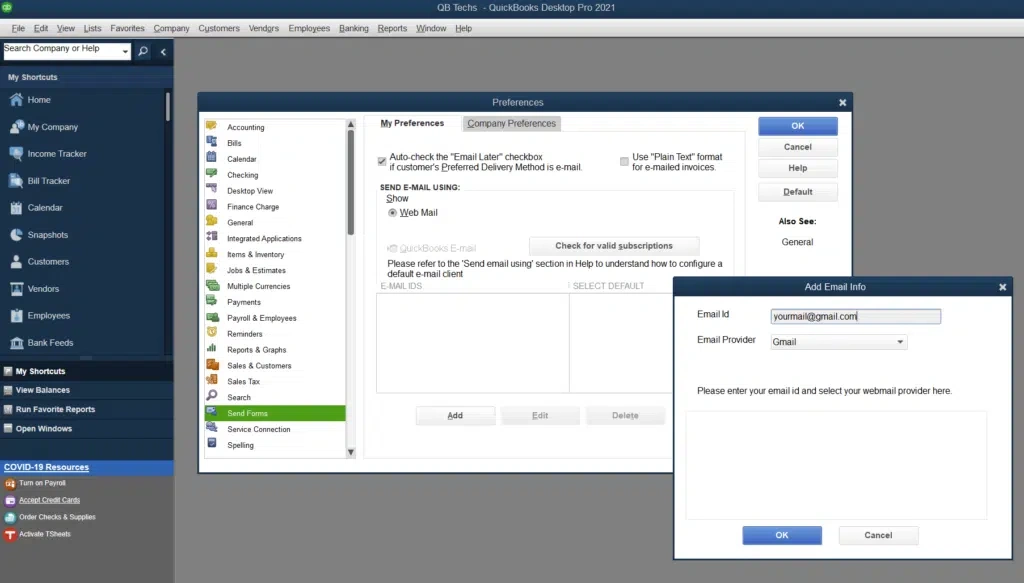
- Then you have to select Web Mail and Add.
- Fill out the Add Email Info and click OK.
- Select OK to save your changes.
- Your webmail provider’s login page will appear on your computer or laptop screen. Then sign in and select to grant Intuit access.
Make sure you read these steps first before doing anything. These will guide you in setting up webmail correctly.
How to Set Up Email in QuickBooks Online : Easy Steps to Follow
You should also learn the steps for doing it online. Unlike the desktop version, here you no longer need an extra application or worry about confusing server ports. Because you already have a live system on the internet. Here, your task is to grant QuickBooks permission to send professional and official messages from its own servers and ensure they appear to come from your business address. This whole process ensures that your invoices look trustworthy and professional, and do not end up in spam filters.
Let’s learn the steps of how to Set Up Email in QuickBooks with the online method:
- First, click the Settings icon at the top and select Account and Settings.
- Select the Company & click the Pencil icon in the Contact info section.
- Then enter your email address carefully in the Company email field, and tick the Same as company email option.
- Click Save, then Done.
How to Set Up Email Invoices in QuickBooks Desktop: Easy Guide
We have discussed the steps of both methods: Webmail and Outlook, and setting up your email using the online method. Now let’s see how to Set Up Email invoice in QuickBooks so that you don’t have to search anywhere else.
Step 1: First, arrange your Email Settings
- Firstly, just go to the Edit menu, then select Preferences.
- Go to the Send Forms Tab in the left panel, then go to the Company Preferences tab.
- Pick Webmail or Outlook, then click Add.
- If you are choosing Webmail, for example, Gmail
- Enter your email address and select the provider.
- Second, ensure that Use Enhanced Security is checked, then click OK to log in through your provider’s portal.
- Note: For Gmail, you may need an “app password” if standard login fails.
- If you have picked Outlook, then make sure it is installed and running on your computer, and select it as the default.
Step 2: Setting up your Customer Emails
- Navigate to the Customers menu and choose Customer Center.
- Select the customer, then click Edit (the pencil icon).
- The next step is to enter the customer’s email address in the email field on the Address info tab.
- Lastly, click Ok and you are good to go.
Step 3: Send an invoice through Email
- The first step is to open the invoice you want to send.
- Second, at the top of the invoice form, you have to click the email button, then comes the next step:
- Select the invoice from the dropdown menu.
- Before sending, make sure the email is perfect. Review the email message and then click Send.
Note: Outlook crashing when sending invoice emails can interrupt workflow, delay payments, and affect smooth communication with clients and customers.
Things to Remember Before Setting Up Your Email
Basically, setting up email in the QB desktop app lets you do many things, like send invoices and reports, etc. The process of setting up mail involves many steps, such as linking your QB to an email provider like Gmail, Outlook, or Yahoo.
Now, there are a few things you should keep in mind to make things easy for you. You can call these some extra tips to help you avoid technical glitches and save your time, too. So let’s get started:
- If you are using a custom mail provider, you will also need an outgoing server address (SMTP) and a port number. If you want an example of how it should look like this, smtp.gmail.com
- If your email provider, for example, Gmail, requires two-step verification. Then you may need to create an “app password” instead of a regular password to use in QB.
- If you have picked Outlook, ensure two things: first, it’s installed properly, and second, it is set as the default email program.
- This point is important: if you are using QB as an administrator, you have to run Outlook as an Administrator too. You have to use both in the same way, with or without an administrator.
- If you want to send invoices to two people at a time, let me make this task easier for you. You just have to put a semicolon (;) between their emails.
So these are some points you should remember, and you are all set.
A Quick View Table – How to Set Up Email In QuickBooks
| How to set up email in QB Desktop | To set up email in QB, there are two methods: Webmail & Outlook. |
| How to set up email in QB Online | The steps are: go to settings, then Account and Settings, then Company, then the pencil icon. The next step is to enter your email address in the company mail, then tick the same as company email option. Save it and Done. |
| What are the Points to Remember Before Setting Up Email? | Firstly, you need SMTP and the port no. If running a custom mail provider.Second, use Outlook and QB as an administrator. Third, use a semicolon between email addresses to send invoices to two or more people at once. |
Conclusion:
In this blog, we learned different ways and steps of how to Set Up Email in QuickBooks. We also discussed some confusing terms and easy ways to set up your email using both methods: Outlook & Webmail. And setting up your email in QB is one of the best things you can do to make your work and business more efficient and easier to manage. So now you are all ready to set up mail. In case you face difficulties in Set Up Email in QuickBooks or you need a professional help, you can reach our support team at +1(800) 780-3064 to get the support without any hassle.
Frequently Asked Questions
How to Set Up Email In QuickBooks Quickly?
You can set up email in QuickBooks in two ways: Online and Desktop. There are separate steps for both of the methods. For desktop, there are two ways: Webmail and Outlook. You can pick either one of them.
What are the Methods to Set Up Email in QuickBooks Desktop?
There are two methods to set up Email in QuickBooks Desktop: Webmail and Outlook. To Learn How to Set Up Email in QuickBooks, here are some ways. For Outlook, follow these steps: go to the Edit menu, choose Preferences, and Send Forms. Choose Outlook and Ok. For Webmail, go to the QB Edit menu and select Preferences. Then select Send Forms. Then select Webmail and Add, Lastly fill in your email info and click Ok to save your changes.
What are the steps to follow to Set Up Email Invoices in QuickBooks Desktop?
As we discussed in the blog, you explored how to set up an email invoice in QuickBooks. First, arrange your email settings, then arrange customer emails, then pick the invoice you want to send, and send it exactly as we learned.
How to Set up Email in QuickBooks Online in simple steps?
First, go to the Settings icon & click Account and Settings. Choose the Company, then click the Pencil icon. Then fill your email address in the Company email field, and
tick the Same as company email option. Click Save, then Done.

Jason Grace is a trained QuickBooks professional with over 10 years of experience in the accounting sector. He is dedicated to helping businesses reduce the stress of managing finances and supports entrepreneurs and small business owners in optimizing their QuickBooks experience.
