QuickBooks reconciliation discrepancy means the QuickBooks transactions and the bank statement don’t match.
When you reconcile, you tally your QuickBooks transactions with your bank statements. The difference between the ending balances at the end of reconciliation should be zero. However, if the ending balances of QuickBooks and bank statements do not match, you will need to check your books and fix this discrepancy.
You can find a reconciliation discrepancy in QuickBooks due to the following reasons:
- You edited or deleted transactions after they had been reconciled.
- Transactions that you have entered into QuickBooks haven’t been cleared by your bank yet.
- You made an adjustment to the last reconciliation by making a journal entry.
- You might have entered an incorrect ending balance at the start of the reconciliation.
- Some transactions are missing from QuickBooks, or there are duplicate transactions.
In this blog, we will go through detailed steps on how you can fix reconciliation discrepancies in QuickBooks.
How to Resolve QuickBooks Reconciliation Discrepancy Easily
To find and resolve the reconciliation discrepancies, let us check and review all the aspects, such as missing or deleted transactions, reconciliation adjustments, opening and beginning balances, and more.
1. Review the Opening and Beginning Balances
The first thing you should do when you start reviewing the reconciliation is to check your opening and beginning balances.
The opening balance is the amount you had in your bank account when your financial period began. In other words, it is the first entry of the financial period. On the other hand, the beginning balance is the bank balance when you connect your bank account to QuickBooks.
If either the beginning balance or opening balance is incorrect, there will be an issue with the reconciliation.
First, check the opening balance of the financial period in which you find a QuickBooks reconciliation discrepancy. Here’s how you can do so:
- Open QuickBooks and go to Settings.
- Choose the Chart of Accounts option, and after that, locate the relevant account.
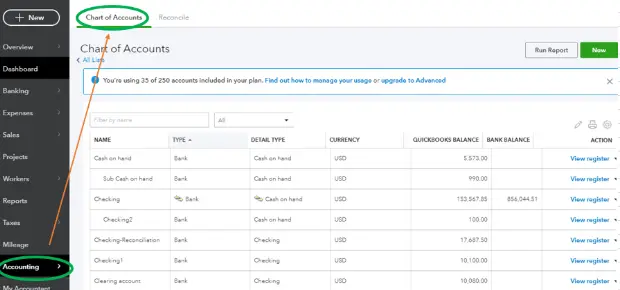
- Tap View Register and select the opening balance entry.
- At this point, click Edit and make the necessary changes.
- Review the opening balance and tap Save.
If the opening balance matches your bank statement, you can proceed to step 2. However, if the opening balance is wrong, go back to the last financial period and check the opening balances for it. Find the point where the bank statement and the opening balance match. Then, start reviewing your reconciliation.
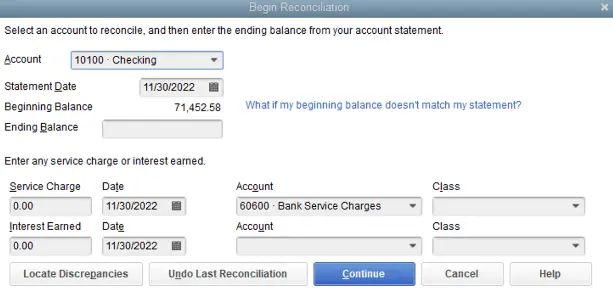
2. Check the Ending Balance Entered to Fix the QuickBooks Reconciliation Discrepancy
You enter an ending balance when you begin reconciling, which QuickBooks uses to check if everything is correct with the books. Let us check if the ending balance you entered was correct.
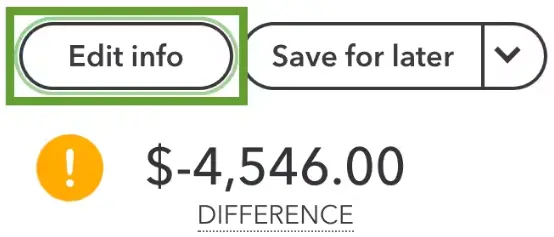
- Go to the Reconciliation window. Choose Edit info.
- Check the Ending date and Ending balance.
- Review the bank statement, and if any changes are required, make them.
- Finally, choose Save.
However, if the QuickBooks reconciliation discrepancy persists even after doing so, proceed to the next step.
3. Find Changed, Deleted, or Added Transactions
If an entry is mistakenly changed, deleted, added, or duplicated, it can lead to issues with reconciliation. Plenty of reports in QuickBooks allow you to find the transactions that were changed or deleted. Here are the reports that you need to run:
a. Run the Reconciliation Discrepancy report
The Reconciliation Discrepancy report allows you to find the transactions that have been changed since you last reconciled. Here’s how to run this report:
- Open QuickBooks and click on the Reports menu.
- Now, hover the cursor over Banking. Choose Reconciliation Discrepancy.
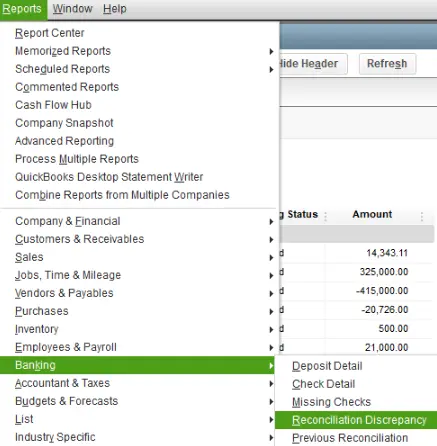
- Pick the account you want to reconcile for and choose OK.
- Check and review the report to find any discrepancies.
Find out who made the changes and determine if the reason for the changes was valid. If necessary, you can edit or delete the transactions.
b. Missing Checks Report
A missing check can cause a discrepancy between QuickBooks’ ending balance and the bank statement. To find the missing checks, you can run the Missing Checks report. Here’s how to do so:
- Go to Reports and tap on Banking.
- Choose Missing Checks.
- Pick the account you are reconciling for and select OK.
Review the reports and look for any transactions that aren’t on the bank statement. These transactions shouldn’t be on your reconciliation list.
c. Run the Transaction Detail Report
You can run the Transaction Detail report to find any changes in the transactions. Here’s how you need to run this report:
- Open the Reports menu and hover the cursor over Custom Reports.
- Choose Transaction Detail followed by the Display tab.
- Go to the Date From field and pick the earliest date in QuickBooks for the account. Alternatively, you can leave it blank.
- Now, in the Date to field, choose the date of your last reconciliation.
- Tap on the Filters tab.
- Go to the Account field and choose the account you want to reconcile for.
- Navigate to the Entered/Last Modified field. Here, set the last date when you had reconciliation as the Date from and today in the Date to field.
- Tap on OK to run the report.
- Find the transactions or discrepancies that do not match your bank statement.
Find who made the changes and get to know if the reason the changes were made was valid. If required, you can edit or delete the transactions.
4. Look for Reconciliation Adjustments
Sometimes, at the end of the financial period, while reconciling the books, things don’t align. You or your accountant might have made an adjustment to force close the reconciliation. These adjustments shouldn’t be made until you are sure they won’t impact the books or reports.
Let us find the reconciliation adjustments and check if any of them were made inaccurately.
- Open the lists menu and choose the Charts of Accounts.
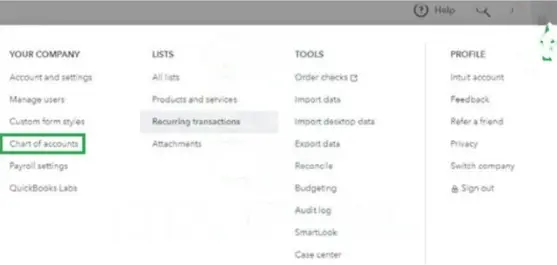
- Now, tap on the Reconciliation Discrepancies account.
- Go to the Dates field and select the dates that expand some last reconciliations you had.
Now, review all the reconciliation adjustments and check which ones were inaccurate. Edit or delete any adjustments as required. However, before you do so, consult an accountant.
5. Review Combined Transactions
Often, you’d find that in your bank statement, there would be several payments combined in one. If that is the case, you should do the same in QuickBooks.
If you find the payments are not combined in QuickBooks, transfer them into the Undeposited Funds account. Now, make a bank deposit to combine these payments into a single entry. Here’s how you can do so:
Step I: Move Payments into the Undeposited Funds Account
- On the QuickBooks window, click +New and choose Sales Receipt.
- Go to the Customer tab and select your customer.
- Move to the ‘Deposit to’ tab, and after that, you need to choose Undeposited Funds.
- At this point, fill out the sales receipt and tap Save and Close.
Step II: Combine Payments into a Single Entry Through a Bank Deposit
- Tap +New in the QuickBooks window, and after that, click Bank Deposit.
- Go to the Account dropdown and select the relevant bank account.
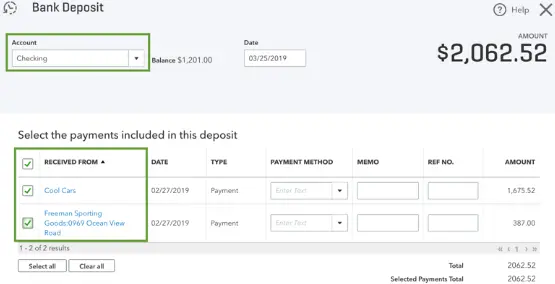
- Mark the checkbox for all the transactions that you want to combine.
- Verify the total of all the chosen transactions and tap Save and Close.
After doing so, review your reconciliation report. If you still find a QuickBooks reconciliation discrepancy, move to the next step.
6. Narrow Down the Transactions
To find the transactions causing it, you can find the ones that you know are surely correct and remove them from the list.
Or you can print out the bank statement and then mark the ones that you know are correct. This will leave you with a short list of the transactions you will need to check for issues.
Once you review them, move to the next step.
7. Add Transactions Not in QuickBooks
We need to make sure that all the transactions are entered into QuickBooks. If you have connected the accounts to online banking, you must review and categorize all the downloaded transactions before you can reconcile them.
Now, go to the reconciliation window and review these transactions. If you find a bank transaction that is in the statement but not recorded in QuickBooks, here’s what to do:
- Click on Bookkeeping and choose Transactions.
- Tap on All Sales or Expenses.
- Find the transactions that aren’t in bank statements but not in QuickBooks.
- When you find them, click on them to open it.
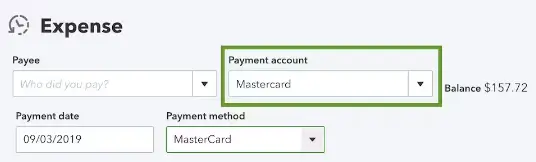
- Now, review the Deposit to or Payment account. Check and ensure the transactions are in the correct account. If required, you can select a different account for the transactions. Furthermore, if you find QuickBooks reports not showing a memo or description, you can fix it easily.
After you have double-checked everything, you will know what transactions to enter. Enter these transactions on bank statements but not in QuickBooks.
8. Remove Transactions Not in Bank Statement
Now, we will find the transactions that are in QuickBooks but not in the bank statement. These are redundant transactions that should not be in QuickBooks.
When you find such transactions, here’s what you should do:
- View the transaction date and check your bank statements for the same timeline.
- Note the date and amount of the transaction.
- Now, run a past reconciliation report for these dates.
Depending on whether you have found the transaction in the past reconciliation report or not, you can follow these steps:
a. If You Don’t Find the Transaction on the Past Reconciliation Report
In a transaction that is on a previous bank statement but not on the past reconciliation report for the same dates, here’s what you should do:
- Open Bookkeeping and choose the Chart of Accounts.
- Select the account you want to reconcile. Choose View register.
- Now, locate and select the transaction to open it.
- If the checkbox is blank or has a C, you need to ensure the transaction is accurate.

- Now, mark the checkbox until you see an R. However, if there is already an R in the checkbox, leave it as is.
- Finally, choose Save.
b. If You Have Found the Transaction in the Past Reconciliation Report
Now, we will check and find the duplicate transactions.
- Open Bookkeeping and choose Transactions.
- Now, tap on All Sales or Expenses.
- You can sort the lists as you want, such as by customer, date, vendor, or amount.
- If you find entries that you are sure are duplicates, you can go ahead and delete them. (In case of duplicate entries, keep one and delete the other so that the same entry only shows once.)
| Note: If you have any doubts or aren’t sure that the transaction you are deleting isn’t a duplicate, do not delete it. |
- Open Bookkeeping and choose the Chart of Accounts.
- Select the account you want to reconcile for and choose View Register.
- Locate the transaction and select it to expand it.
- Choose Delete followed by Yes to confirm.
After you have got rid of all the duplicate transactions, move on to the next step.
9. Review Transactions that are Slightly Off
Is there a transaction in QuickBooks that matches your bank statement but is slightly off? It means it doesn’t match exactly. Talk to your accountant and review these transactions.
Note: Do not edit transactions, like invoices, for which customers have already paid.
10. Check for Bank and Transaction Fees
Your bank’s ending balance and the one on your QuickBooks might not match for one reason. Your bank charges transactions and other fees, which might not be entered in QuickBooks.
If you find some transaction fees or charges that are not entered in QuickBooks, enter them. Here’s how you need to do so:
- Choose + New.
- Tap on Bank deposit.
- Now, add a bank or processing fee to the account you are reconciling.
- Go to the Memo section and choose a note about which transaction it’s linked to.
Finally, check for the mistakes in your bank or credit card account. Sometimes, there could be a mistake from the financial institution’s side, although it is rare.
Winding Up
In this detailed guide, we have explored proven steps to resolve the QuickBooks reconciliation discrepancy. Hopefully, you can now ensure accurate reconciliation for all your financial records.
If, however, you continue to face issues during reconciliation or have a query, you can connect with a QB professional for real-time assistance.
Frequently Asked Questions (FAQs)
How do I fix the QuickBooks reconciliation discrepancy?
a. Now, check the reports for edited, deleted, or missing transactions
b. Moreover, check the opening and beginning balances
c. Find the reconciliation adjustments and check if they are correct
What is the discrepancy in reconciliation?
Why does QuickBooks fail to connect to the bank account?
a). Outdated financial institution directory
b). Incompatible web browser application
c). Slow Internet service connection
d). Unchecked notifications from the official bank

Gabby Taylor, combines financial expertise with literary prowess. With over a decade in finance, she crafts insightful narratives on navigating fiscal complexities
