When you delete multiple transactions in QuickBooks Desktop, you save considerable time and effort. Consequently, you can put more focus on your business operations. In this guide, we will explore the step-by-step process to erase multiple transactions in QB Desktop.
To effortlessly delete multiple transactions in QuickBooks Desktop, you can utilize the Batch Delete/Void Transactions Utility (BDT). This powerful feature is now available in several QuickBooks versions. Moreover, you can print a copy of all the deleted transactions through this utility.
Let’s go deep into the article to learn how to run BDT to remove multiple transactions in QuickBooks Desktop.
Which QuickBooks Versions Have Batch Delete/ Void Transactions Utility?
The Batch Delete/ Void Transactions Utility (BDT) is available in the following QuickBooks versions:
- QuickBooks Desktop Accountant 2018 and later editions
- QuickBooks Enterprise
- QuickBooks Enterprise Accountant 18.0 and later editions
To ensure that you can run BDT smoothly, you should update QuickBooks Desktop. Once you have done that, proceed to the next section to learn some of the most crucial details about BDT.
Things to Know Before You Remove Multiple Transactions in QB
Here are the points that describe essential details that you need to know before running BDT in QuickBooks:
1. To use BDT, you must run QuickBooks using the admin or external accountant user account
2. This tool does not function for multi-currency transactions.
3. When using BDT, you can avail of either of these options:
- Delete: You should use this option if you want to permanently remove the transaction. This option can be used for duplicate entries that haven’t affected other accounts. However, you should be cautious while using this option because the deleted transactions cannot be recovered.
- Void: You can use this option to keep a record of the original transaction while indicating that it is no longer correct. This option is useful for those transactions that have already affected other accounts.
4. You won’t be able to delete or void the following transactions through BDT:
- Payroll payments
- Sales tax payments
- Invoices that contain reimbursed expenses, mileage, items, etc.
- Online bill payments
- Payroll liability cheques
- Invoices with bailable time and costs
- Transactions in a closed period
- Credit card entries
Note: You can remove all these transactions through the manual process described in a later section of this blog.
Now that you know the crucial details regarding BDT, let’s go to the following section to learn how to run it.
Steps to Delete Multiple Transactions in QuickBooks Desktop
Here are the steps that you must follow to successfully erase multiple transactions in QB Desktop:
Step I: Save a Backup Copy of Your Company Data
Before using BDT to delete multiple transactions in QuickBooks Desktop, you must save a backup company file on your system. This will provide additional security to your transaction data. Here’s what you need to do:
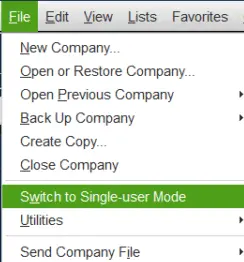
- Open QB Desktop and jump to the File menu to choose the Switch to Single-User Mode option.
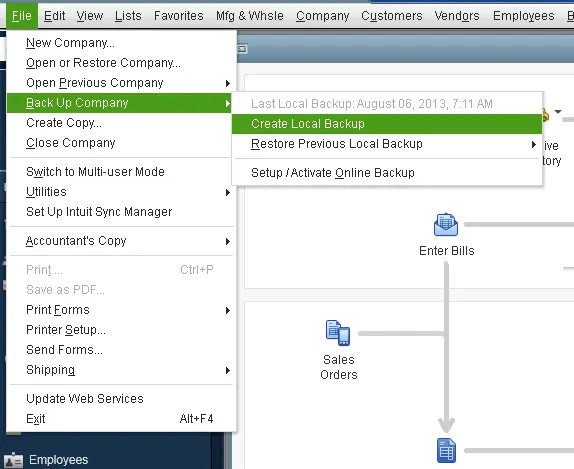
- Move back to the File menu and select the Back Up Company tab. After that, you need to tap the Create Local Backup option.
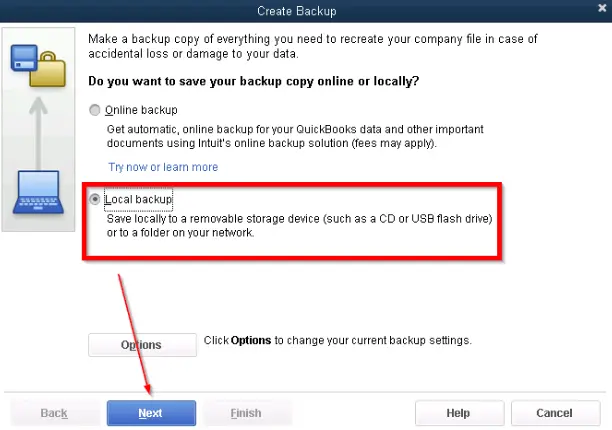
- At this point, choose the Local Backup tab, and after that, tap Next.
- Go to the Local Backup Only section, and after that, use the Browse option to select a folder.
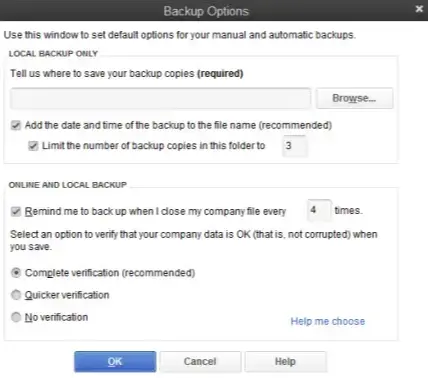
- When you have checked everything, click OK to save the backup company file in the selected folder.
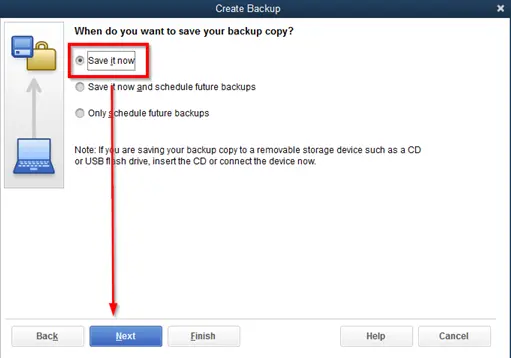
- Finally, you must click the Save it Now option and tap Next to finish the process.
Note: If you face errors when backing up company data, you can resolve them easily.
Now that you have saved the backup company file let’s proceed to the next step, which is to learn how to delete multiple transactions in QuickBooks Desktop via BDT.
Step II: Delete Multiple Transactions in QuickBooks Desktop Via BDT
Here are the steps to remove multiple transactions in QB Desktop using BDT:
- Open QB Desktop and choose File, after which you must tap Switch to Single-User Mode. If you find the Switch to Multi-User Mode option, you must not choose it.
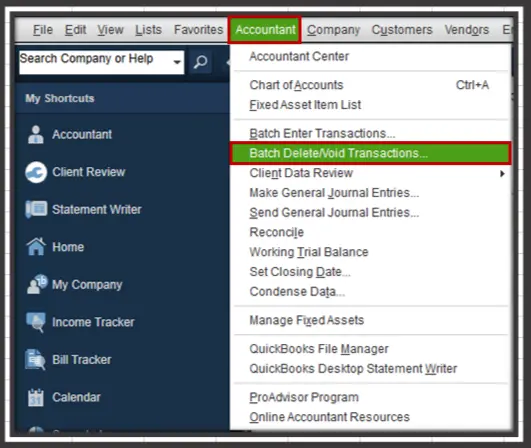
- After that, access the Accountant menu and choose the Batch Delete/Void Transactions option.
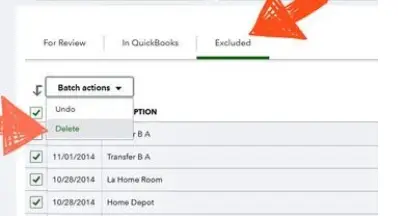
- Now, you can choose the transactions that you need to delete or void from the available list.
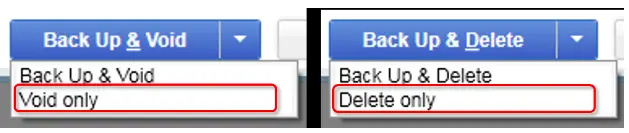
- Next, click the Back Up & Delete option or the Back Up & Void option. Alternatively, you can tap the Delete Only or Void Only options.
- Tap the Yes button for confirmation, and all the selected transactions will be erased successfully.
- Finally, you can also click the View Deleted/Voided Transaction Report option to print a copy of all the deleted or voided transactions.
Let’s now learn about some extra options in BDT that can be quite helpful to you when erasing multiple transactions in QuickBooks.
Additional Options That You Can Use When Running BDT
The following points mention additional options that can help you when removing multiple transactions in QB Desktop using BDT:
- You can sort the transaction list alphabetically, by date, or by numbers using different headers shown on the window.
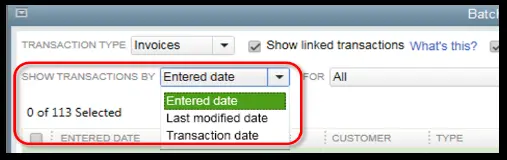
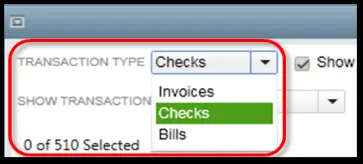
- It is possible to choose the transaction type that you want to delete or void using BDT.
- You can also view linked or voided transactions in BDT.


As stated earlier, you cannot delete or void some specific transactions in QB Desktop using BDT. However, you can erase those transactions individually, as described in the following section.
Learn How You Can Delete Transactions Individually in QB
Here’s how you can erase transactions individually in QuickBooks Desktop:
- Find the appropriate transaction in the required register (e.g., credit card, bill payments, etc.).
- After that, right-click the transaction icon and choose Edit.
- Tap the Delete option and click the Yes button to confirm the deletion of the selected transaction.
Sometimes, you might need to erase multiple transactions from your bank feed in QuickBooks. To learn how to do so, you can navigate to the following section.
How to Erase Multiple Transactions From QB Bank Feed
You can remove multiple transactions from the QB Desktop bank feed to ensure that they don’t appear when you download a statement. Here are the steps that you need to follow:
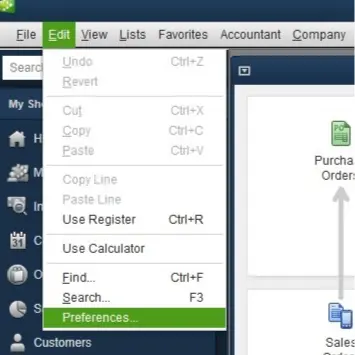
- Open QB Desktop and go to the Edit menu to choose Preferences.
- Next, click the Checking tab to tap the Company Preferences option.
- After that, choose the Classic Mode option shown in the Bank Feeds section.
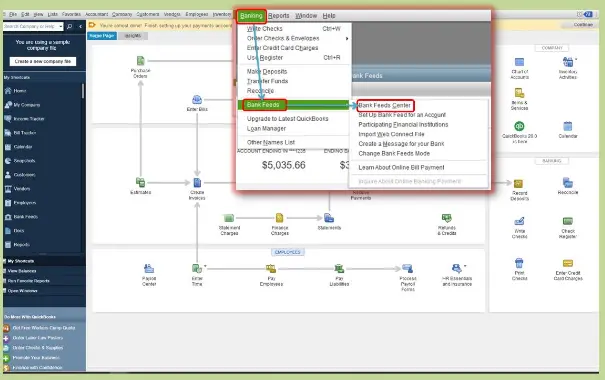
- Tap OK and access the Banking menu.
- Now, tap the Bank Feeds icon and click the Bank Feeds Center option.
- After that, choose the statement available in the Items Received From Financial Institution section.
- Next, tap View and match the relevant transactions.
- At this point, tap the Done button and click the Yes option in the Not Finished Matching window.
- Now, go to the Items Received From Financial Institution section to choose the same statement.
- Finally, you can remove the selected transaction by clicking the Delete button.
You can now download and print your bank statement without worrying about the appearance of multiple transactions.
Wrapping Up
In this extensive blog, we showed you how you can effortlessly delete multiple transactions in QuickBooks Desktop. Hopefully, you can now seamlessly erase multiple transactions in your QuickBooks application.
If, however, you cannot remove certain transactions or have a query, you can immediately connect to an experienced QB professional.
Frequently Asked Questions (FAQs)
A. Yes, you may bulk delete transactions in QuickBooks Desktop with the Batch Delete/Void Transactions tool that is found in Accountant and Enterprise editions. It enables you to pick many entries at once and delete them to save time.
A. Click the Accountant menu, and then select Batch Delete/Void Transactions, then select the items you wish to delete, look through the list, and delete. This will allow you to un-do a few transactions at a time.
A. Deleting multiple transactions in QuickBooks Desktop refers to removing several entries—such as invoices, bills, checks, or journal entries—in bulk instead of deleting them one at a time. This feature helps accountants and business owners clean up incorrect, duplicate, or test data quickly. It’s commonly used during file cleanup, company file reorganizing, or after importing inaccurate data. QuickBooks Desktop Accountant, Enterprise, and certain editions provide tools like “Batch Delete/Void Transactions” that make this process faster and more efficient.
A. The batch delete feature is not available in every QuickBooks edition. It is fully supported in QuickBooks Desktop Accountant, QuickBooks Enterprise, and QuickBooks Desktop Pro/Premier with an Accountant Copy. Regular Pro and Premier versions may not show the option unless accessed through the Accountant Tools menu. If your version does not support it, you must either upgrade or manually delete transactions one by one.
A. Voiding preserves the transaction in your records but sets the amounts to zero. This maintains historical data for audits and reconciliations, making it safer than deletion in many cases. Deleting should be reserved for errors, duplicates, or test entries.

Gabby Taylor, combines financial expertise with literary prowess. With over a decade in finance, she crafts insightful narratives on navigating fiscal complexities
