Bank connection errors are common in QuickBooks and strike with different error codes and messages. One of these errors is the QuickBooks American Express not syncing error that prevents you from downloading your transactions. Here are the common error messages that you might see on the screen:
| “Error message: Have the authorized account holder provide authorization.” |
| “Error message: Something unexpected happened, and we couldn’t connect to your bank.” |
| “The American Express site is down for maintenance. Try connecting again in a few hours. (105)” |
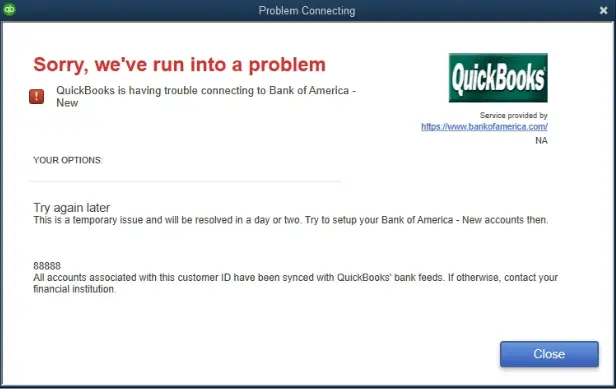
| “Sorry, we’ve run into a problem. QuickBooks is having trouble connecting to the American Express Card – QBDT.” |
Some of the common indications of this problem are as follows:
- Transactions mismatching the expenses after manual upload.
- QuickBooks is getting stuck with the ‘Reconnect my Account’ popup.
- Finding missing transactions when reconciling the accounts.
The good news is that you can effectively fix this error using verified troubleshooting methods. Therefore, let’s dive into the article to explore all the causes behind this issue and find detailed solutions.
Why is QuickBooks Not Syncing with American Express?
Before trying to fix the issues syncing QuickBooks with American Express, you must understand the reasons for a better troubleshooting approach. Here’s the table that shows all the factors behind the QuickBooks American Express not syncing error.
| Relevant QuickBooks Product | Reasons Behind the American Express Not Syncing Error |
| QuickBooks Desktop | Automatic bank feed updates are interrupting the connection between QB Desktop and AMEX. There are connectivity issues while manually uploading the bank transactions. The financial institution might be incorrect, or the directory might be outdated. |
| QuickBooks Online | There are connectivity issues while syncing American Express in QuickBooks Online. Unchecked notifications, alerts, and security updates by the bank require you to perform certain operations before downloading the bank feeds. Excessively stored cookies and caches in the web browser. Your web browser is incompatible with QuickBooks. |
Now, let’s move to the next section and check out some prerequisites to sync American Express in QuickBooks.
Quick Fix for QuickBooks American Express Sync Issues
The most frequent reasons include expired bank connection, session expiration or authorization pending. Here’s how to fix it fast:
Step 1: Reconnect American Express account.
QuickBooks In QuickBooks, under the Banking menu, one should find a connection account search, typing American Express, and re-entering the credentials.
Step 2: Check the bank connection.
Click on Banking and then on your Amex account and then click on Update. This re-invigorates the sync token.
Step 3: Re-connect and disconnect in case update fails.
Banking > pencil icon beside Amex > Edit account info > Disconnect > reconnect without any of the information.
Step 4: Validate transactions that are two or more.
On Banking tab, the list in For Review. eliminate duplicates and re-match whatever has not been identified.
Points to Consider Before Syncing AMEX with QuickBooks
Here are the points that you need to know before syncing your American Express account in QuickBooks.
- Have the primary account holder secure authorization for the bank feeds setup process.
- Once you have the primary account holder’s credentials, ensure that QBDT is updated to the latest release.
- Lastly, create a backup of your company file to avoid data loss.
Once done, proceed with the troubleshooting solutions in the next section to fix issues with the American Express account in QuickBooks.
9 Things to Do If QuickBooks American Express Not Syncing
Here, you will learn verified methods to resolve the QuickBooks American Express not syncing error. These methods are divided into two separate sections, viz., QuickBooks Desktop and QuickBooks Online.
You can jump to the relevant section to explore effective step-by-step solutions for this issue.
Section A: American Express Not Syncing in QuickBooks Desktop
Here are the resolutions that you should use if you find American Express not syncing in QuickBooks Desktop.
1. Refresh the Connection between QB Desktop and American Express
To fix the syncing issues, you must reconnect using the Express Web Connect in QuickBooks Desktop. Before following the steps below, make sure to reconnect your accounts with the online banking services and review the affected AMEX accounts mentioned below –
If you are using an American Express version older than 03/30/2023 –
- Choose American Express Card QBDT in Bank Feed Setup for Credit Cards, Charge Cards, and Checking accounts.
- Select American Express Delegate in Bank Feed Setup in the following cases –
- Only a Delegate User and Non-Account Holder with proper authority can connect accounts in Intuit’s products.
- If you need to link an account other than a Credit Card, Charge Card, or Checking account.
Once the affected accounts are reconnected, follow the steps described below and switch to Express Web Connect.
Step I: Prepare to Switch QBDT to Express Web Connect
The first step is to prepare to switch to Express Web Connect. For this, you can follow the detailed points given below.
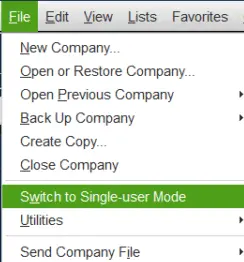
- Launch QuickBooks Desktop and then go to the File menu at the top.
- Select Utilities and click on Switch to Single-user mode.
- Further, choose Company, click My Company, and sign in to Intuit if you haven’t already.
Note: If you haven’t signed in yet, you can create a new Intuit account or recover your user ID and password.
- Next, delete any pending online payments and checks.
- Lastly, add and match the previously downloaded bank feed transactions.
Note: After these changes, you will not be able to use Chase Bank, First USA, CardMember Services, Bank One, or Bank of America Bill Pay in QuickBooks Desktop. However, any scheduled or recurring payments you’ve already set up with Chase Bank, First USA, CardMember Services, or Bank One will continue until 9/27/2022. Moreover, any scheduled or recurring payment already set up with Bank of America will continue until 10/11/2022. Remember, if you’d like to continue to pay your bills within QBDT, you can set up QuickBooks Bill Pay powered by Melio.
Once this step is complete, move to the next step and turn off the bank feeds for your account.
Step II: Turn Off All Bank Feeds for Your Account
Before updating the bank feeds connection, you must turn off all related accounts to ensure no discrepancies. Don’t worry; these accounts will be set up again in the next step. To turn the bank feeds off, ensure that you match or delete all of the downloaded transactions for all the accounts, as QBDT won’t allow any changes if the transactions are pending. Then, follow the detailed steps given below-
Case A: QBDT for Windows
- Go to Lists and select Chart of Accounts, then right-click the account you want to turn off.
- Select Edit Account and then go to Bank Settings.

- Further, choose Deactivate all online services.
- Select OK, then click Save & Close to confirm the changes.
Case B: QBDT for Mac
- From the Lists menu, select Chart of Accounts.
- Highlight the account and select the Pencil icon to edit.
- Now, click on Online Settings.
- Select Download Transactions and then click on Not Enabled.
- Click OK to confirm the changes, then hit OK again to end the process.
Note: QB won’t be able to download new transactions after disconnecting your account.
Once done, move to the next step and set up an account for bank feeds.
Step III: Set Up an Account in QB for Bank Feeds
You need to set up your bank account in QBDT to download your bank transactions in the following manner-
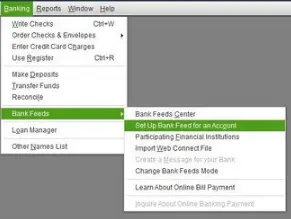
- First, select Bank Feeds from the Banking menu and click Set Up Bank Feed for an Account.
- Now, enter the name of your bank, then hit Next.
Note: Use the updated bank name shown in the account reconnection required list above and then return here to complete the next steps.
- When the My Company sign-in page opens, sign in using your Intuit User ID and enter your online banking account information.
- Further, select Connect, and QB will connect to the bank’s server. Your bank might ask you to enter a one-time password.
- Choose the account you want to connect with QuickBooks, then hit Connect and click Close.
Note: Chase may launch an external browser and requires authentication. Once logged in, move back to QuickBooks Desktop.
Once the account is set up for bank feeds, move to the next step and download transactions with Express Web Connect.
Step IV: Use Express Web Connect and Download Transactions
As the last step, you must download the transactions with Express Web Connect. The next time you use bank feeds, the latest transactions will be auto-downloaded. To download the transactions, implement the steps given below –
Note: After the setup is complete, you may see transactions from the previous day that you’ll need to review and categorize. Make sure to remove any duplicate transactions.
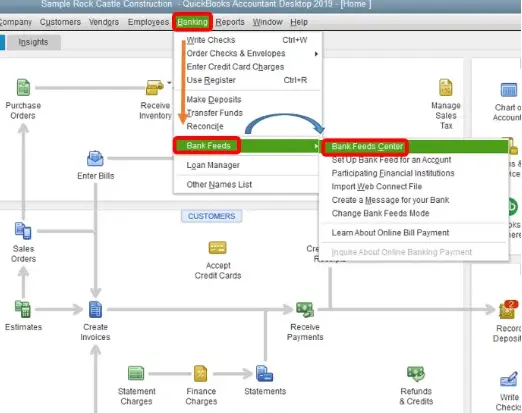
- Select Bank Feeds from the Banking menu, then choose Bank Feeds Center.
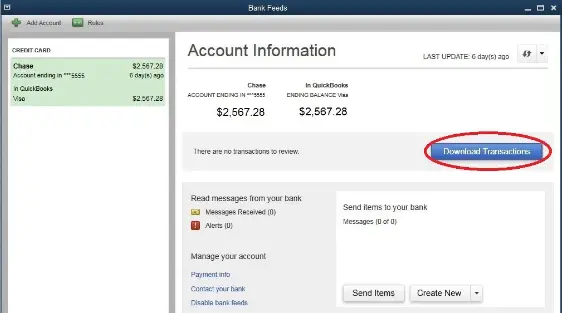
- Select the account you need to download, then click Download Transactions.
- Once the process is complete, select the Transaction List to process the transactions.
Note: To view any connection/bank errors, select the Add Account dropdown (v) and then select Manage Accounts.
Now, rerun QuickBooks and try to sync American Express to check if the issue is fixed. If you cannot sync American Express to QuickBooks, move to the next troubleshooting solution.
2. Update the Financial Institution Directory If You Find QuickBooks American Express Not Syncing
To ensure you have the latest info from your financial institution, you need to update the Financial Institution Directory (FiDir). Follow the steps provided below to update the FiDir in QuickBooks Desktop-
Step I: Setup Automatic Updates for the FiDir in QB
Firstly, ensure that QB is updated and you have created a backup copy of the company file. Then, follow the steps below to set automatic updates for the FiDir-
- Go to the Banking menu and select Bank Feeds. Then, choose Bank Feeds Center.
- Next, select Refresh account(s) or choose Sync all for this bank from the dropdown menu.
This will set up the updates automatically for your Financial Institution Directory. However, if you still face the same syncing issues, you can manually update the location of each file in the next section.
Step II: Manually Update Each File Location for Every QB Version
To manually update the FiDir, you must update each file location for every QB version you use. Implement the steps mentioned below to update the Financial Institutions list in QuickBooks manually-
- Find the fidir.txt file on your system by following the path below as per the QB version-
- QB Enterprise – C:\ProgramData\Intuit\QuickBooks Enterprise Solutions XXXX\Components\OLB\branding\filist
- QB Pro/Premier – C:\ProgramData\Intuit\QuickBooks Enterprise Solutions XXXX\Components\OLB\branding\filist
- Right-click the fidir.txt file, select Rename, and change .txt to .old.
- Click outside the field to save the change, then select your QuickBooks version (year) to get the latest file.
- Save the file to your desktop and then right-click the fidir.txt file.
- Select Copy, open the filist folder, then right-click anywhere in the folder. Now, click Paste.
- Lastly, close and re-launch QuickBooks Desktop.
Your Financial Institution list has been successfully updated. If you still find the QuickBooks American Express not syncing, move to the next solution and verify your FI’s website.
3. Verify the Financial Institution’s Website
If QuickBooks cannot access the bank’s server or if the server is down, you might be forced to search ‘QuickBooks American Express not syncing 2024’. So, ensure your financial institution is correct, and the servers are accessible by following the steps below-
Step I: Link Your American Express Bank Account
You need to review the URL to ensure proper connection and link your bank account in the following manner-
- Ensure that the URL QuickBooks uses to connect to American Express is correct, then open QuickBooks.
- Further, go to the Bookkeeping section, choose Transactions, then select Bank Transactions.
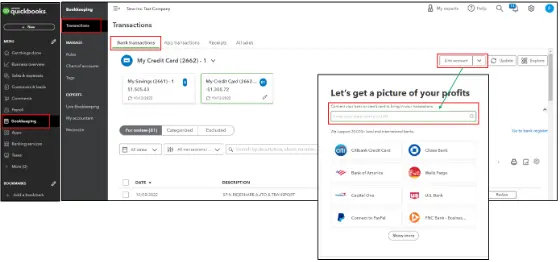
- Next, select Link Account to connect to your bank. You don’t need an account; just add a link to your bank to connect.
- Choose American Express, copy the URL on the bank’s website, and log in to your account using the same URL.
Now, check if you can connect to your bank without any issues. Then, follow the steps in the next section to ensure you can download the transactions in QBDT.
Step II: Check for Pending Notification and Security Requirements
Once the account is linked, check for any pending notifications, announcements, security requirements, etc, by following the steps given below-
- Access your bank’s website and ensure you have no pending notifications, alerts, or messages.
- Next, check for any display issues. If there are any, QuickBooks might block the bank’s website from downloading the transactions.
- Lastly, make sure to check for any announcement of new security requirements. If there is, first review these announcements, notifications, or messages, then download the transactions.
When done, move back to QuickBooks Desktop and follow the next step.
Step III: Refresh the Bank Feeds in QB
As the last step, you need to refresh the bank feeds in QuickBooks Desktop by going through the following steps-
- Go to the Bookkeeping section, then select Transactions and choose Bank Transactions.
- Next, click the Refresh option.
Once done, you will be able to sync your American Express account with QuickBooks Desktop.
If you want to fix the American Express not syncing with QuickBooks issue in QuickBooks Online, follow the solutions mentioned in the next section.
Section B: American Express Not Syncing in QuickBooks Online
If you find that American Express is not syncing with QuickBooks Online, you can follow the troubleshooting solutions mentioned below.
1 . Check for Latest Notifications and Security Requirement Announcements
Sometimes, problems from the bank’s end can also lead to syncing issues. The bank requires you to complete the registration and refresh the connection between American Express and QuickBooks. You can sign in to the bank account and check for the latest notifications and alerts.
Additionally, check for any announcements related to security requirements. If you face any display or sign-in issues in the process, it can block QB from downloading the latest transactions. Also, if you have updated anything on your bank’s site, including your account number or credentials, make sure to update the same in QB by following the steps given below-
- Go to the Banking section from the left menu and select the Edit icon.
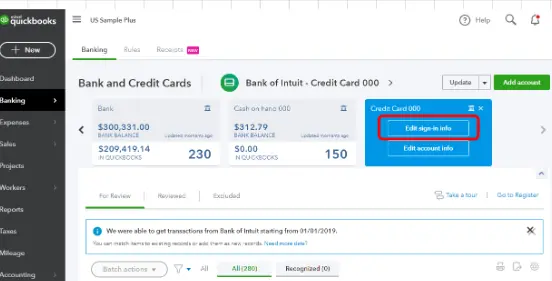
- Next, select Edit Sign-in Info and update the info to incorporate the latest changes.
Note: If you haven’t connected the account, use the Bank’s URL in the search box.
Once the info is updated and the notifications are checked, rerun QBO and check if the QuickBooks American Express not syncing 2024 error is rectified. However, if the issue persists, reconnect your American Express account in QB Online as described below.
2. Reconnect Your Amex Business Account in QBO
The next solution is disconnecting and reconnecting your American Express account in QuickBooks Online. By doing this, you can eliminate any syncing issues that arise when the connection between QB and Amex is interrupted. Thus, follow the steps given below to reconnect the account-
Step I: Disconnect the American Express Account
Firstly, disconnect your American Express account from QuickBooks by implementing the steps given below-
- Go to the Transactions menu, select Bank Transactions, and mark the blue square for one of your American Express accounts.
- Next, select the Edit ✎ icon, then click Edit account info to access the Account window.
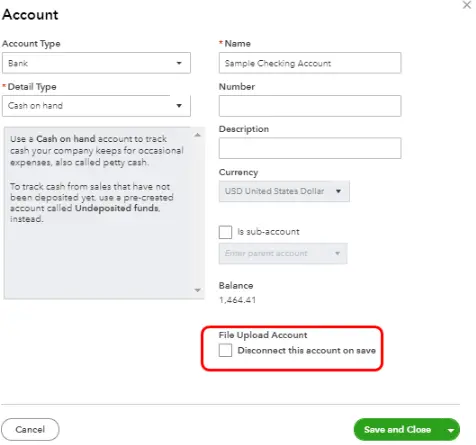
- Checkmark the ‘Disconnect this account on save’ box, then hit Save and Close to confirm.
This will disconnect your Amex account from QB Online banking. Once done, move to the next section and reconnect the account.
Step II: Connect the American Express Account Again
Now, reconnect the account in QuickBooks Online by going through the steps provided below-
- Go to the Transactions menu and then click on Bank Transactions.
- Since you’ve already connected the banking before, select Link account and search for one of the following accounts depending on your American Express account user type:
(i) If you’re a primary account holder, search for and select American Express Business Credit Card& Checking (US).
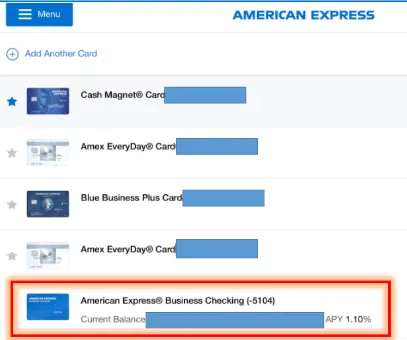
(ii) If you’re a delegate user on a card account, search and select American Express (Delegate).
- Select Continue, then sign in with your American Express User ID and password in the pop-up window. If American Express requires additional security steps, follow the prompts on your screen.
- Now, choose one of the accounts you want to connect to QuickBooks Online.
- Choose the account type from the dropdown for each selected account, then select the Date Range for the download.
- Lastly, select Connect and let the account reconnect to QBO.
Once done, check if the “QuickBooks American Express Not Syncing” issue is addressed. If not, move to the next solution to address the syncing issues.
3. Connect to your American Express Account Using a Private Browser
You can log in to QBO in a private window and use your Amex account. This will help avoid any existing damaged or outdated cached files that might lead to syncing issues. To open your account in a private browser, follow the shortcut keys mentioned in the following table.
| Web Browser | Shortcut Keys |
| Google Chrome | For Windows: Ctrl + Shift + NFor Mac:Command + Shift + N |
| Mozilla Firefox | For Windows: Ctrl + Shift + PFor Mac:Command + Shift + P |
| Safari | For Mac: Control + Option + P |
| Microsoft Edge | For Windows: Ctrl + Shift + PFor Mac:Command + Shift + P |
If you do not encounter issues using a private browser, return to your regular browser and clear the cache files and data (see Solution 4 below). However, if you encounter issues while accessing the account in a private browser, you should try using another supported browser based on the QuickBooks system requirements (see Solution 5 below).
4. Clear the Web Browser’s Cache and Cookies
Cache and cookies in your web browser can cause issues and interruptions while connecting with the bank account. When there is excessive cache present in the browser, it can trigger QuickBooks American Express not syncing. To address this issue, you should immediately clear the cookies and cache data as per your web browser.
Once done, rerun QBO, try syncing American Express again, and check the status of the “QuickBooks American Express not syncing” issue. If it persists, move to the next troubleshooting solution to resolve it.
5. Use Another Supported Browser for QBO
You might need a compatible browser if you face issues accessing your account via a private browser. To ensure that the web browser you are using supports QuickBooks, refer to the table shown below.
Note: These browsers are supported on both web and mobile devices; however, Internet Explorer is no longer supported.
| Web Browser Application | Recommended Edition |
| Microsoft Edge | 79 or Newer |
| Opera | 68 or Newer |
| Google Chrome | 78 or Newer |
| Samsung | 10 or Newer |
| Mozilla Firefox | 76 or Newer |
| Safari | 12 or Newer (Mac Only) |
Note: The Firefox PDF plugin must preview and print forms on the Mac OS.
Choose a supported browser to run QuickBooks Online, then try syncing American Express. If you continue to find QuickBooks American Express not syncing, follow the next solution and manually upload the transactions in QBO.
6. Manually Upload the Transactions into QBO
If none of the above solutions work and you are still facing issues syncing QB and American Express, you can try manually uploading the transactions by following the steps given below-
Step I: Find the Oldest Transaction Date
Firstly, choose a start date. To avoid duplicates, you need to know the date of the oldest transaction in the account. Here’s how you can do so:
- Select Chart of Accounts from the Settings tab and find the account to which you want to upload the transactions.
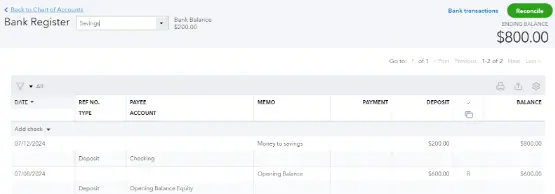
- Select View Register, then find the oldest transaction (which is usually the opening balance) and note down the date.
Once done, move to the next step and get the transactions from your bank.
Step II: Download the CSV Files to Get Transactions from your Bank
You need to download the CSV files of your transactions by following the detailed steps below –
- Sign in to your bank or credit card website, then follow the instructions to download CSV files of your transactions, as your bank or financial institution has instructed.
- Check the date range for the download, which should be at least one day before the date of your oldest transaction.
- Now, download your transactions and save the file to an easily accessible location on the PC.
Tip: If your bank offers a few file formats, choose the QuickBooks Online data (QBO) format, specifically for QuickBooks Online. Remember, you can also upload transactions from a CSV or Quicken (QFX) file.
Once the transactions are downloaded, review the file size and format in the next step.
Step III: Review the File Size and Format
You must ensure the downloaded files are in the correct format before uploading them. To review the file size and format, follow these steps –
- Ensure that the file size is not more than 350 KB. If so, shorten the date range and download the transactions in smaller batches for big file sizes.
- Remove zeros from the file and keep the cells blank.
- Fix transactions that display numbers in the Description column.
- Next, remove “amount” from the Credit or Debit column header.
- Make sure that all dates follow the same format (dd/mm/yyyy is the recommended format).
- If you’re a Mac user, save the file as a Windows CSV file.
- If your bank adds the day of the week in the Date column (for example, 20/11/2018 TUE), split the date and the day of the week into separate columns.
Now, go to the next step to manually upload all your bank transaction data.
Step IV: Manually Upload the Bank Transactions
Now, manually upload the bank transactions by going through the steps given below –
- Go to the Transactions tab, click Bank Transactions, and select the blue tile for the account into which you want to upload the transactions.
- Select the Link account dropdown, select Upload from File, and click Drag and Drop or select Files.
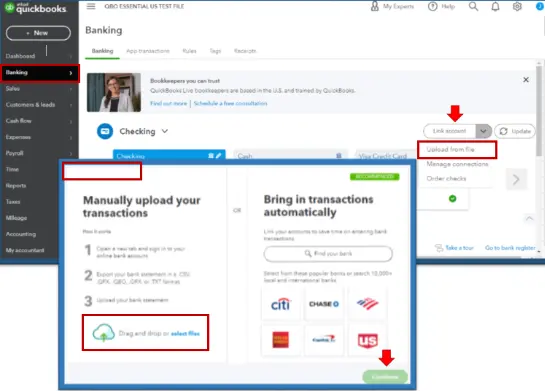
Note: If your account is not yet connected to online banking, click the Upload from File option.
- Select the file you downloaded from your bank, hit Continue, and access the QuickBooks account dropdown.
- Further, select the account you want to upload the transactions into and hit Continue.
Note: If you’re new to QuickBooks Online, you may not have an account to upload the transactions. In such a case, select Add New from the dropdown and create a new bank account.
- Follow the on-screen steps to match the columns on the file with the correct fields. Then, hit Continue and select the transactions you want to import.
- Click Continue, select Yes, and hit Done to end the process.
After this step, you will have successfully uploaded the transactions. Then, you can move to the final step below to categorize and reconcile them.
Step V: Categorize and Reconcile the Transactions
Now that your transactions are in QuickBooks, the next step is to match and categorize them. After you review the bank transactions, they go into your accounts. QBO also automatically enters certain details if you set up any banking rules or if there are transaction descriptions.
You should also reconcile the transactions you uploaded to ensure that all transactions are recorded correctly in QuickBooks. Once done, you can utilize all your bank transaction data for different business projects seamlessly.
Winding Up
In this comprehensive guide, we showed you how you can effortlessly resolve the QuickBooks American Express not syncing error. Hopefully, you can now download all your bank transaction data successfully. If, however, you still encounter this error message or have a query, you should connect with a QB professional for real-time guidance.
Frequently Asked Questions (FAQs)
A. The “QuickBooks American Express not syncing” issue indicates problems between Amex and your bank. This occurs when connection issues occur, and the bank cannot work simultaneously with American Express to produce real-time results.
A. You might notice QuickBooks American Express not syncing due to the following reasons –
a) There are connectivity issues, and the connection between QB and Amex is interrupted.
b) Some 3rd party software might interfere with the browser while syncing Amex with QuickBooks Online.
c) There are incompatibility issues with the web browser.
d) Excessive cache and cookies in the browser can trigger the QuickBooks American Express not syncing error.
e) While you connect American Express to QuickBooks Desktop, the financial institution might be incorrect, or the financial institution directory might be outdated.
A. To successfully reconcile a credit card in QuickBooks, follow the steps mentioned below:
a) Go to the Gear icon, select Reconcile, and choose the account you want to c) reconcile from the Account dropdown menu.
b) Review the Beginning Balance, then enter the Ending Balance and Ending Date on your statement.
c) Lastly, once you’re ready to start, tap on Start Reconciling.
A.Yes, Intuit recognizes American Express as a valid payment method. You can link the American Express card to your QB account to track expenses, manage finances, and reconcile transactions. Through this integration, Intuit ensures that accounting processes are streamlined for businesses that use Amex cards for transactions.
A. Yes. The Tool Hub includes features like Banking Error Fixes and Quick Fix My Program that can resolve common connectivity or credential-related issues, including password syncing errors.

Gabby Taylor, combines financial expertise with literary prowess. With over a decade in finance, she crafts insightful narratives on navigating fiscal complexities
