When you want to convert from Sage 50 to QuickBooks Desktop, you can utilize the QuickBooks Conversion Tool. Once you run this tool, the Sage 50 data will move to QB Desktop, allowing you to perform all your operations. In this blog, you will discover the step-by-step procedure to run this tool.
In general, the initial steps to move the Sage 50 data to QB Desktop are saving the Sage 50 backup data and creating a password for the data transfer. After implementing these steps, you can install the QB Conversion Tool and transfer the Sage 50 data successfully. Some errors can also arise during this process, and you will learn how to resolve them in this article.
Let’s dive into the blog to discover detailed steps to transfer the Sage 50 data to QuickBooks.
QuickBooks System Requirements: What You Must Check Before Migration
The following points describe all the crucial requirements that your system must satisfy so that you can convert from Sage 50 to QuickBooks Desktop effortlessly:
- Your computer should have all the technical capabilities outlined in the following table:
| System Component | Required Version |
| Operating System | Windows 10, Windows 8.1, Windows 8 |
| Memory (RAM) | 512 MB (Minimum) |
| Microsoft .NET Framework | Version 2.0 (Minimum) |
| Processor | 500 MHz Intel Pentium II (Minimum) |
| Hard Drive | 2.5 GB of Free Space |
| QuickBooks Desktop | Pro, Premier, or Enterprise (2018 or Higher) |
| Sage 50, Sage 50 Quantum | 2015 Version and Above |
Note: For Sage 50 (2014 or older), Sage 100, Sage 300, Sage Industry Specific, and Peachtree, you won’t be able to use the QB Conversion Tool. In such cases, you can transfer Sage 50 data to QB Desktop using Excel. You can go to the Help menu and click the About Sage option to find the Sage version that you currently have.
- You need to fulfill all the system requirements necessary for the installation and operation of the relevant QB Desktop version. This will ensure that the Sage 50 data transfer process takes place smoothly.
Now, you should move to the next section to learn some limitations related to the QB Conversion Tool.
QuickBooks Conversion Tool Limitations: What You Need to Know Before Converting
The QuickBooks Conversion Tool won’t transfer all the data from Sage 50 to QB Desktop. You must know all the limitations of this tool as that will help you in managing all your data successfully. The following points will help you quickly understand all the facts related to the data transfer limitations of this tool:
1. The table below depicts what data will move to QuickBooks Desktop from Sage 50 and what won’t:
| Data that Will Move | Data that Won’t Move |
| Account, Employee, Item, Customer, and Vendor Lists | Payroll Transactions and Employee Year-to-Date Info (Paychecks, Year-to-Date Adjustments) |
| Customer and Vendor Transactions | Fixed Assets |
| Payroll General Ledger Account Balance Info | Closed or Partially Closed Sales Orders, Purchase Orders, and Estimates |
| Account Balances | Work Tickets |
| Employee Profile and Contact Info | Payroll Items Used to Calculate Paychecks (Payroll Items, Deductions, etc. ) |
| Paychecks (Convert as Journal Entries ) | Individual Employee Wage or Deduction Details |
2. Here are some additional details regarding the Sage 50 data transfer limitations by the QB Conversion Tool:
- The tool won’t transfer a chart of account numbers if any of the account numbers are seven or longer.
- The foreign currency data is moved to the home currency.
- You might notice that the tool uses a dummy customer or vendor to match the Account Receivable (AR) and Account Payable (AP) history.
- The tool will post transactions under a future date in QB Desktop if the relevant journals also have the future date.
- You can find some reversed journals transferred to QuickBooks by the tool. If you erase those journals, your account data may get imbalanced.
Note: You can transfer data to QB Desktop from Sage 50 only if both belong to the same region. For instance, if you have a US edition of the Sage 50 application, you can convert it only to a US edition of QB Desktop.
Now, let’s jump to the following section to learn what steps we must take before beginning the data transfer through the QB Conversion Tool.
Sage 50 to QuickBooks Desktop: What You Need to Prepare Before Migration
You need to run some initial steps to make sure that you can smoothly convert from Sage 50 to QuickBooks Desktop. The following points mention what actions you need to take before moving the data:
1. Install QB Desktop and Save Sage 50 Data Backup
- Firstly, you should ensure the installation of QB Desktop on the same system as Sage 50.
- The QB Desktop should be installed on your local hard drive.
- You must create and save a backup of the Sage 50 data before beginning the conversion process.
Now, you need to create a password in Sage 50 for the data transfer.
2. Create a Password in Sage 50 for the Data Transfer
- Access your Sage 50 account in admin mode and open the file that you want to transfer to QuickBooks.
- Choose the Main menu, after which you must click the Maintain tab.
- After that, go to the Users tab and tap the Setup Security option.
- Next, choose the Data Access/ Crystal Reports tab and click the With the following login information option.
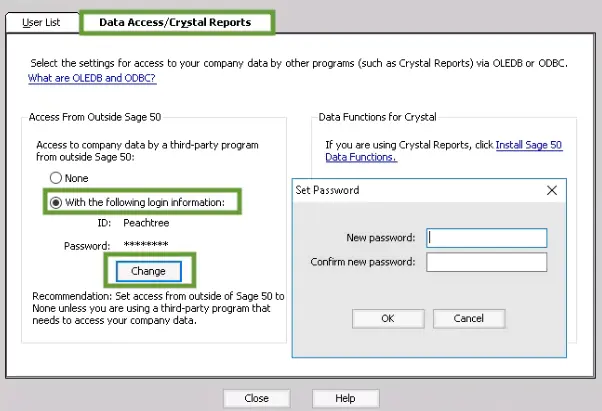
- After that, choose the Change option and set an 8-character password for the data transfer process.
- Tap the OK button, and after that, you can exit the Sage 50 application window.
Let’s move to the following section to commence the data transfer process to QB from Sage 50.
3 Steps to Convert From Sage 50 to QuickBooks Desktop
You should follow these points to successfully convert from Sage 50 to QuickBooks Desktop on your computer:
1. Download and Install the QB Conversion Tool
- You should download the QB Conversion Tool and save the file in a suitable folder.
- Access the folder where you have saved the Conversion Tool file and right-click the icon of the QuickBooks Conversion Tool.
- Choose the Properties tab and access the Compatibility mode.
- After that, mark the checkbox for Run this program in compatibility and choose the Windows 8 option (even if you are using Windows 10) through the dropdown tab.
- Click the OK button and right-click the icon of the QuickBooksConversionToolSetup.exe file.
- Finally, choose the Run as Administrator option and install the QB Conversion Tool successfully.
Now, you will need to run the QB Conversion Tool.
2. Run the Conversion Tool to Convert From Sage 50 to QuickBooks Desktop
- Access the QB Conversion Tool and use the Browse tab to select the Sage 50 company file that you want to transfer to QuickBooks.
- After that, go to the Pervasive 32-bit ODBC Engine DSN Setup section and choose the Sage 50 company file through the Database Name tab. You can use the scroll option to select multiple Sage 50 company files.
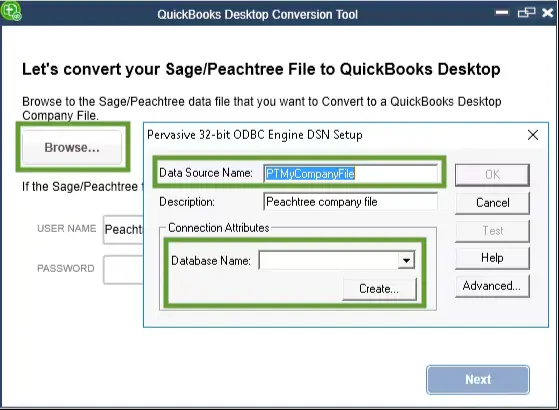
- Tap the OK button and type the Sage 50 password that you created in the previous step.
- Hit the Next option and choose the QB Desktop edition.
- Use the Browse tab to select the folder where the converted Sage 50 data will be saved. If you don’t choose any folder, the converted Sage 50 data will be saved in the My Documents folder.
- Now, review your Sage 50 file and tap the Convert File option to commence the data transfer process.
- You must tap the Yes option if any prompt appears on the screen during the conversion process.
- Once the data transfer process is completed, you will find the Open in QuickBooks option on the screen.
Now, let’s check all the data transferred to QB Desktop.
3. Review the Transferred Data in QuickBooks
- Click the Open in QuickBooks option and review all the data that has been transferred to your QB Desktop application.
- After that, open the Start menu and launch the File Explorer window.
- Next, go to the QuickBooks folder using the following path: C:\USERS\[Your Windows User Name]\My Documents\ Intuit\QuickBooks.
- Open the failed transaction log file to review all the transferred data. You will be able to determine if any data failed to get transferred to QuickBooks.
Finally, launch your QB Desktop application and start working on the transferred data.
However, if you have experienced any errors during the data transfer process, you can go to the next section to learn how you can address them.
Resolve Sage 50 to QuickBooks Desktop Migration Errors Fast
There is always a possibility of experiencing some error messages when converting Sage 50 data to QB Desktop. Here are the points that explain how you can fix the following common error messages:
Error: It Looks like Something Went Wrong
The following points will help you rectify this error message successfully:
- Ensure that the Sage 50 is installed on the local computer. If it is present on a server or network, create a backup of the Sage 50 company file and restore it to the local computer (C: Drive).
- If you find any special character in the Sage 50 company filename, right-click the file icon and choose the Rename option. After that, remove special characters and tap the Enter key to save the edited name.
Error: We Just Need a Little More Info
You should operate the QB Conversion Tool in Compatibility mode to fix this error message. Here’s how you can do so:
- Identify the QuickBooks Conversion Tool icon and right-click it to select the Properties tab.
- After that, check the ‘Run this program in compatibility for’ box located under the Compatibility mode section.
- Next, choose the appropriate Windows operating system through the dropdown tab and click the OK button.
- After that, select the QuickBooksConversionToolSetup.exe file icon and right-click it to choose the Run as Administrator option.
Finally, you can carry out the Sage 50 data transfer process to QuickBooks seamlessly.
Winding Up
In this comprehensive blog, we walked you through all the steps that you need to convert from Sage 50 to QuickBooks Desktop. Hopefully, you can now perform the Sage 50 data conversion to your QB Desktop application easily. If, however, you are still experiencing any issues or have a query, you can connect with an experienced QB professional for real-time support.
Frequently Asked Questions (FAQs)
Q. How do I convert from Sage 50 to QuickBooks Desktop without losing data?
A. Converting from Sage 50 to QuickBooks Desktop requires careful preparation to ensure no financial records are lost. Start by backing up your Sage 50 company file. Clean up inactive vendors, customers, and accounts to avoid transferring unnecessary data. Next, use a reliable migration tool or professional conversion service that supports Sage 50 to QuickBooks Desktop data mapping.
It’s important to verify balances after migration, including accounts receivable, accounts payable, payroll totals, and bank reconciliations. Once the data is imported into QuickBooks Desktop, run financial reports in both systems and compare them side by side. This step confirms accuracy and prevents reporting discrepancies later.
Q. Is it difficult to migrate from Sage 50 to QuickBooks Desktop?
A. The difficulty level depends on the size and complexity of your company file. Small businesses with minimal transactions usually experience a smooth transition. Larger companies with years of financial history, payroll data, and multi-user configurations may require professional assistance.
While QuickBooks Desktop is known for its user-friendly interface, the actual data conversion from Sage 50 involves technical mapping between two different database structures. That’s why many businesses prefer using experienced migration specialists to reduce risk and downtime.
Q. Why do businesses convert from Sage 50 to QuickBooks Desktop?
A. Many businesses choose to convert from Sage 50 to QuickBooks Desktop for greater flexibility and broader third-party integration options. QuickBooks Desktop often provides easier navigation, stronger reporting customization, and a large community of certified advisors.
Additionally, QuickBooks offers extensive add-on applications for inventory, payroll, and industry-specific needs. For growing companies, this ecosystem can provide scalability that supports expansion without switching systems again later.
Q. How long does it take to convert from Sage 50 to QuickBooks Desktop?
A. The time required depends on file size and transaction history. A small file may be converted within a few hours, while a complex company file with years of historical data may take one to three business days.
Preparation plays a key role in speeding up the process. Cleaning your Sage 50 file, reconciling accounts, and closing unused fiscal years beforehand can significantly reduce conversion time. After migration, always allow additional time for verification and adjustments.
Q. Can I convert from Sage 50 to QuickBooks Desktop on my own?
A. Yes, it is possible to handle the conversion independently, especially if you are comfortable with accounting software and data management. However, DIY conversions require patience and careful attention to detail. Any error during the process could lead to imbalanced books or incomplete transaction history.
If you decide to manage it yourself, make sure to create multiple backups and test the QuickBooks file thoroughly before going live. Many businesses opt for professional help to avoid costly mistakes and ensure compliance with accounting standards.

Gabby Taylor, combines financial expertise with literary prowess. With over a decade in finance, she crafts insightful narratives on navigating fiscal complexities
