Sage 50 has powerful email capabilities that can significantly reduce manual tasks and improve overall productivity. When you setup email in Sage 50, you can effortlessly send invoices, purchase orders, and financial statements to your clients and business partners. In this guide, you will discover the easiest steps to configure email setup in Sage 50.
You can choose Microsoft Outlook or Webmail to seamlessly send emails to your clients via Sage 50. The difference between the two is that Webmail allows you to select the email service provider of your choice. Furthermore, if you are a Canadian user of Sage 50, the process of setting up an email is a little different. You will find that process in this blog.
Alright, let’s quickly dive into the article to learn how to configure email settings in Sage 50.
How to Setup Email in Sage 50
Before you setup email in Sage 50, you need to take a backup of your reports and layouts. Here’s how you need to do so:
- First of all, open Sage 50 and move to the File menu.
- Choose Back Up and select the No option.
- Type a filename and location where the backup data file will be stored.
- Unmark the Data Files checkbox, and after that, checkmark the Report Files and Layout Templates boxes.
- Tap OK and Yes, and after that, click OK.
Now, you can either select Microsoft Outlook or Webmail to configure email settings in Sage 50. You can go to the relevant section to discover steps for both options as described below.
Section A: Setup Email in Sage 50 Using Microsoft Outlook
First of all, ensure that the Sage 50 version is compatible with Microsoft Office. After that, follow all the steps discussed below.
1. Select Microsoft Outlook as the Email Client
You need to begin by choosing Microsoft Outlook as your email service provider. Here’s how you can do so:
- Access the Sage 50 Accounts and move to the Settings menu.
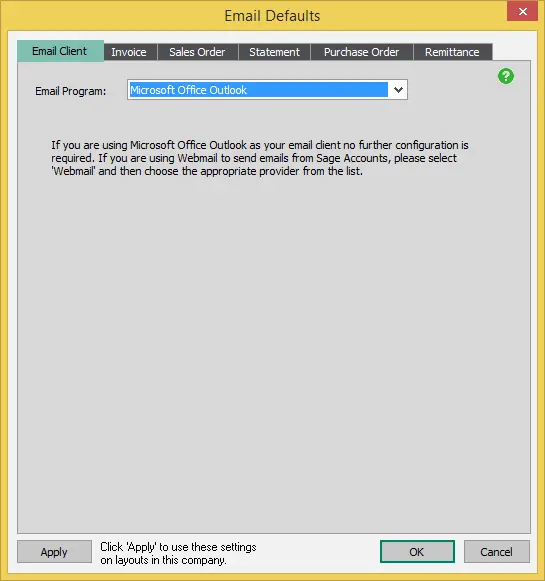
- Choose Email Defaults and jump to the Email Program dropdown menu.
- Now, select the Microsoft Outlook option from the dropdown menu.
2. Configure Email Settings When You Setup Email in Sage 50
After choosing Microsoft Outlook as the default email service provider, you should go to the Invoice tab to configure email settings. Here’s how you need to do so:
a. To
Here, you can choose the email address this layout will use.
- Customer Record Email 1 is for the Email1 address in the supplier or customer record.
- Customer Record Email 2 is for the Email2 address in the supplier or customer record.
- Customer Record Email 3 is for the Email3 address in the supplier or customer record.
- Addresses & Contacts’ Preference Email is for the email address in the supplier or customer record in Addresses & Contacts, Preferences. This field is not available in Sage 50 Accounts Essentials.
- Manually Entered Address – When you want to manually enter an email address, you should select this option.
b. CC
Here, you can choose which email address will be copied to this field in this layout.
c. Subject
Here, you can choose what to copy to layout for the subject field of the email.
- Invoice 25 from (company name)
It will show the company name, statement, invoice, order, or remittance number.
- Invoice 25 from (company name) – (date)
It will show the company name, date, statement, invoice, order, or remittance number.
- [None] – No subject
- Manually Entered Subject – Choose this if you want to manually enter a subject every time.
d. Send Information in the Body of the Email, Not as an Attachment
Selecting this checkbox will show the layout in the body of the email rather than an attachment.
e. Attachment Format
You can choose PDF, HTML, Excel, or Text to send the layout as an attachment.
f. Attachment Filename
You will need to choose the filename if you want to send the layout as attachment.

g. PDF Password
If you are attaching a PDF file, you can add a password to protect the document. To do so, choose Yes – From the Customer / Supplier Record.
However, if you don’t want to password-protect the PDF attachment, choose No.
This option is not available in Sage 50 Accounts Essentials.
h. Sending Options (Microsoft Outlook only)
Tap on the Send button immediately.
3. Save the Revised Email Settings
After configuring the email settings, you can choose which layout you want to apply these settings to. Following this, you will need to save these changes. Here is how you can do the same:
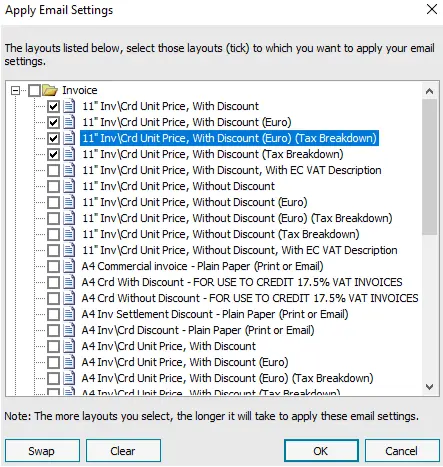
- Tap on Apply.
- Check the boxes for the layouts you wish to apply these settings to.
- Choose OK.
Now, you will be able to email the documents in Sage 50. Let’s move to the following section to discover how to configure Webmail to send emails using Sage 50.
Section B: Setup Email in Sage 50 Using Webmail
Firstly, if you utilize SMTP to send emails using Sage 50, you need to update your email configuration. This is essential because Microsoft & Google are retiring their basic authentication. Here’s what you should do if you want to continue sending emails via Microsoft Outlook or Gmail:
- In the Microsoft email account, you should choose Classic Outlook to send emails.
- For the Gmail account, you can either select Classic Outlook or utilize an App password to send emails using SMTP.
Now, you can follow these points to set Webmail as your email service provider:
- Access the Sage 50 Accounts and select Settings.
- Move to Email Defaults, and after that, you should choose the Email Program dropdown menu.
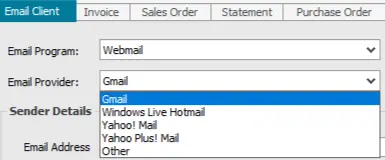
- At this point, select Webmail and go to the Email Provider dropdown menu.
- Choose your email provider, and if it is not listed, you need to select Other.
- Type the display name and email address under the Sender Details.
- If you have selected Other, you also need to type the Server Details for your provider.
- You can select the Use Logged-On User Details option if you always want to be logged into your Webmail when emailing various files. Otherwise, you can utilize Use Username and Password to enter your user & password information.
You should now follow step 2 and step 3 described in Section A to complete the entire configuration of Sage 50 using Webmail.
Let’s now jump to the following section to learn how to configure Sage 50 (Canada) to send emails.
Section C: Steps to Setup Email in Sage 50 (Canada)
Here is how you can set up email in Canadian Sage 50:
- Go to the Allow a new application to access the account window.
- Now, log in to a suitable Gmail account if prompted
- Click on Continue.
- Sage 50 will let you send an email within minutes.
- Next, check the email service that was previously blocked.
- If you don’t face an issue, continue.
- Allow Gmail to remember the device, email client, or service and access the address in the future
- Choose Security.
- Choosing Turn on will take you to the SMTP connection.
- Click on Setup, followed by the Settings tab.
- Choose Company, followed by Email.
- Select Webmail.
Finally, you can send emails to your clients and business partners using Sage 50 (Canada).
Fix Sage 50 Email Not Sending Issue
- Check SMTP settings
- Disable firewall blocking
- Update Sage 50
- Verify login credentials
Summing Up
In this comprehensive guide, we showed you how to setup email in Sage 50 using proven steps. Hopefully, you can now easily send emails to all your clients and business associates using Sage 50.
If, however, you still experience problems or have a query, you should connect with a QB professional for real-time assistance.
Frequently Asked Questions (FAQs)
A. To set up email in Sage 50, open the software and go to Setup > Company > Email Settings. Choose your preferred email method, such as SMTP or your default email application like Outlook. Enter the required server details, including the SMTP server, port number, and authentication credentials. Once everything is filled in, send a test email to confirm the configuration works properly.
A. Email setup issues in Sage 50 often occur due to incorrect SMTP server settings, wrong login credentials, or blocked ports. Verify your email provider’s SMTP details and ensure the username and password are correct. Also check that your firewall or antivirus is not blocking the connection.
A. Yes, Sage 50 allows users to send invoices directly through email. After configuring the email settings, open the invoice you want to send and select the Email option. The system automatically attaches the invoice as a PDF file, making it easy to send to customers instantly.
A. Sage 50 generally supports three email methods: MAPI (Outlook or default email client), SMTP server, and webmail integration. Most users prefer SMTP because it allows emails to be sent directly from the software without opening another email program.
A. To configure SMTP settings, navigate to Email Setup inside Sage 50. Enter the outgoing mail server (SMTP), port number, and enable SSL or TLS if required. Then input your email address and password. Save the settings and test the connection to ensure emails are sending correctly.

Gabby Taylor, combines financial expertise with literary prowess. With over a decade in finance, she crafts insightful narratives on navigating fiscal complexities
