When you import CSV into QuickBooks, you can effortlessly transfer and integrate financial data, such as transactions, inventory records, bills, and invoices. A CSV file is a comma-separated file that has tabular data entered in a structured format, and a comma separates each value from the others.
In this guide, we will explore how to import CSV files into various QB products, such as QB Desktop, Online, and Self-Employed. Furthermore, we will also learn how to export QuickBooks data to a CSV file.
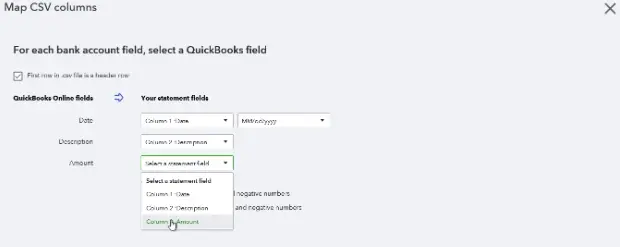
The process of utilizing CSV files for data transfer is very easy. In general, you need to select the CSV file and upload it to the relevant software application.
Sometimes, you might require an additional toolkit to move data from CSV files to the selected application.
The steps for importing and exporting CSV depend on the type of QB product that you are currently using.
Let’s dive into the blog to discover step-by-step processes to move data to and from CSV files into various QuickBooks products.
Which Transactions Can You Import into QuickBooks?
Here’s the table that shows different types of transactions you can upload by importing CSV into QuickBooks:
| Expenses | Payments | Journal Entries |
| Money Transfers | Credit Card Charges | Deposits |
| Invoices | Bills | Checks |
Because CSV files are program-independent, you can easily use them to integrate financial data into QuickBooks. It allows better financial analysis, performance monitoring, and comprehensive forecasting of financial trends over time. To sum up, importing and exporting CSV files will allow you to make informed choices for overall business growth and sustainability.
Now, let’s proceed to the next section to explore how you can import CSV into different QuickBooks products.
Section 1: How to Import CSV into QuickBooks Desktop, Online, Self-Employed
In this section, we will discuss how to import CSV into QuickBooks Online (QBO), QB Self-Employed, and QB Desktop (QBDT). You can go to the relevant points described below as per your QuickBooks product.
A. How to Import CSV into QuickBooks Online
Let us show you how you can import CSV into QuickBooks Online to upload transactions. Here are the steps that you must follow:
- Sign into QBO and choose Profile ⚙.
- Tap Imports.
- Choose to Import transactions.
- Go along with the instructions you see on the screen to upload the file.
- Finally, choose Import.
This will import your CSV file into QuickBooks Online. Now, let’s move to the next point to learn how to import CSV data into QB Desktop.
B. How to Import CSV into QuickBooks Desktop
In order to import a list in the form of a CSV file into QBDT, you need the QuickBooks Import Excel and CSV toolkit. Once you install and run this toolkit, you can successfully move CSV file data to QB Desktop. Here are the points that you need to follow:
(i) What is QuickBooks Import Excel and CSV Toolkit?
The QuickBooks Import Excel and CSV toolkit contains:
- XLS Example Folder – This is a sample Excel file that contains four worksheets, each for a different type of list.
- CSV Examples Folder – These are four sample CSV files, each for a different type of list.
- Allowed fields – This is a reference guide that explains which fields are available for Excel and CSV import.
- Import from Excel and CSV Manual – This is a PDF manual that contains instructions, best practices, and notes.
Now, proceed to the following point to learn how to install this toolkit on your system.
(ii) How to Install the QuickBooks Import Excel and CSV Toolkit
Follow the instructions given below to install QuickBooks import Excel and CSV toolkit.
- First, download QuickBooks Import Excel and CSV toolkit and choose Save.
- Now, browse to the location like Desktop or a folder where you would like to save the file and choose Save.
- Go to where you saved the downloaded file and double-click on it. This will open the WinZip Self-Extractor window.
- Choose Browse and head to the folder where you wish to install the toolkit. It can be like your Desktop or a folder on a hard disk.
- Finally, choose OK and click on Unzip. This will extract the contents.
- When it’s done, choose Close. This will close the WinZip Self-Extractor window.
- Now, open the folder where you selected to install the QuickBooks Import Excel and CSV toolkit.
When you wish to run the tool, you will find it here. The tool will let you easily import CSV into QuickBooks Desktop. Let’s scroll down to the next point to discover how to import a CSV file into QB Self-Employed.
C. How to Upload CSV File into QuickBooks Self-Employed (QBSE)
To import CSV into QuickBooks Self-Employed, you should follow these steps:
- Sign to QBO and click on the Profile ⚙ icon.
- Navigate to Imports, followed by Import transactions.
- Go along with the onscreen steps you see and upload the CSV file.
- Finally, choose Import.
This will import your CSV file into QuickBooks Self-Employed.
Section 2: How to Export QuickBooks Data to a CSV File
This section will show you how you can export QB data to a CSV file. Go through the steps below and follow the instructions given there carefully.
A. How to Export QuickBooks Desktop Data to CSV
If you want to view and edit the lists using a different format or if you don’t use MS Excel, you can export your QuickBooks Desktop data to a CSV file. You can export three different types of data, viz., customers & vendors, items, and reports. We recommend that before you follow the steps below, update your QuickBooks Desktop.
Here are the points that you should follow:
(i) Customers and Vendors
To export customers & vendors data to a CSV file, you need to do the following:
- Go to the Customer/Vendor Center.
- Choose the Excel drop-down, and click:
- Export Transactions: If you wish to export transactions (by name or by transaction type).
- Export the Customer/Vendor list: If you wish to export customer/vendor data like balances, contact information, and names.
- Now, from the Export window, select the option to Create a comma-separated value (.csv) file.
- Go to Export.
- Give the file a name and select where to save the file.
Now, you can find and open the file when you need to edit or upload it. Let’s now learn how to export items to a CSV file, as described below.
(ii) Items
Here’s what you need to do to transfer items from QB Desktop to a CSV file:
- Open the Lists menu and go to Item List.
- Choose the Excel drop-down menu followed by Export all Items.
- Create a comma-separated value (.csv) file from the Export window.
- Choose Export.
- Give the file a name and select where to save the file. You can edit or upload this file as per your requirements.
Now, let’s shift to the following point to discover how to transfer QB Desktop reports to CSV files.
(iii) Reports
You can transfer data from different reports from QB Desktop to a CSV file by following these steps:
- First, open the report you wish to export.
- At the top of the report, choose the Excel drop-down menu.
- Click Create New Worksheet.
- Create a comma-separated value (.csv) file from the Export window from the Send Report to Excel window.
- Choose Export.
- Give the file a name and select a location to save the file. After that, you can access the file and upload it whenever necessary.
This will export QuickBooks Desktop data to a CSV file.
B. How to Export QuickBooks Online Data to CSV
There is no direct way to export QuickBooks Online data to a CSV file. However, you can export it to Excel and convert that to a CSV file. Here’s the process that you should follow:
(i) Export QuickBooks Online Data to Excel
The following points will help you move QBO data to Excel:
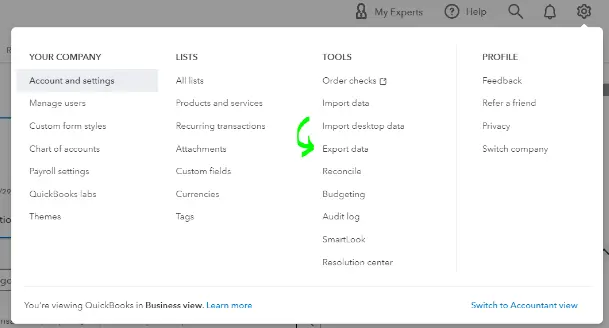
- Open QBO and click on the Gear (settings) icon. Choose Export data under Tools.
- Select the Reports tab and toggle the switch on to export the following reports to Excel.
- Now, toggle the switch off for the lists from the Lists tab.
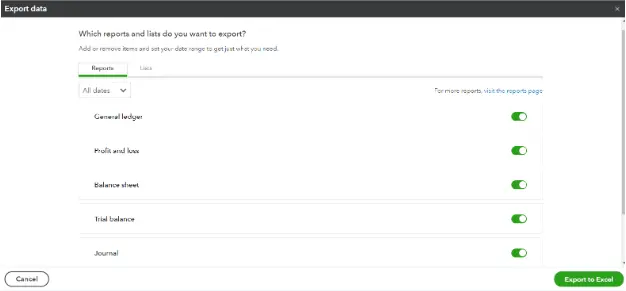
- Choose Export to Excel and select OK.
- Finally, open the zip file, followed by the Excel file containing the report, and click on Enable Editing.
Now, let’s learn how to convert Excel to CSV, as discussed below.
(ii) How to Convert Excel File to CSV
Here’s what you should do to convert Excel file to CSV:
- Open MS Excel and choose File.
- Select Save As and go to the Documents folder.
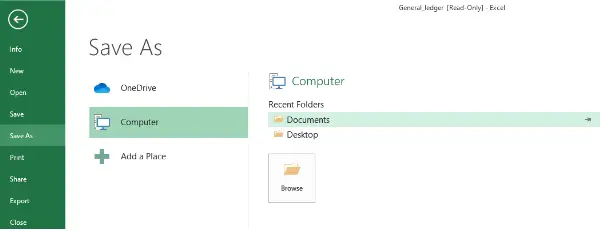
- Go to the Save as Type menu and choose CSV (Comma Delimited).
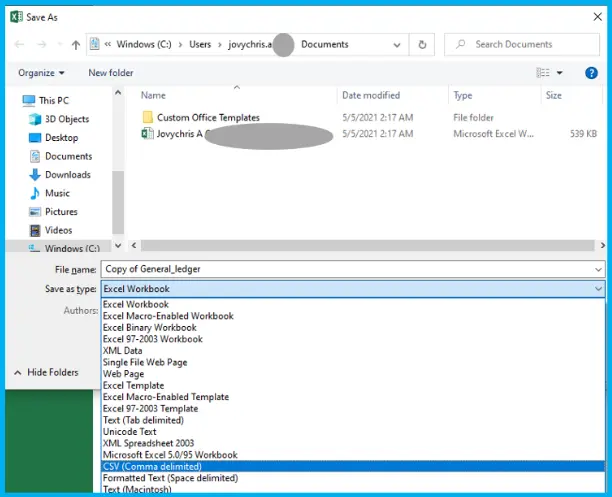
- At this point, click Save, followed by Yes.
Finally, the QuickBooks Online data will be successfully converted from Excel to CSV.
Final Words
In this exhaustive article, we showed you how you can import CSV into QuickBooks Desktop, Online, and Self-Employed. Moreover, we have discussed how to export QB Desktop and Online data to CSV. Hopefully, you can now effortlessly transfer your financial data between QB and CSV files for various projects.
If, however, you face any challenges or have a query, you can contact a QB professional for instant guidance.
Frequently Asked Questions (FAQs)
Can I export data from QuickBooks to CSV?
Can QuickBooks import CSV?
How do I download QuickBooks Import Excel and CSV Toolkit?
a. To start with, download QuickBooks Import Excel and CSV toolkit and then select Save.
b. Go to the folder or Desktop where you wish to save the downloaded file and select Save.
c. Finally, access the file and follow all the steps to import CSV into QB Desktop.

Gabby Taylor, combines financial expertise with literary prowess. With over a decade in finance, she crafts insightful narratives on navigating fiscal complexities
